Overview
When team members operate remotely, spread across various time zones and working under different contracts, ensuring smooth operations requires understanding when they are expected to work, their available capacity and when they can accept tasks. Working Schedules and Office Calendar can be used to define when each user is expected to work.
The Time Tracking App uses this expected working time to:
Display daily and weekly targets in Timesheet and Calendar Views
Cross out non-working time on the calendar
Calculate overtime in My Time and Team Time
Display the Duration Exceeds Working Hours confirmation dialogue
Working Schedules define each user's working days and hours, including part-time patterns, shifts and rotations. They replace the Working Hours field previously configured in the Users module.
Office Calendar defines non-business days, such as public holidays or office closures, for groups of users (e.g. all users based in Denmark).
Both features are configured from the Optional section of the Time Tracking app configuration:
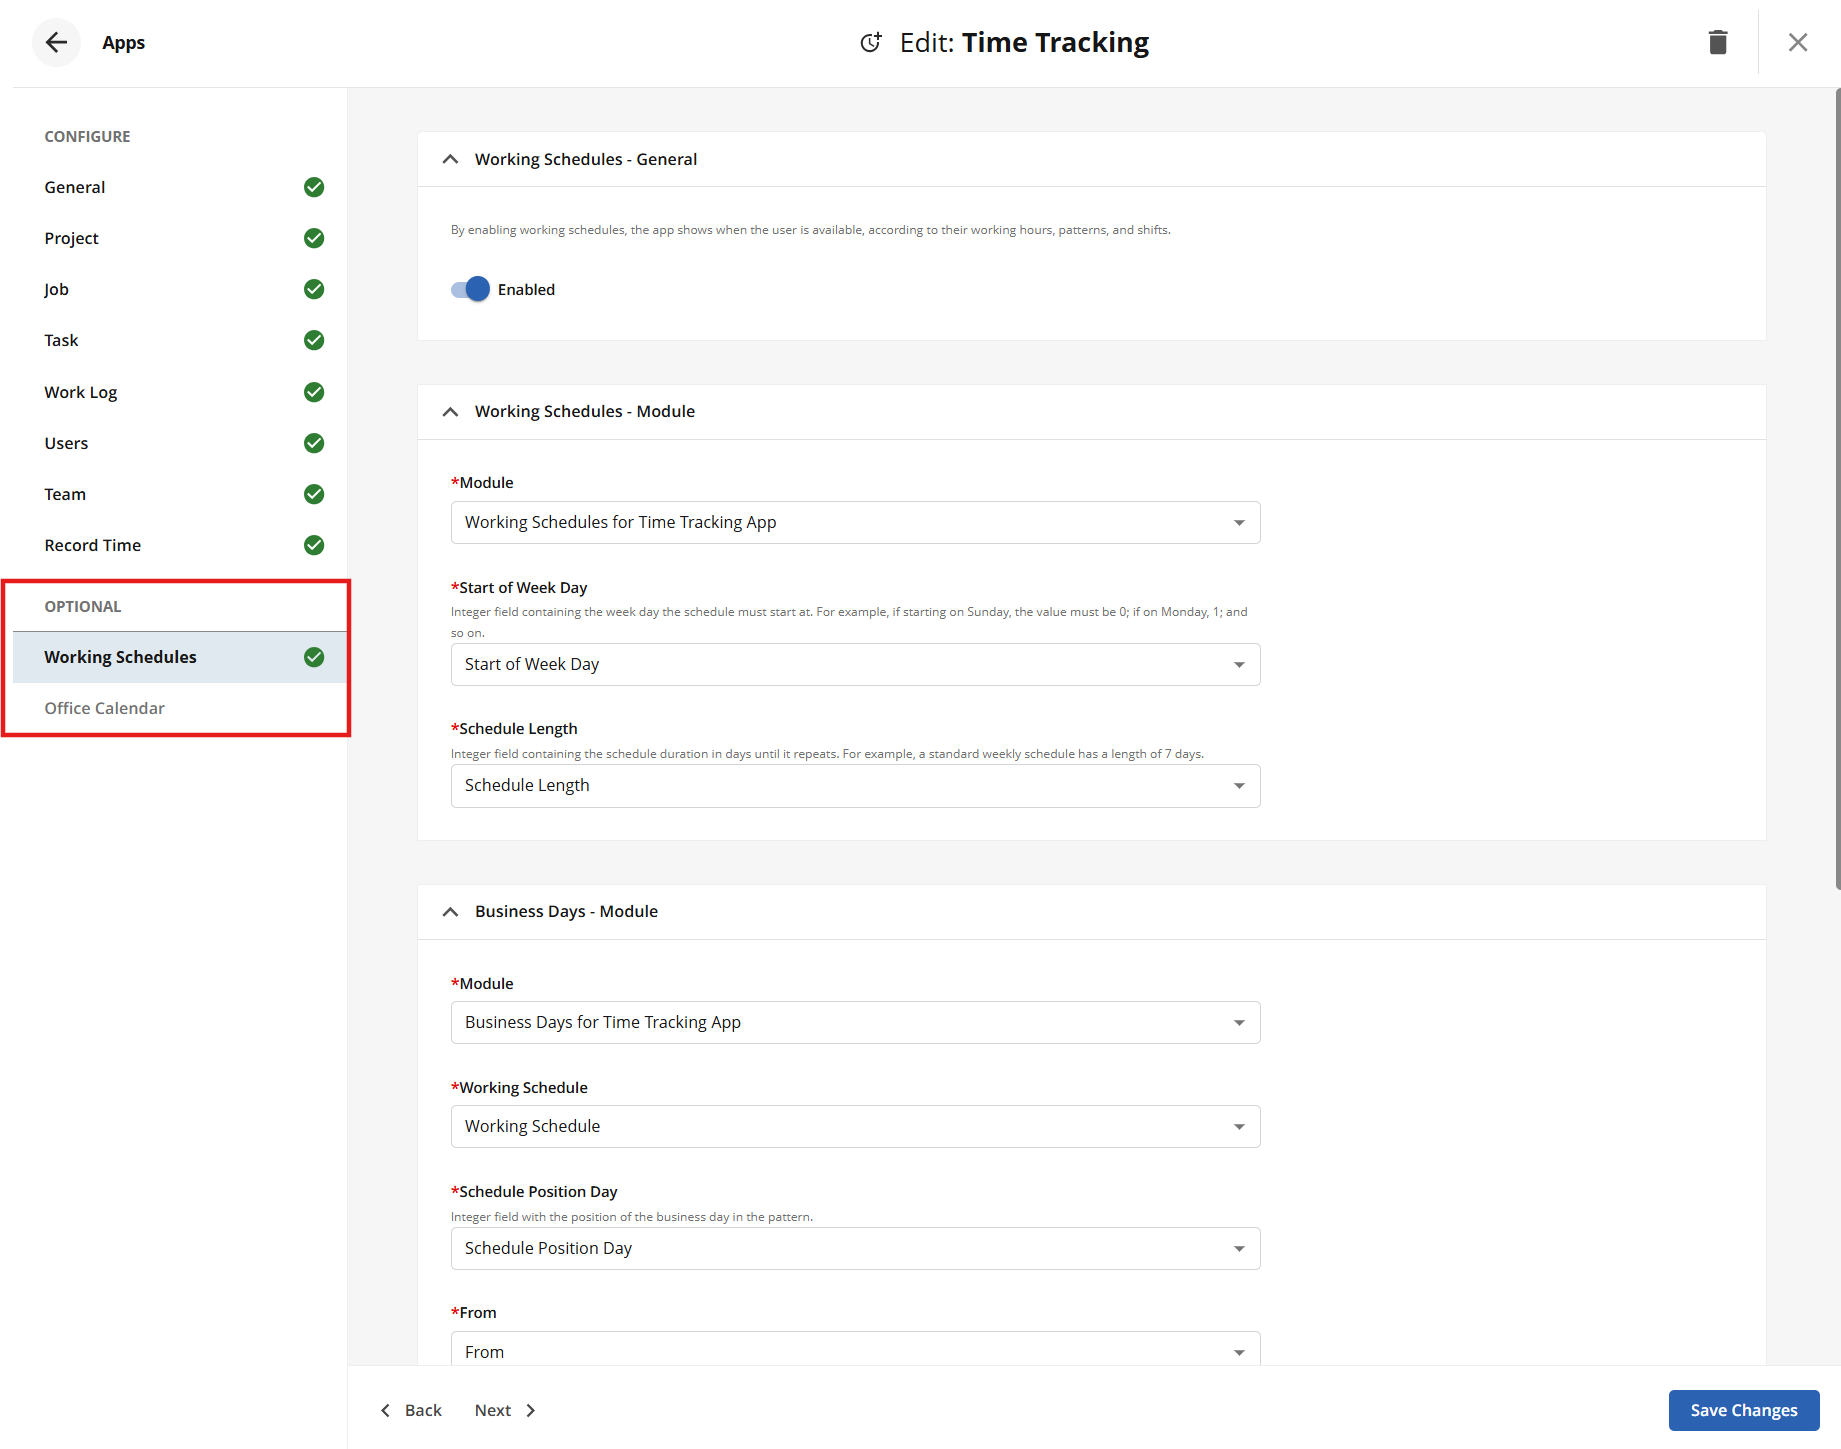
An image displaying the Optional section with the Working Schedules and Office Calendar tabs
How Expected Working Time is Calculated
For each user and day, the expected working time is calculated as follows:
1. The app finds the working schedule assigned to the user on that date.
2. It finds which day of the schedule (the Schedule Position Day) falls on that date.
3. It adds up the working hours (From - To) defined for that position.
4. It subtracts any of those working hours that are covered by a non-business day in the user's office calendar.
Example: A user works Monday to Friday, 08:00–16:00 (8h). A non-business day Office closed early is set from 12:00 to 16:00 on Thursday, so the expected working time for Thursday is 4h. On a full-day public holiday, no target is displayed for that day.
Any time logged above the expected working time counts as overtime, including time logged on non-working days such as weekends.
Note: If no working schedule is assigned to a user, no targets are displayed, no time is crossed out, and the Duration Exceeds Working Hours dialogue is not presented.
Where Expected Working Time is Used
Once a working schedule is assigned to a user, and optionally an Office Calendar, the expected working time is used in the following areas:
Area | Description | Links |
|---|---|---|
Timesheet view | The bottom row compares the time logged each day and week with the expected working time. Days without working hours are crossed out, and non-business days are highlighted in the date header. | |
Calendar view | In Week and Month view, time outside working hours is crossed out and non-business days are displayed as events. The Totals compare the time logged with the expected working time. | |
Team Time | Overtime is calculated for each team member against their own expected working time. Team members without a working schedule display their logged time with no target. | |
Duration Exceeds Working Hours | A confirmation dialogue is presented when a time entry would take the day's total above the expected working time. |
Working Schedules
A working schedule defines when a user is expected to work: which days are working days and the working hours on each of them. Schedules can follow a standard week, part-time patterns, or rotations that repeat over several weeks. Each user follows one schedule at a time, and several users can share the same schedule.
In My Time, a working schedule:
Sets the daily and weekly targets in the Totals of Timesheet and Calendar View
Crosses out time outside working hours in Calendar Week View, and days without working hours in Calendar Month View and Timesheet
Counts any time logged above the target as overtime
Example: A Day shift Copenhagen office schedule from Monday to Friday, 09:00–17:00, gives every user assigned to it a target of 8 hours a day, while Saturday and Sunday are crossed out as non-working days.
Working Schedules use three linked modules:
Module | Purpose | Fields |
|---|---|---|
Working Schedules for Time Tracking App | Defines a named working pattern | Name, Start of Week Day, Schedule Length |
Business Days for Time Tracking App | Defines the working hours for each day of a schedule | Working Schedule, Schedule Position Day, From, To |
Schedule Assignment for Time Tracking App | Assigns a user to a schedule from a given date | Working Schedules, User, Effective Date |
These modules are created and mapped automatically when the site is upgraded. To check the configuration:
1. Navigate to Configuration → Apps Library from the sidebar.
2. Locate the Time Tracking app and click the card.
3. In the Optional section, select Working Schedules.
4. Ensure Enabled is switched on and that each module and field is selected.
5. Click Save Changes.
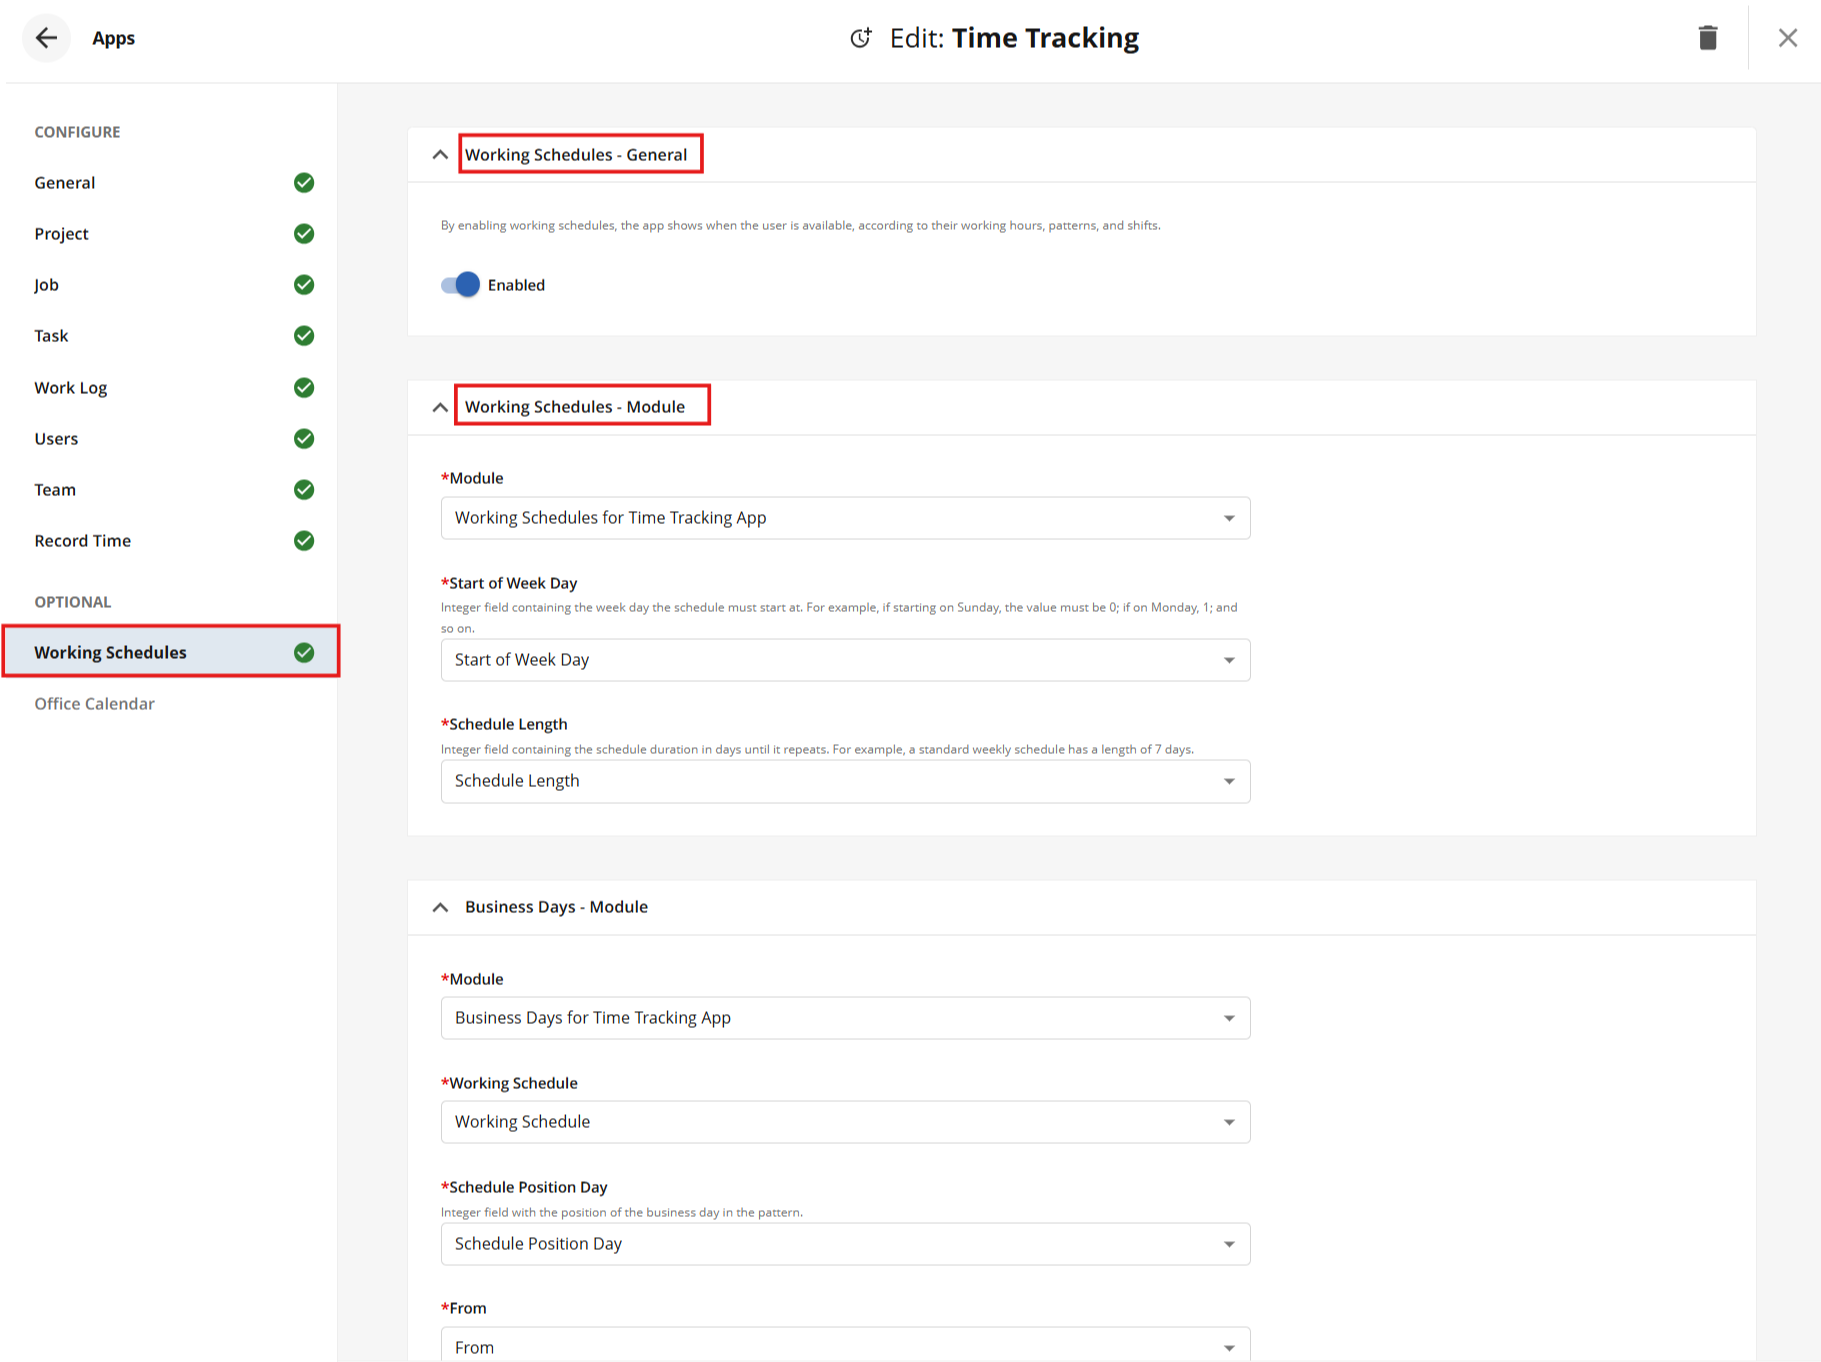
An image displaying the Working Schedules tab in the Time Tracking app configuration (part 1)
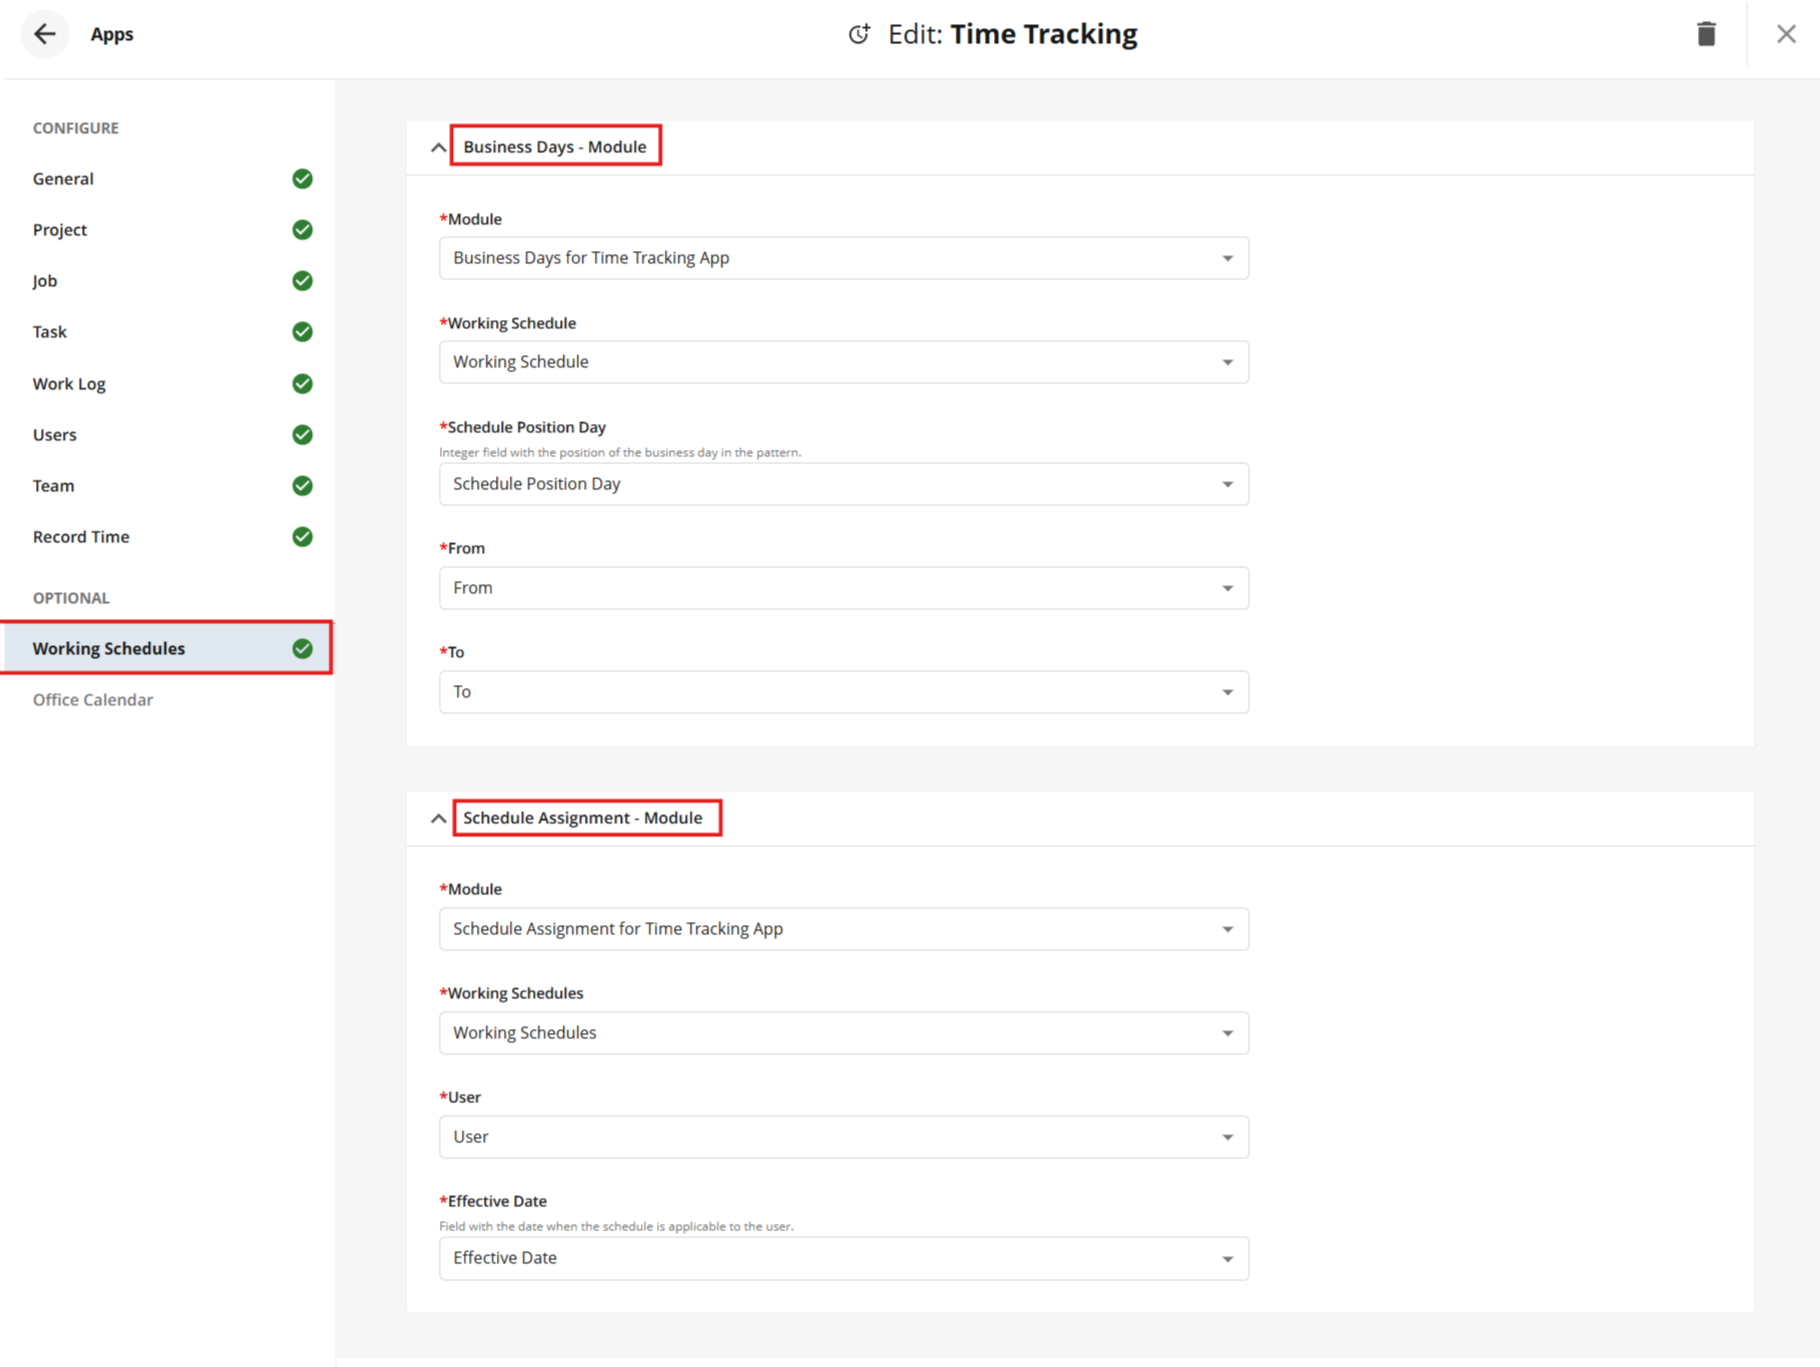
An image displaying the Working Schedules tab in the Time Tracking app configuration (part 2)
Note: To view and manage working schedules, create module and item views for the three modules. See here how to configure Module and Item views
Understanding Schedule Positions and Rotations
A working schedule works like a strip of numbered days that repeats:
Schedule Length sets how many days the strip has, e.g. 7 for a weekly pattern or 8 for a "4 days on, 4 days off" rotation.
Schedule Position Day numbers the days of the strip, starting at 0. Each Business Day entry sets the working hours for one position. Positions without a Business Day entry are days off.
Start of Week Day sets the weekday on which position 0 is placed: 0 = Sunday, 1 = Monday, 2 = Tuesday, and so on up to 6 = Saturday.
Effective Date sets the week in which the strip is first placed. Position 0 falls on the Start of Week Day of that week, and any days before the Effective Date are ignored.
Once placed, the strip repeats continuously. With a Schedule Length of 7, each position always falls on the same weekday. With any other length, the pattern moves across the week; e.g. an 8-day schedule starts one weekday later in each cycle.
Example A: A schedule with Start of Week Day = 1 (Monday), Schedule Length = 8, working positions 0–3 and an Effective Date of Wednesday 7 October:
Week | Date | Position | Working hours |
|---|---|---|---|
Week 1 | Mon 5 Oct - Tue 6 Oct | 0–1 | None (before the Effective Date) |
Wed 7 Oct | 2 | 12:00–20:00 (schedule starts from position 2) | |
Thu 8 Oct | 3 | 13:00–21:00 | |
Fri 9 Oct - Mon 12 Oct | 4–7 | Days off | |
Week 2 | Tue 13 Oct | 0 | 10:00–18:00 |
Wed 14 Oct | 1 | 11:00–19:00 | |
Thu 15 Oct | 2 | 12:00-20:00 | |
Fri 16 Oct | 3 | 13:00-21:00 | |
Sat 17 Oct - Tue 20 Oct | 4-7 | Days off | |
Week 3 | Wed 21 Oct | 0 | 10:00–18:00 |
Thu 22 Oct | 1 | 11:00–19:00 | |
Fri 23 Oct | 2 | 12:00-20:00 | |
Sat 24 Oct | 3 | 13:00-21:00 | |
Sun 25 Oct - Wed 28 Oct | 4-7 | Days off | |
Week 4 | Thu 29 Oct | 0 | 10:00–18:00 … |
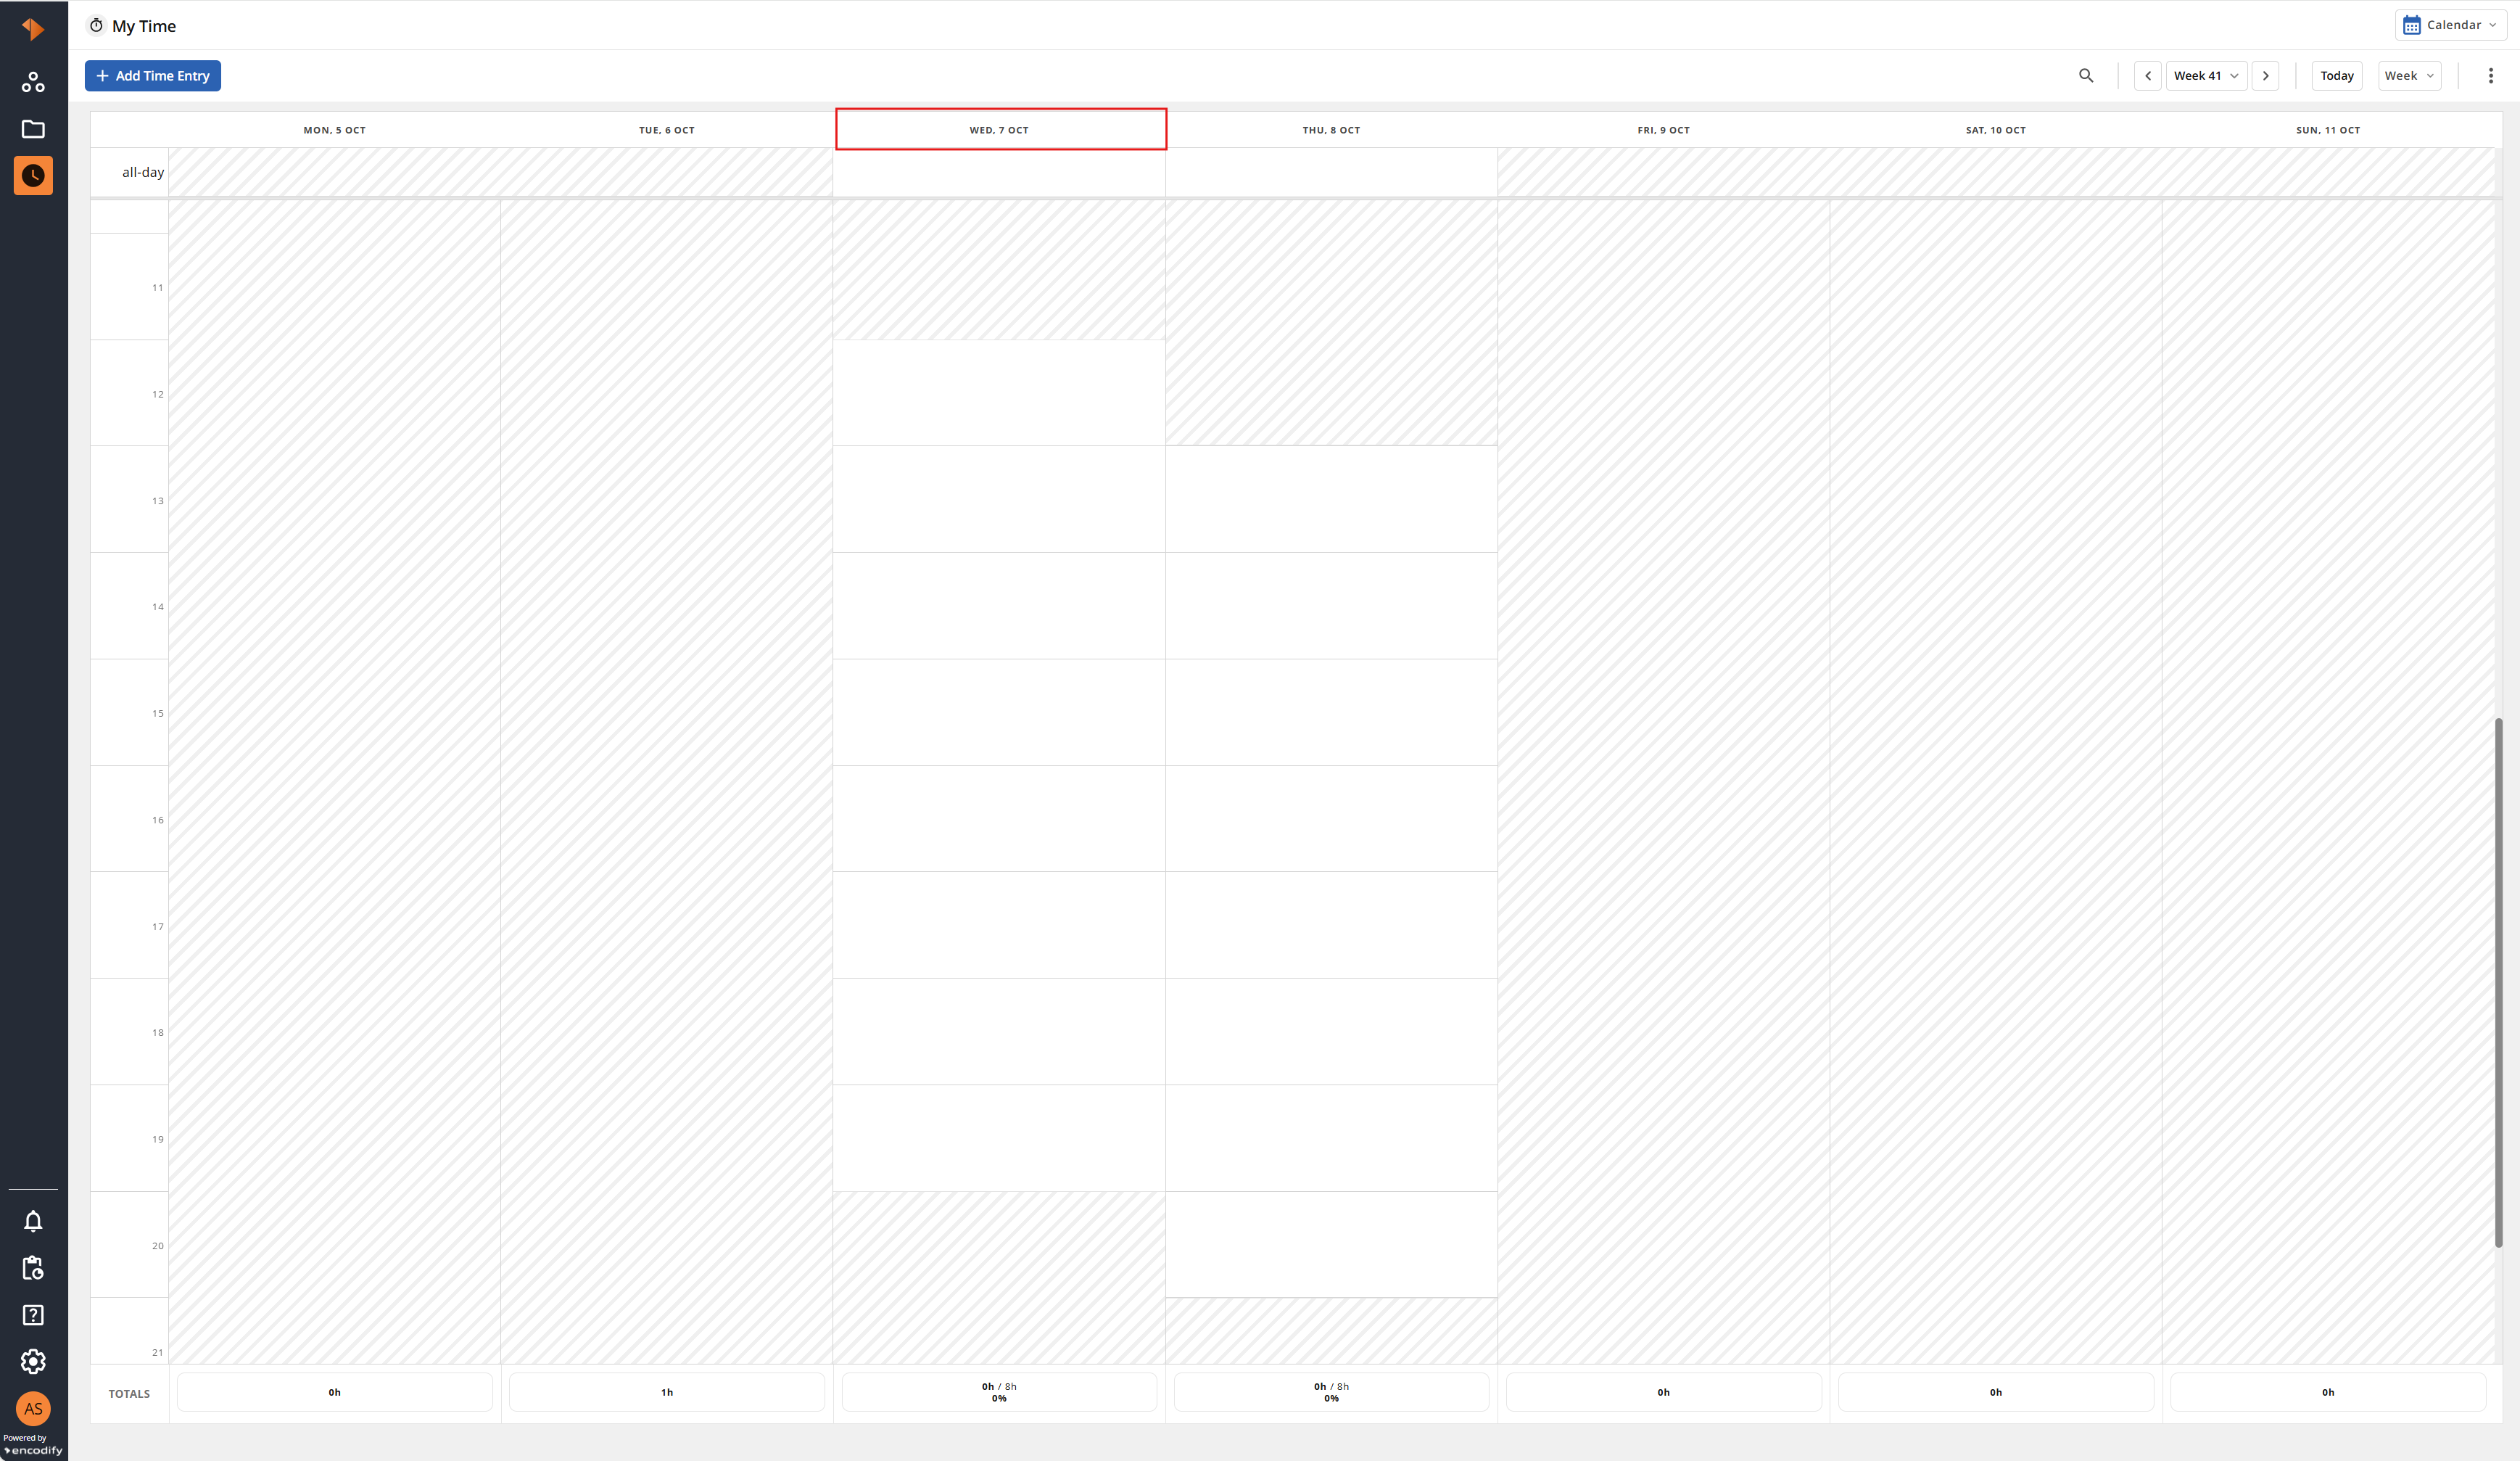
An image displaying an 8-day rotation in Calendar View – Week View (week 1)
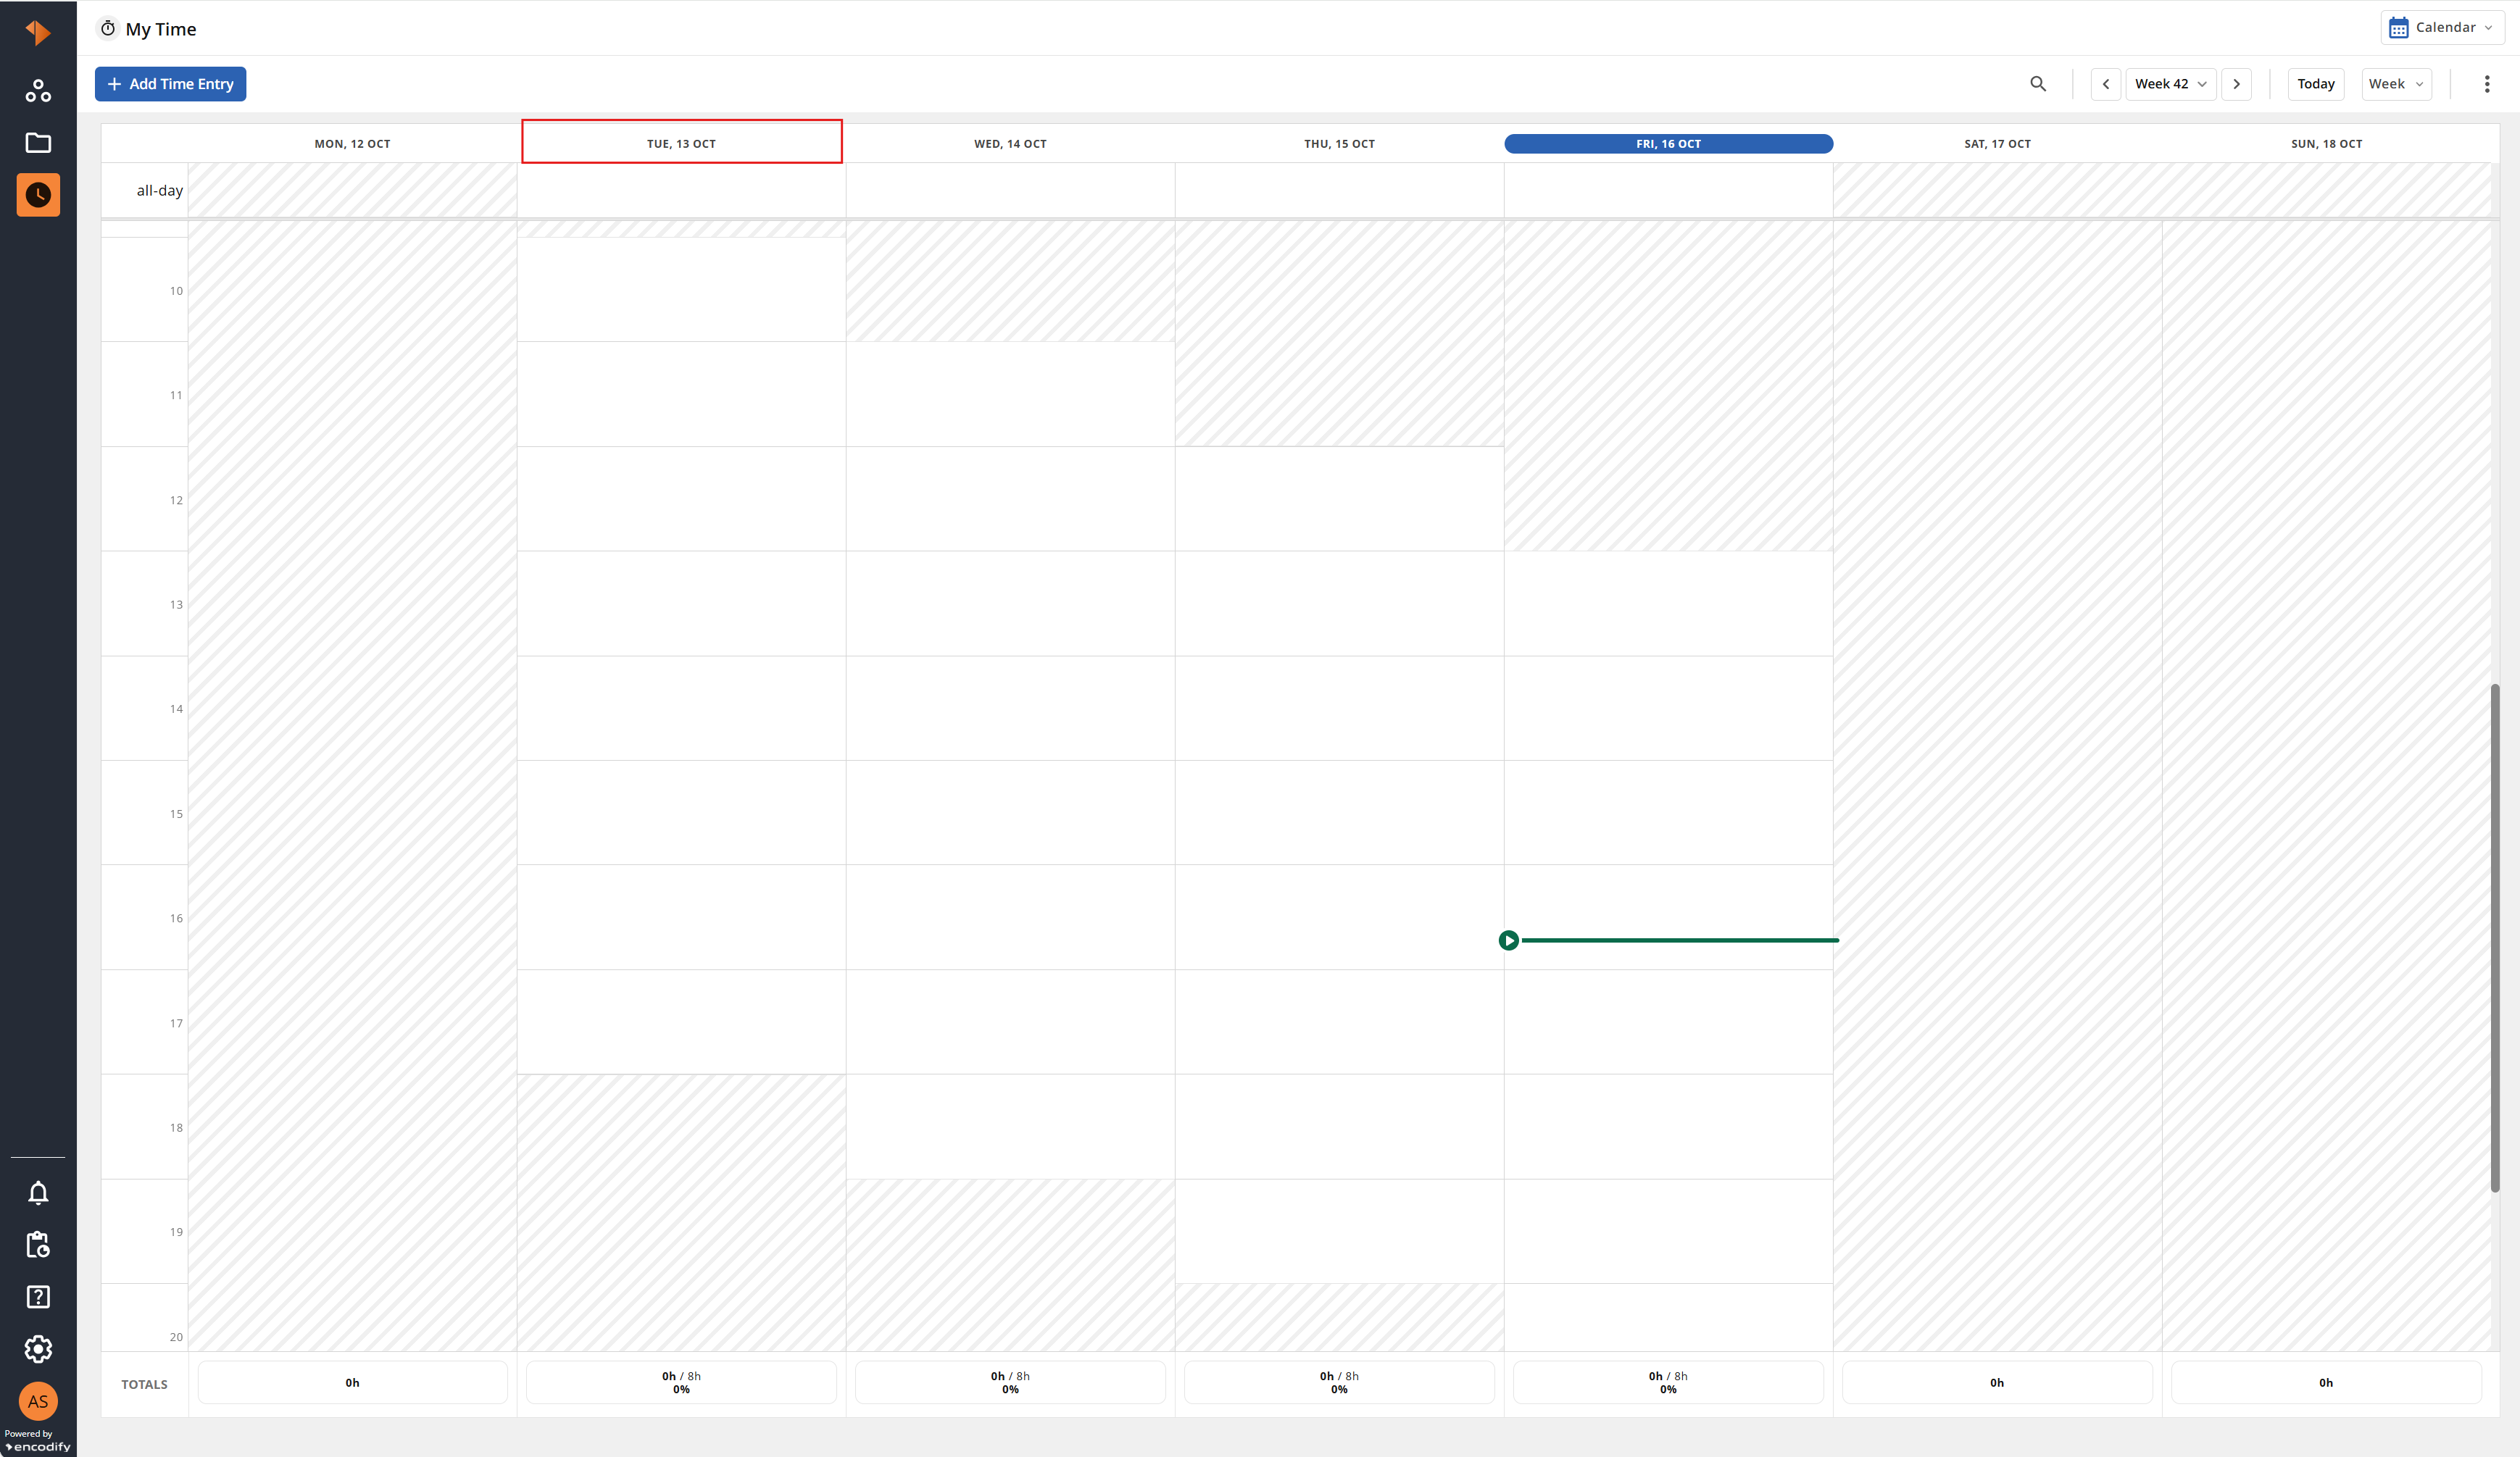
An image displaying an 8-day rotation in Calendar View – Week View (week 2)
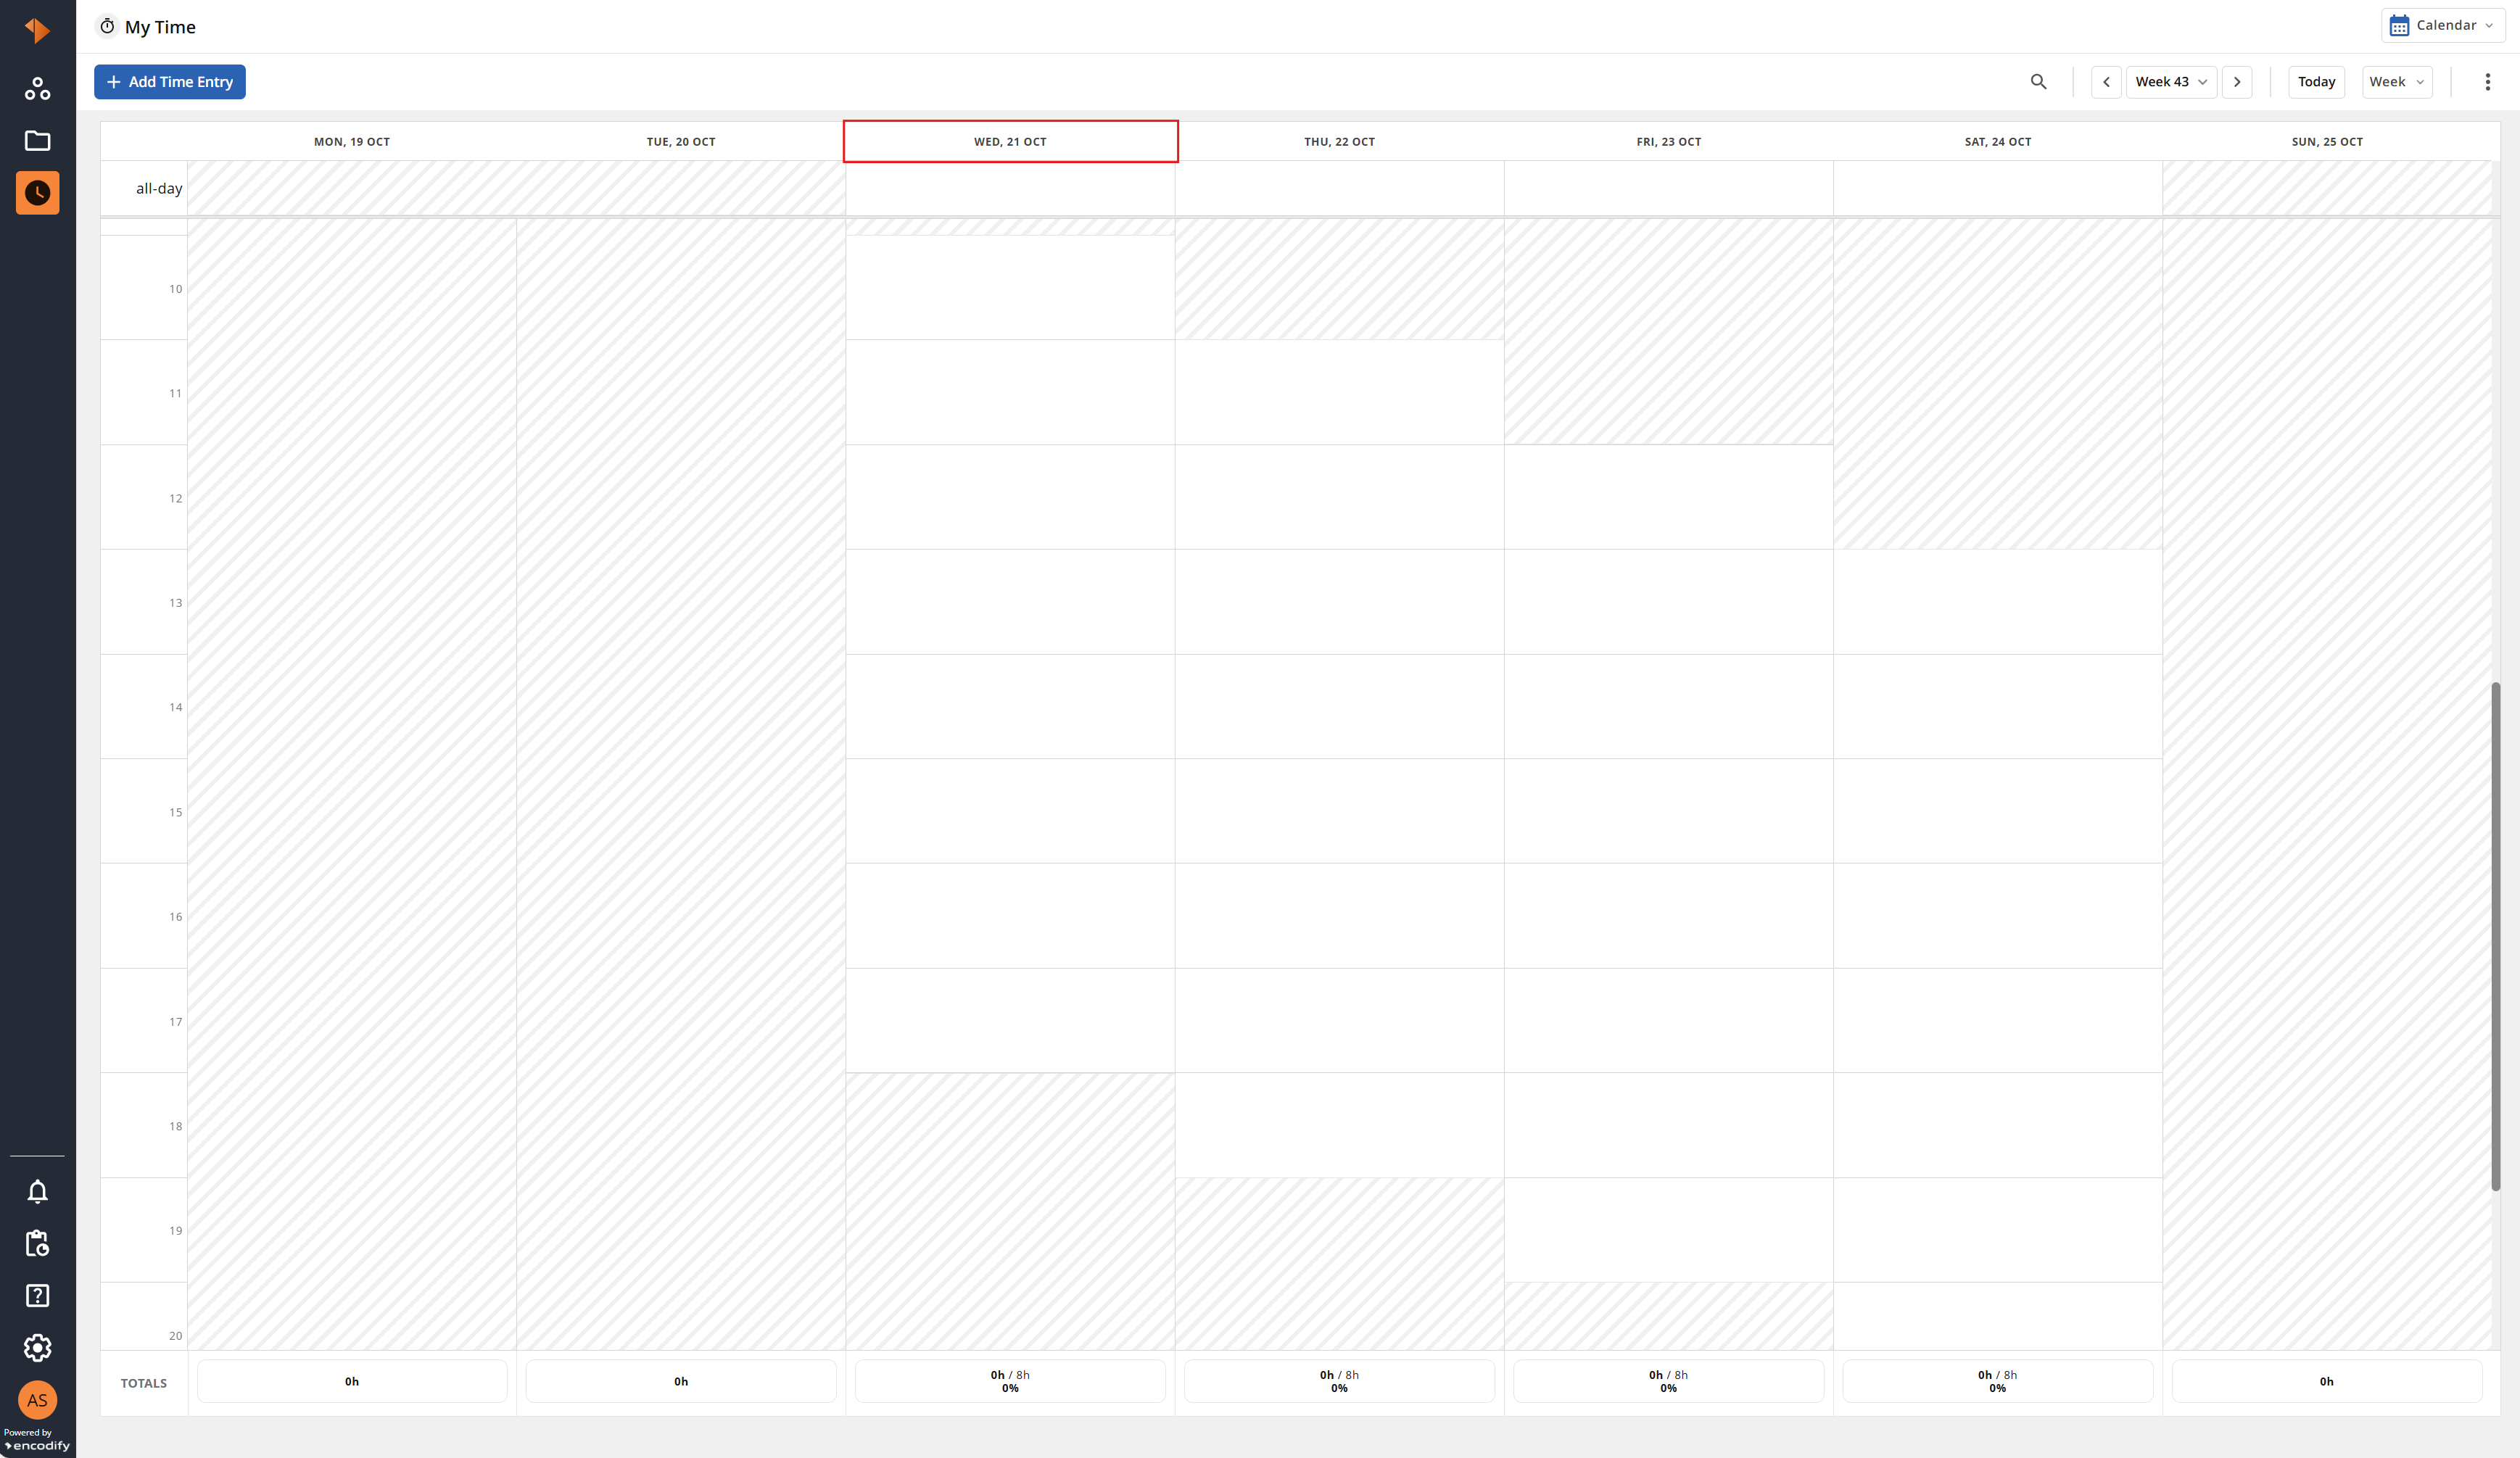
An image displaying an 8-day rotation in Calendar View – Week View (week 3)
Tip: To start a user on position 0, set Start of Week Day to the weekday of the Effective Date, e.g. 3 for a Wednesday.
Example B: Late shift across midnight
A Business Day cannot run past midnight. To configure a shift that ends after midnight, split it into two Business Days: one for the evening part on the day the shift starts, and one for the early-morning part on the next position.
A user works a late shift from Monday to Friday, 18:00–02:00, with Saturday and Sunday off. Configure a schedule with Start of Week Day = 1 (Monday) and Schedule Length = 7, and the following Business Days:
Position | Weekday | From | To | Part of shift |
|---|---|---|---|---|
0 | Monday | 18:00 | 23:59 | Monday evening |
1 | Tuesday | 00:00 | 02:00 | End of Monday's shift |
1 | Tuesday | 18:00 | 23:59 | Tuesday evening |
2 | Wednesday | 00:00 | 02:00 | End of Tuesday's shift |
2 | Wednesday | 18:00 | 23:59 | Wednesday evening |
3 | Thursday | 00:00 | 02:00 | End of Wednesday's shift |
3 | Thursday | 18:00 | 23:59 | Thursday evening |
4 | Friday | 00:00 | 02:00 | End of Thursday's shift |
4 | Friday | 18:00 | 23:59 | Friday evening |
5 | Saturday | 00:00 | 02:00 | End of Friday's shift |
Positions 1–4 each have two Business Days, as each of these days contains the end of one shift and the start of the next. Position 5 (Saturday) only contains the end of Friday's shift, and position 6 (Sunday) has no Business Day, so it is a day off.
Note: Daily targets are calculated per calendar day, so the hours of a shift are split between the two days it covers. In this example, Monday has a target of about 6 hours, Tuesday to Friday about 8 hours each, and Saturday 2 hours.
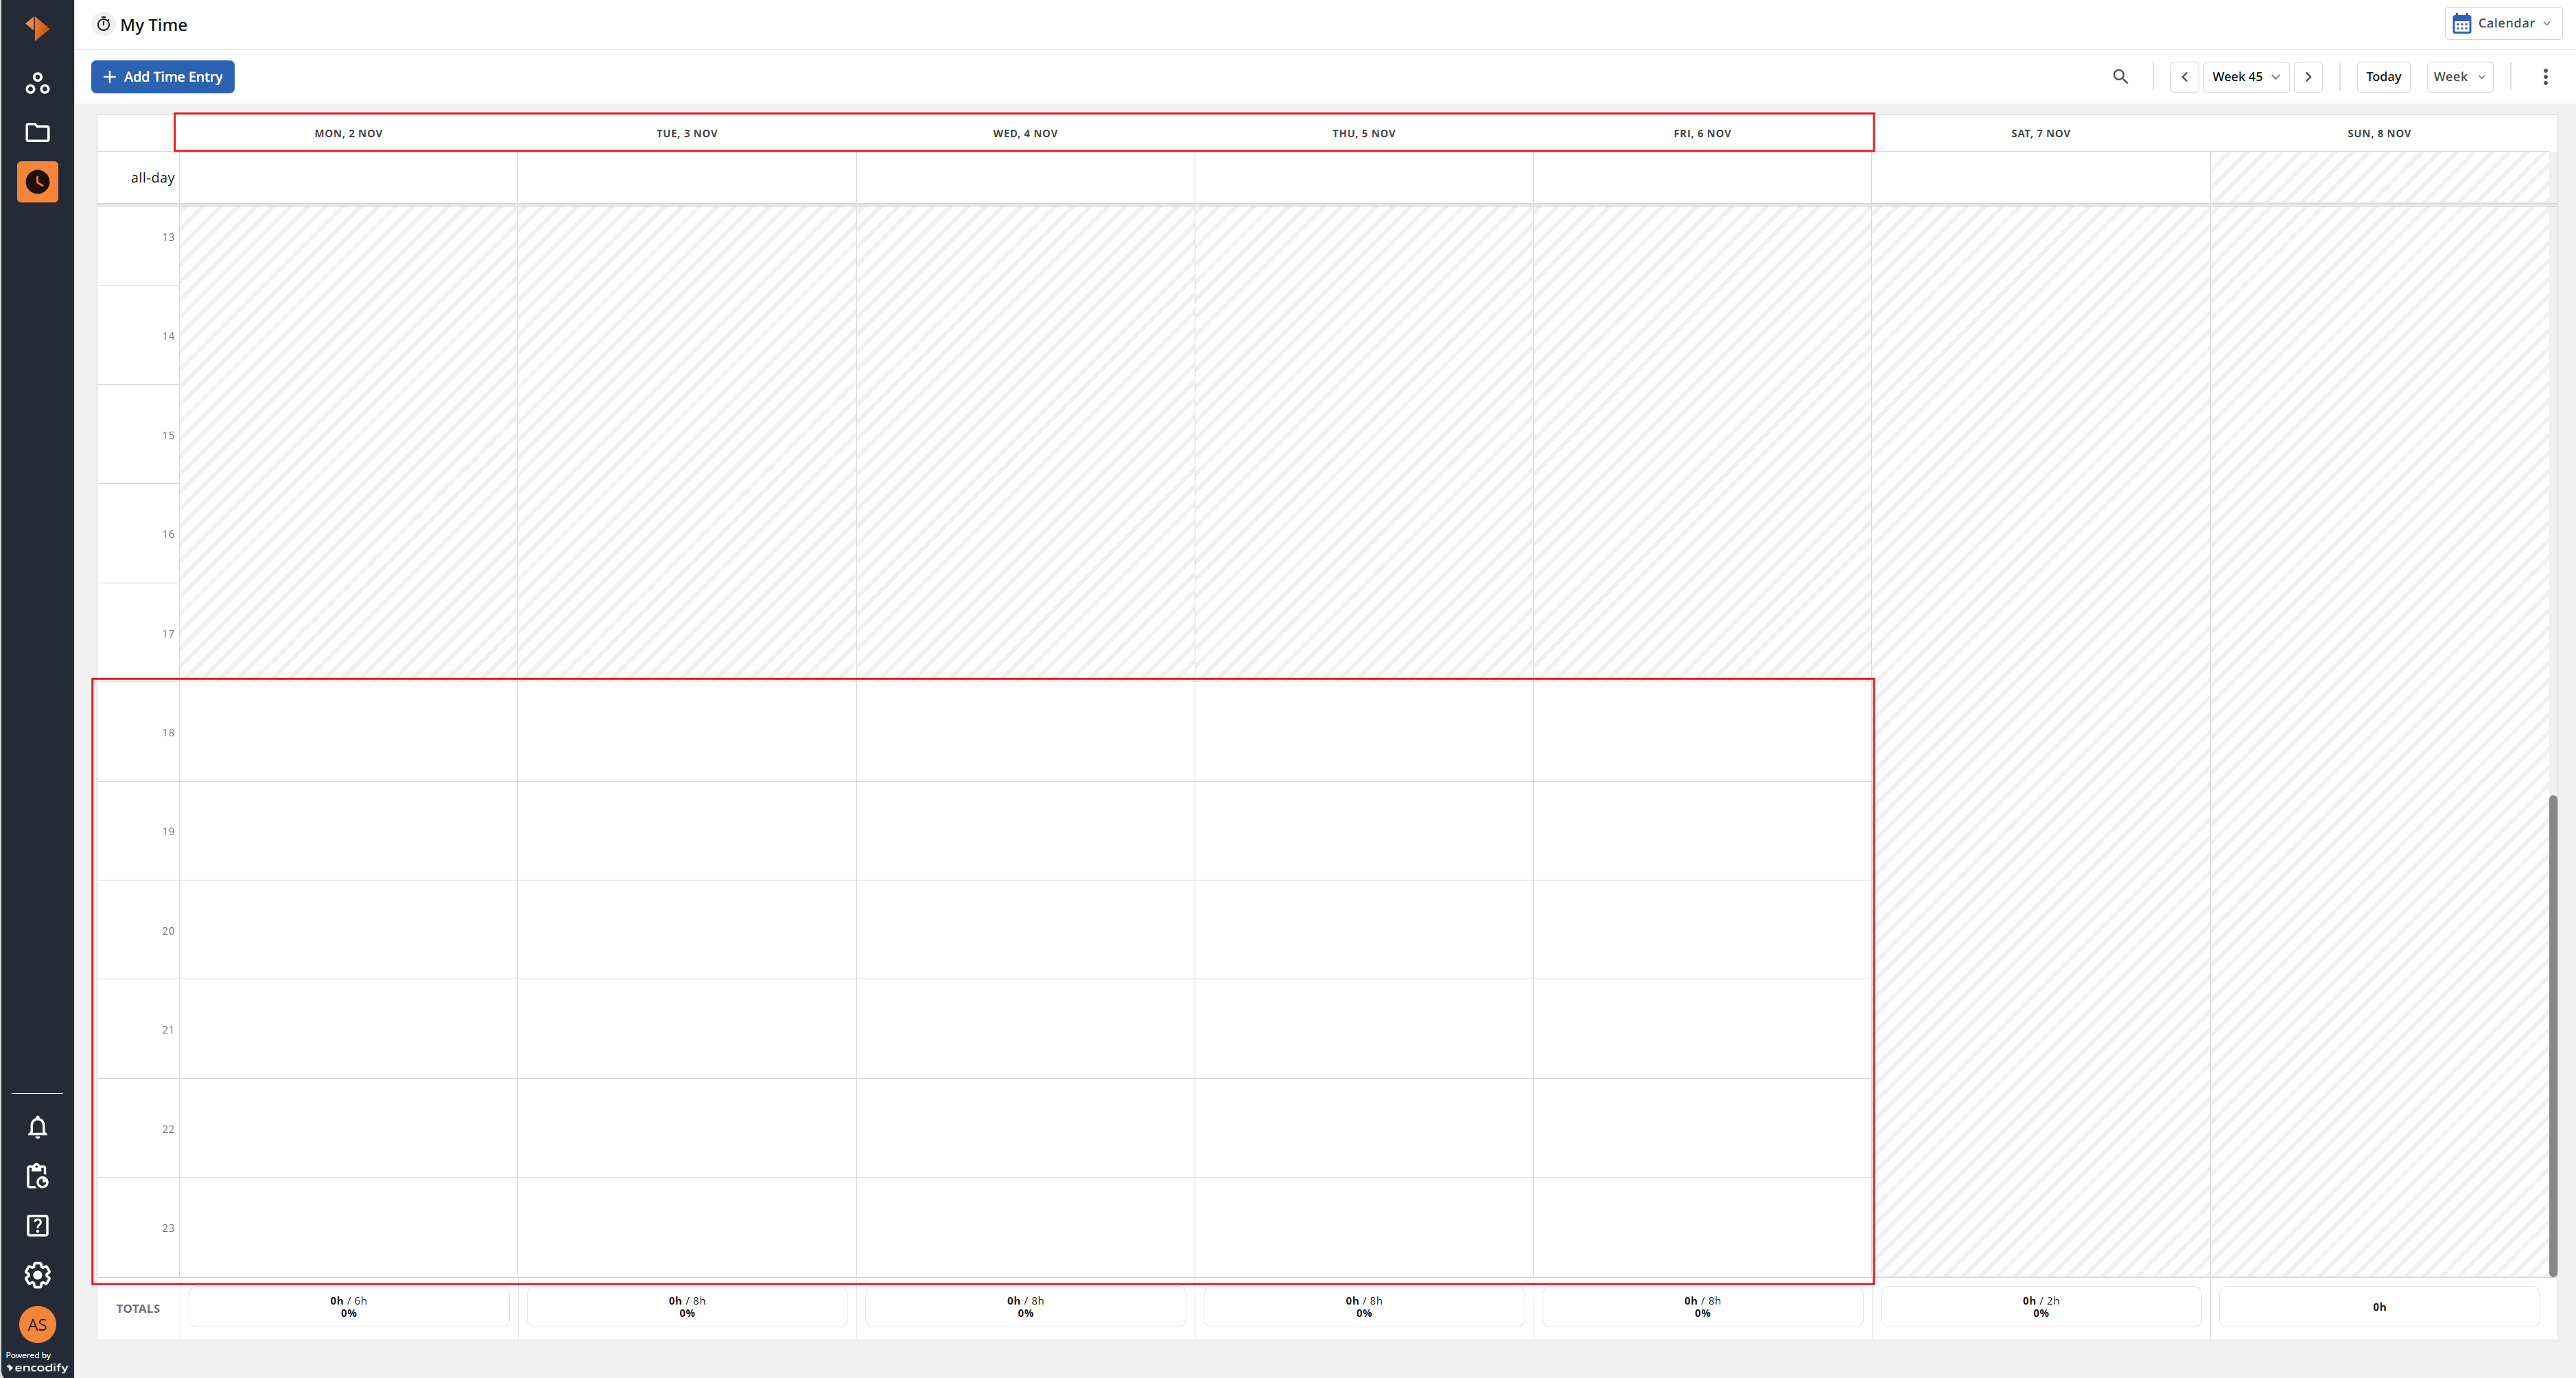
An image displaying the evening part of a late shift (18:00–23:59) in Calendar Week View, scrolled to the end of the day
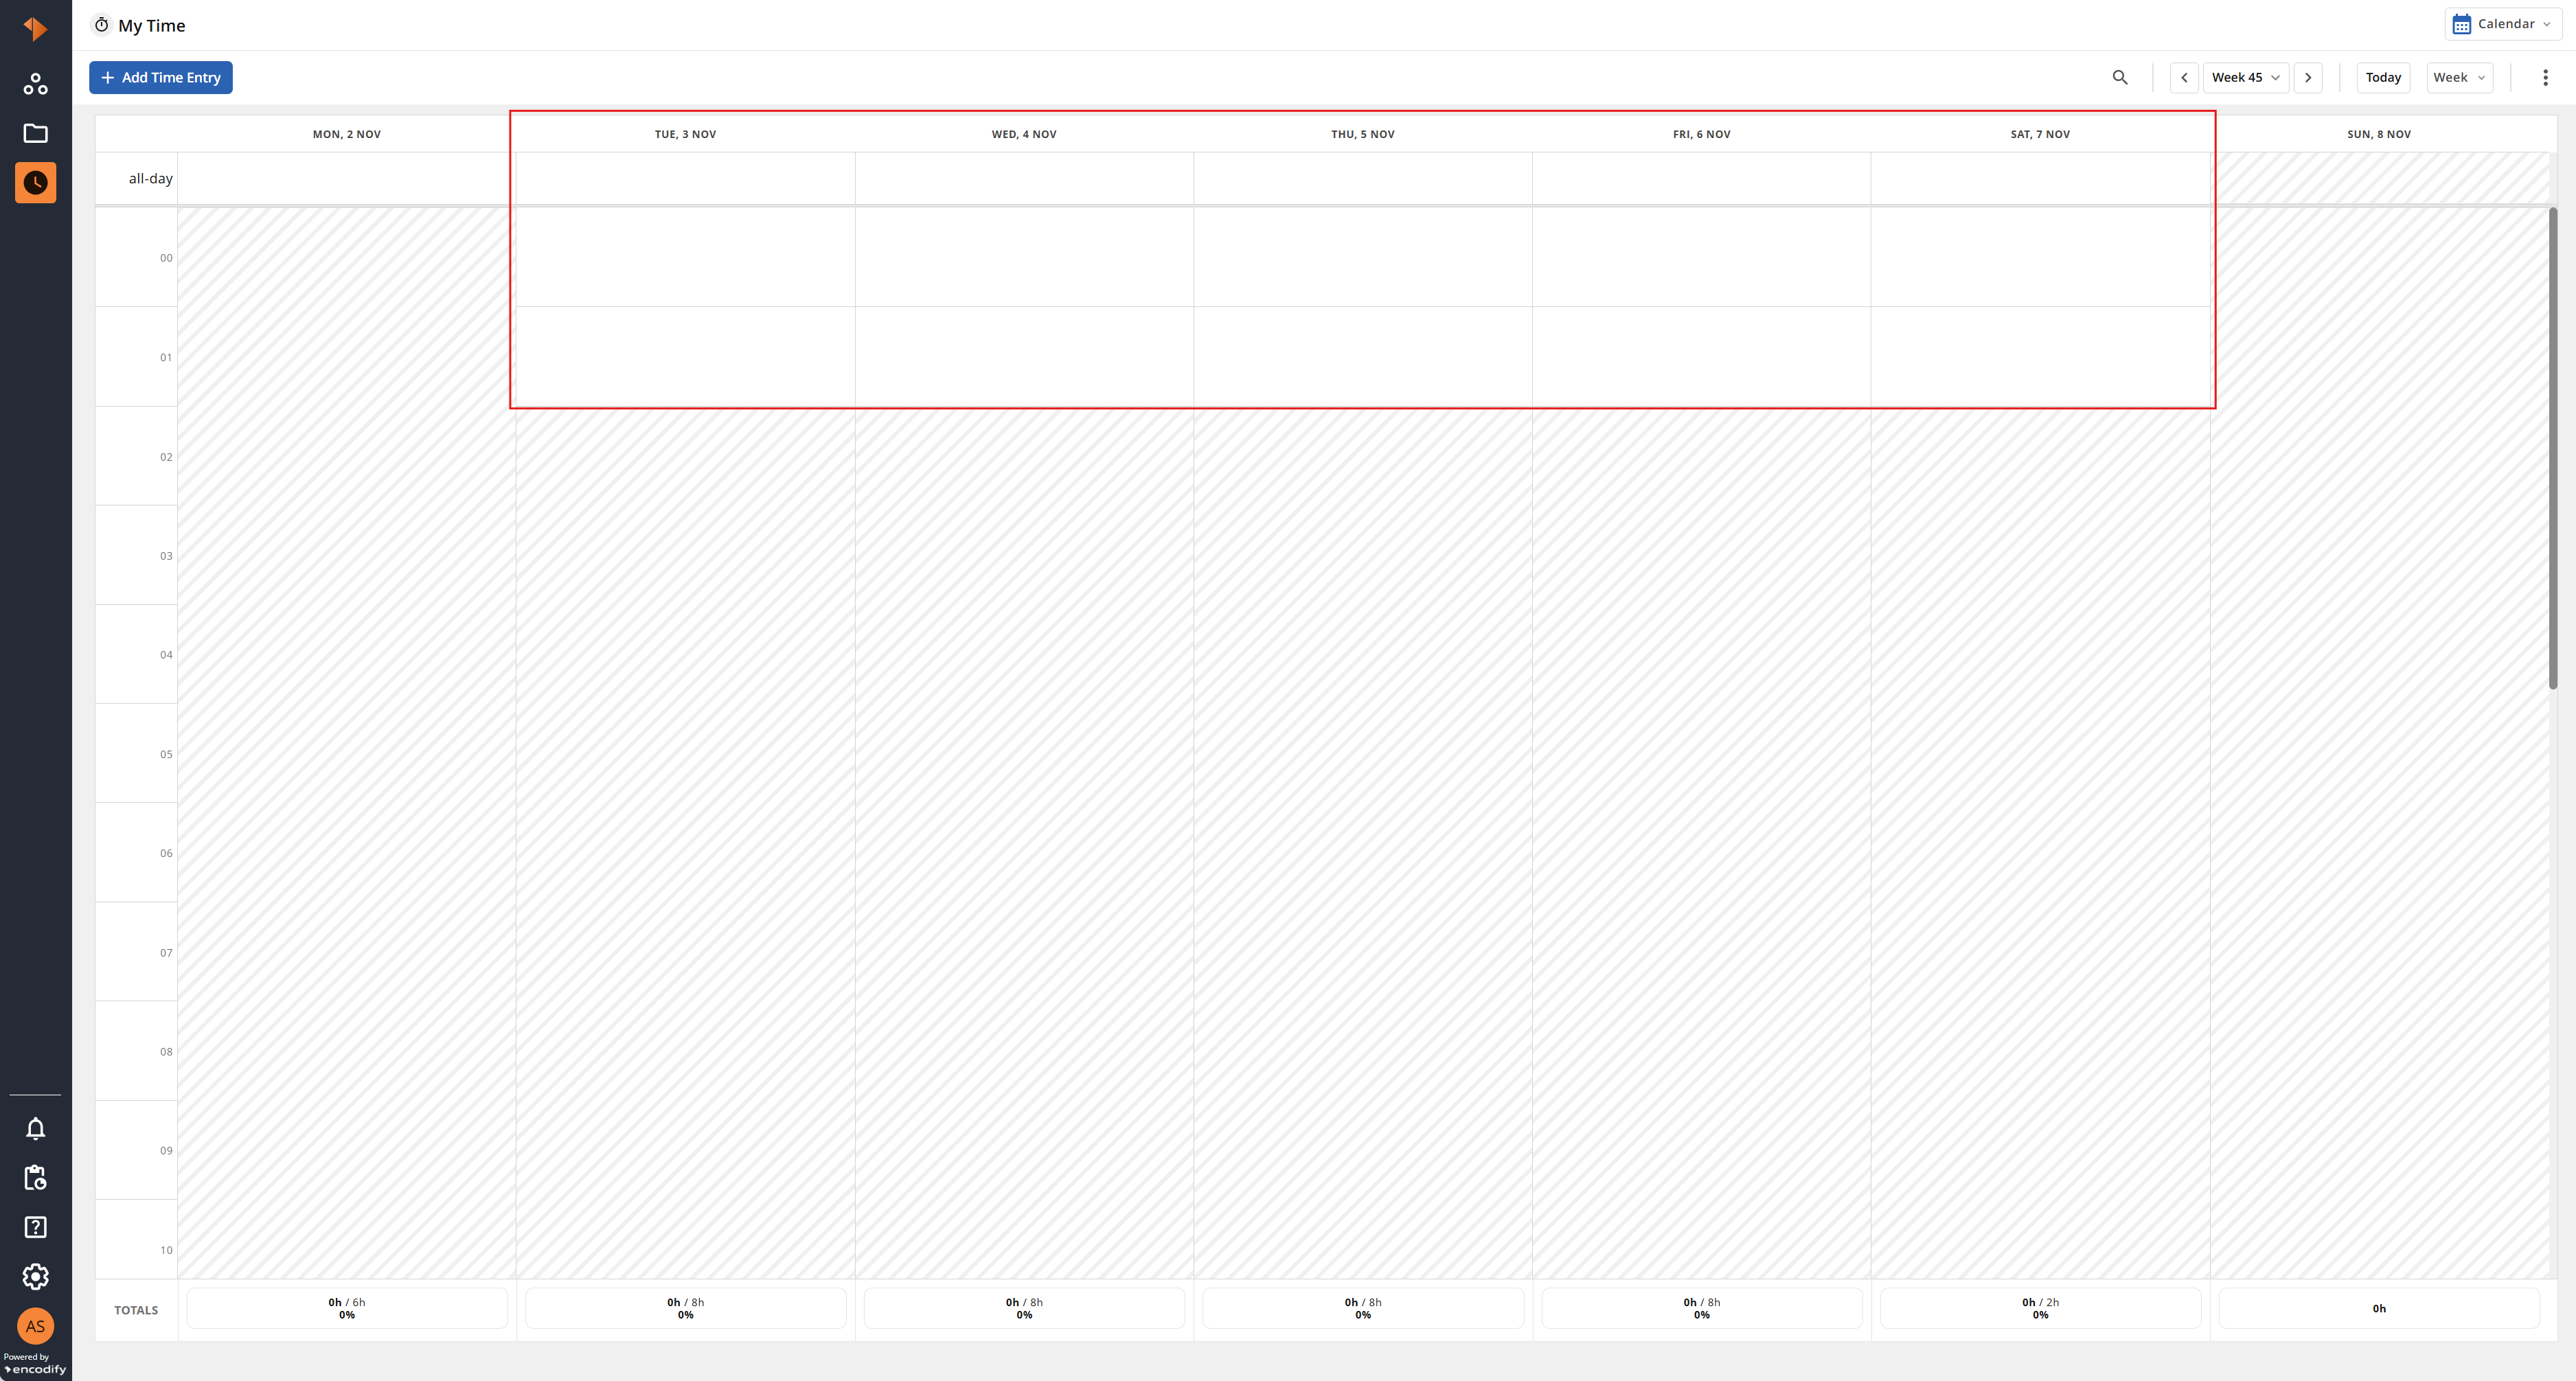
An image displaying the early-morning part of a late shift (00:00–02:00) in Calendar Week View, continuing from the previous day's shift
Common Patterns
Pattern | Start of Week Day | Schedule Length | Business Days |
|---|---|---|---|
Monday to Friday, 09:00–17:00 | 1 | 7 | Positions 0–4, 09:00–17:00 |
Part-time, Monday, Wednesday and Friday mornings | 1 | 7 | Positions 0, 2 and 4, 09:00–13:00 |
Two-week rotation, every other Friday off | 1 | 14 | Positions 0–4 and 7–10, 08:00–16:00 |
4 days on, 4 days off | 1 | 8 | Positions 0–3 |
Creating a Working Schedule
The Working Schedules for Time Tracking App module holds the schedule itself: its name, the weekday it starts on and how many days it lasts before repeating. It does not contain any working hours; these are added as Business Days.
Example: A schedule named Day shift Copenhagen office with Start of Week Day = 1 (Monday) and Schedule Length = 7 repeats every week, starting on Monday.

1. Navigate to the Working Schedules for Time Tracking App module and click Add.
2. Enter a Name (e.g. “Day shift Copenhagen office”), a Start of Week Day and a Schedule Length.
3. Save the item.
Adding Business Days to a Working Schedule
The Business Days for Time Tracking App module holds the working hours. Each item sets the hours for one day of a schedule, identified by its Schedule Position Day. Days of the schedule without a Business Day are days off.
Example: For the Day shift Copenhagen office, four Business Days at positions 0 to 3 (Monday to Thursday), each from 09:00 to 17:00, and one at position 4 (Friday) from 09:00 to 15:00, give a working week of 8 hours a day from Monday to Thursday and 6 hours on Friday. Positions 5 and 6 (Saturday and Sunday) have no Business Day, so they are days off.
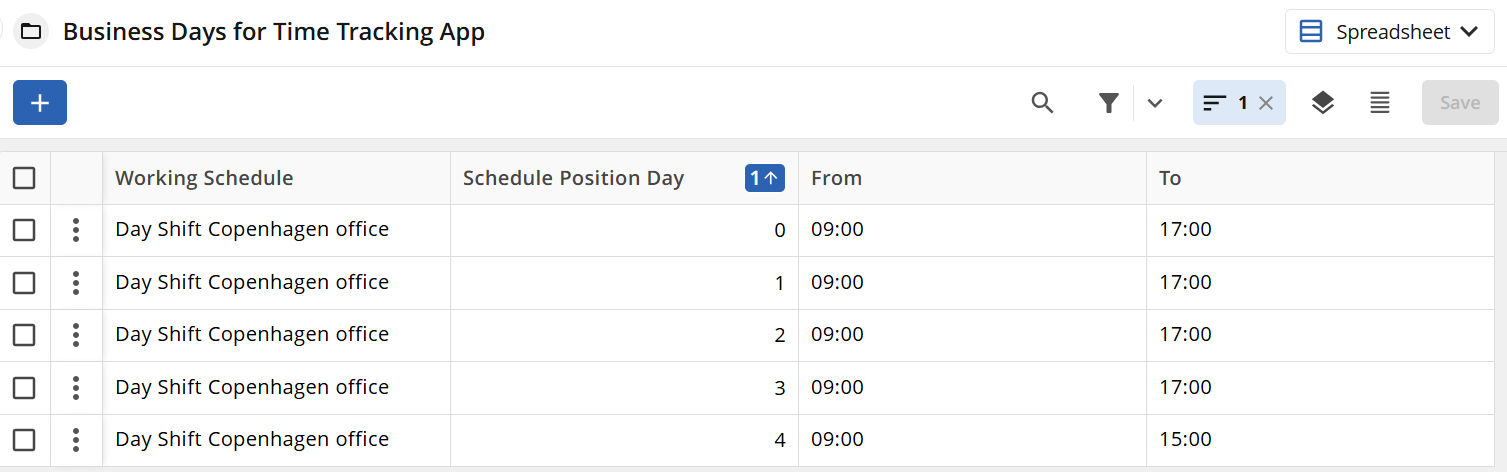
1. Navigate to the Business Days for Time Tracking App module and click Add.
2. Select the Working Schedule and enter the Schedule Position Day, From and To.
3. Save the item.
4. Repeat steps 1-3 for each working day of the schedule.
Note: From and To are fixed times and are not converted between time zones. See Understanding Schedule Positions and Rotations
Assigning a Working Schedule to a User
The Schedule Assignment for Time Tracking App module links users to schedules. Each item says which schedule a user follows and from which date (the Effective Date). Several users can share the same schedule.
Example: An assignment linking Antonio Salas to Day shift Copenhagen office with an Effective Date of 2 November 2026 gives Antonio a target of 8 hours from Monday to Thursday and 6 hours on Friday from that date.

1. Navigate to the Schedule Assignment for Time Tracking App module and click Add.
2. Select the Working Schedules and the User.
3. Enter the Effective Date from which the user follows the schedule.
4. Save the item.
To change a user's schedule from a given date, add a new assignment with the new schedule and Effective Date. Dates before the new Effective Date keep using the previous schedule.
Office Calendar
An office calendar defines the days when users are not expected to work, such as public holidays or office closures, in addition to their working schedule. Each calendar is shared by a group of users, e.g. all users based in Denmark, so a non-business day only needs to be added once. A non-business day can cover a whole day or only part of it.
In My Time, a non-business day:
Is displayed as an event in Calendar Week View and Calendar Month View
Is highlighted in the date header of the Timesheet, with its details shown on hover
Reduces the daily target by the hours it covers, or removes the target for a full day
Example: Adding Christmas Day to the Denmark calendar removes the target for that day for every user linked to the calendar. Adding Christmas Eve (early finish) from 15:00 to 18:00 reduces the target for that afternoon only.
Office Calendar is disabled by default. Before enabling it, you will need to create two modules and add a field to the Users module.
Step 1: Configuring the Calendar Module
1. Navigate to Modules → Manage Modules.
2. Click +Add Module.
3. Set the Type to Module.
4. Specify a Name for the module (e.g., Calendar).
5. Select a Template (e.g., Without Preconfigured Media Settings and Audit Fields).
6. Click OK to confirm the module creation.
7. Open Module Configuration of the recently created module.
8. Open Fields → Field Definitions
9. Click New Field.
10. Enter a Field Name. (e.g. Name)
11. Ensure the Field Type dropdown is set to Text Field.
12. Click OK to create the field.
13. Click New Field.
14. Enter a Field Name. (e.g. Description)
15. Ensure the Field Type dropdown is set to Text Field.
16. Click OK to create the field.
Step 2: Configuring the Non-Business Day Module
1. Navigate to Modules → Manage Modules
2. Click +Add Module.
3. Set the Type to Module.
4. Specify a Name for the module (e.g., Non-Business Day).
5. Select a Template (e.g., Without Preconfigured Media Settings and Audit Fields).
6. Click OK to confirm the module creation.
7. Open Module Configuration of the recently created module.
8. Open Fields → Field Definitions
9. Click New Field.
10. Enter a Field Name. (e.g. Name)
11. Ensure the Field Type dropdown is set to Text Field.
12. Click OK to create the field.
13. Click New Field.
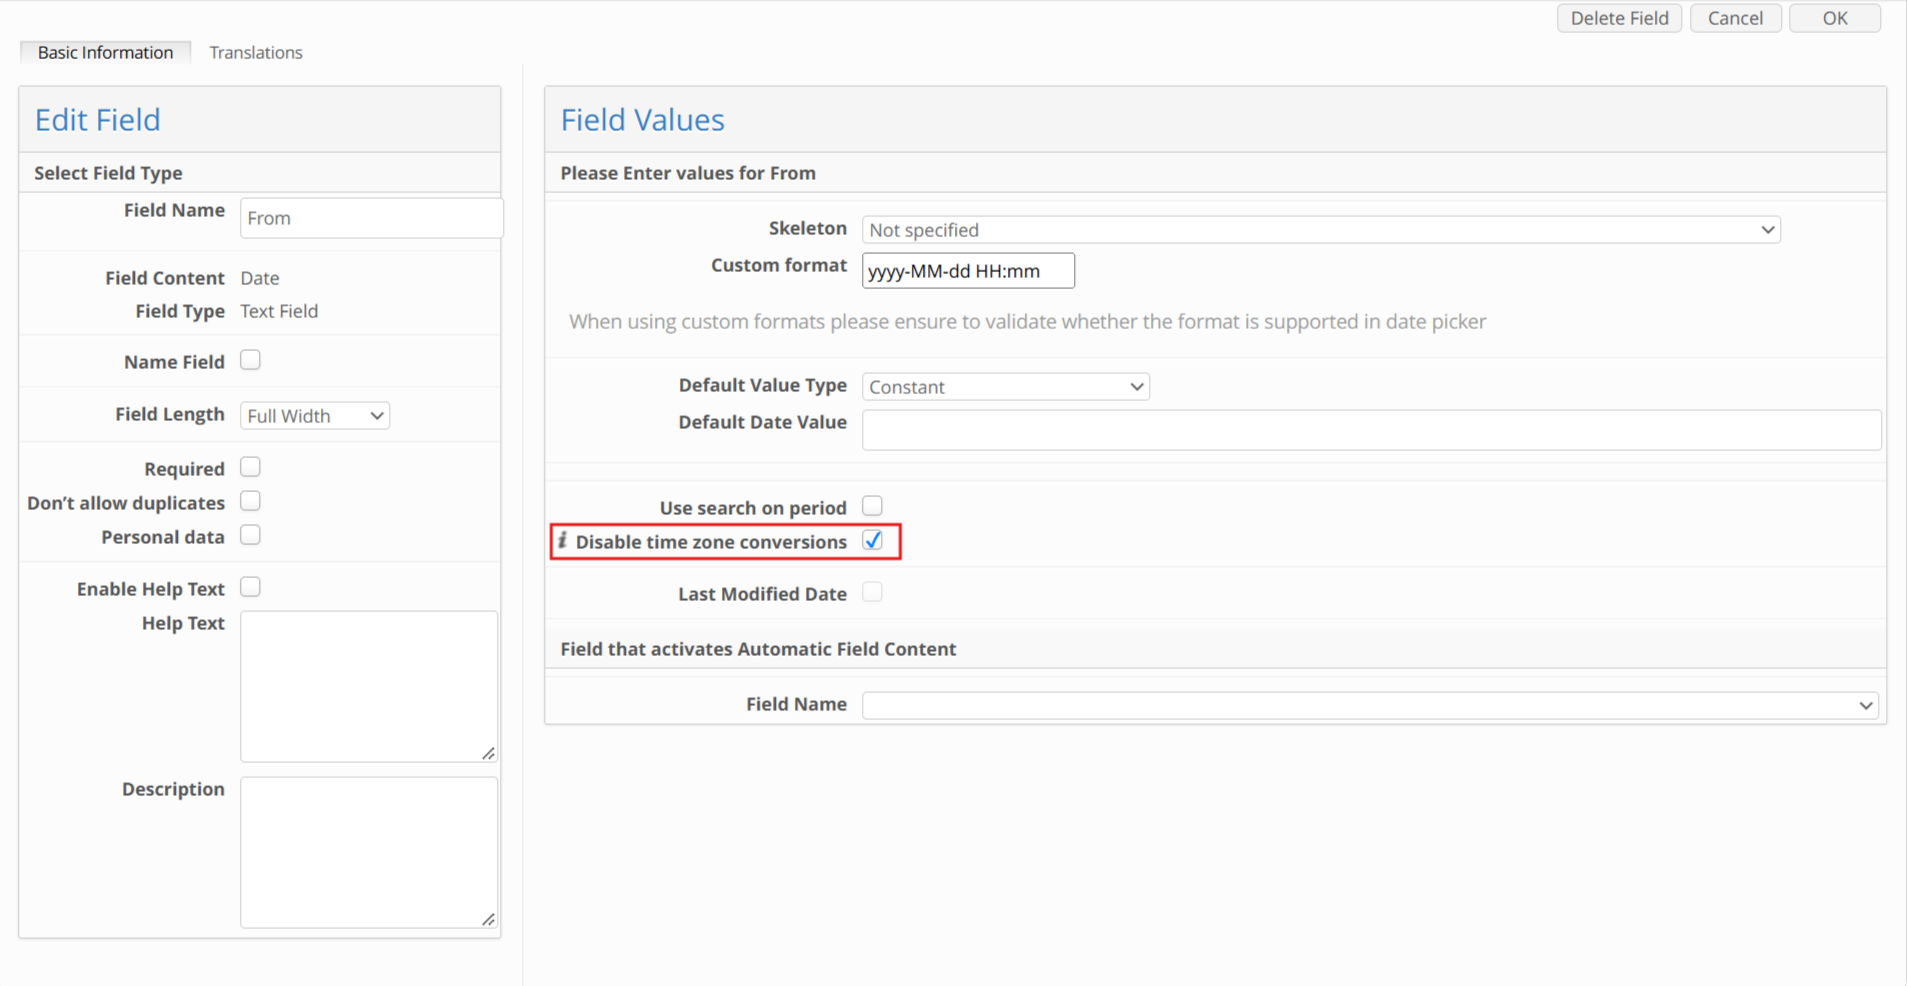
14. Enter a Field Name (*e.g. From*).
15. In the Field Content dropdown, select Date.
16. Locate the Skeleton field and set the date format to yyyy-MM-dd HH:mm.
17. Ensure Disable time zone conversions is checked.
18. Click OK to create the field.
19. Click New Field.
20. Enter a Field Name (*e.g. To*).
21. In the Field Content dropdown, select Date.
22. Locate the Skeleton field and set the date format to yyyy-MM-dd HH:mm.
23. Ensure Disable time zone conversions is checked.
24. Click OK to create the field.
25. Click New Field.
26. Enter a Field Name (*e.g. Calendar*).
27. Select Module from the Field Content dropdown.
28. In the Field Type dropdown, select Multi Select Field.
29. Locate the Module field and select the Calendar module previously created.
30. Within the Module Field dropdown, select the Name field previously created.
31. Click OK to create the field.
Note: As the Calendar field is a Multi Select Field, one non-business day can belong to several calendars.
Step 3: Configuring the Users Module
1. Navigate to Modules → Manage Modules.
2. Open Module Configuration for Users module.
3. Open Fields → Field Definitions.
4. Click New Field.
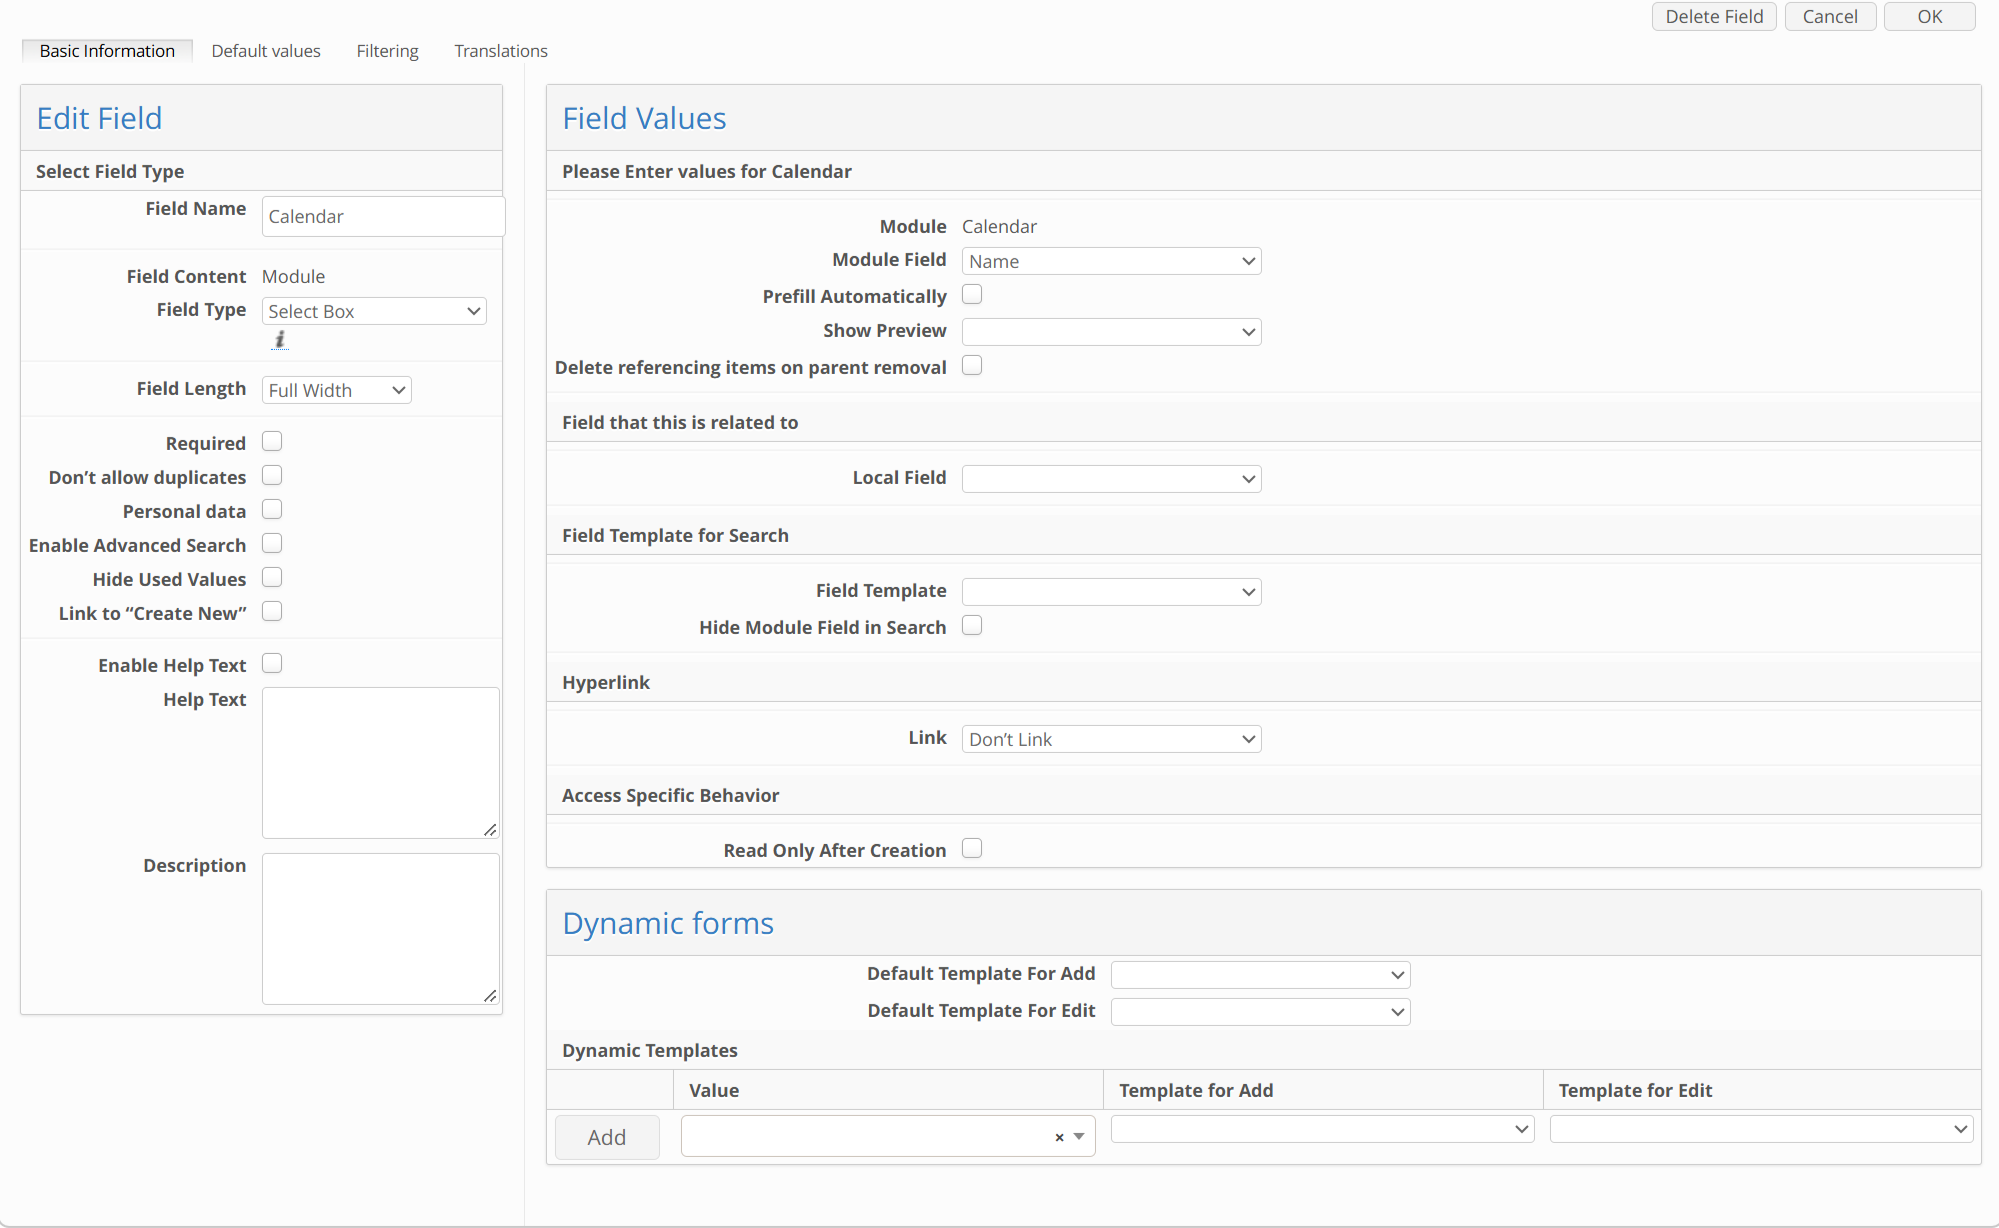
5. Enter a Field Name (*e.g. Calendar*).
6. Select Module from the Field Content dropdown.
7. In the Field Type dropdown, select Select Box.
8. Locate the Module field and select the Calendar module previously created.
9. Within the Module Field dropdown, select the Name field.
10. Click OK to create the field.
Add the Calendar field to the module and item views of the Users module, so that a calendar (e.g. ‘Denmark’) can be assigned to each user.
See here how to configure Module and Item views.
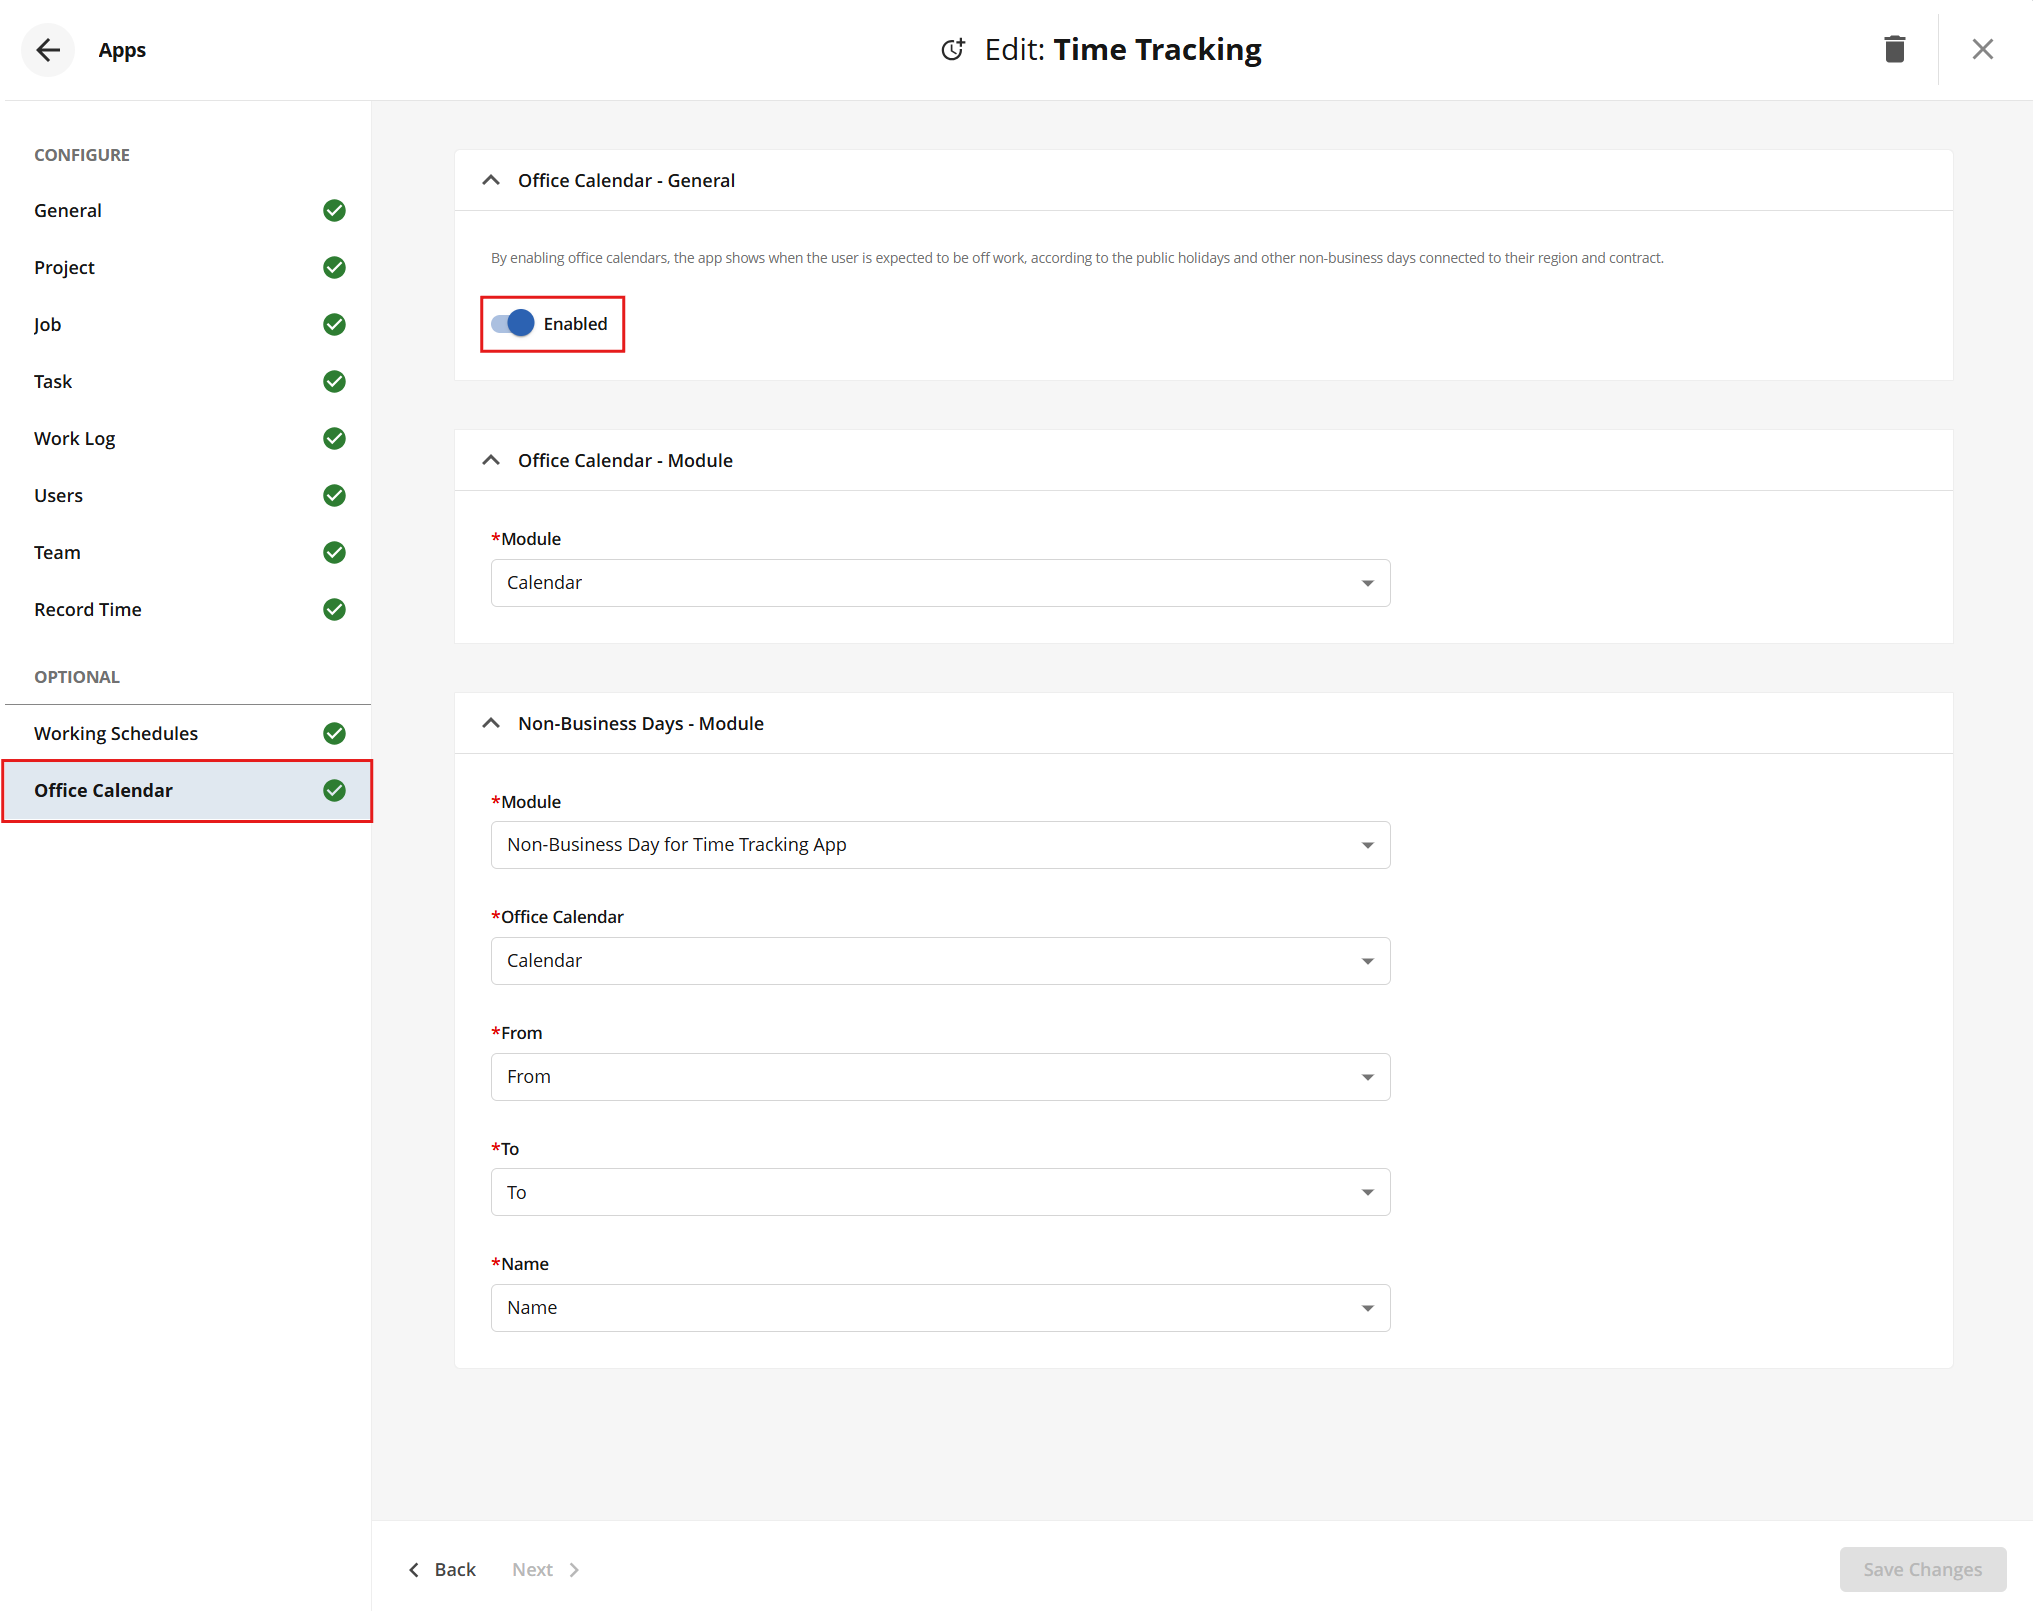
Step 4: Configuring the Time Tracking App
1. Navigate to Configuration → Apps Library from the sidebar.
2. Locate the Time Tracking app and click the card.
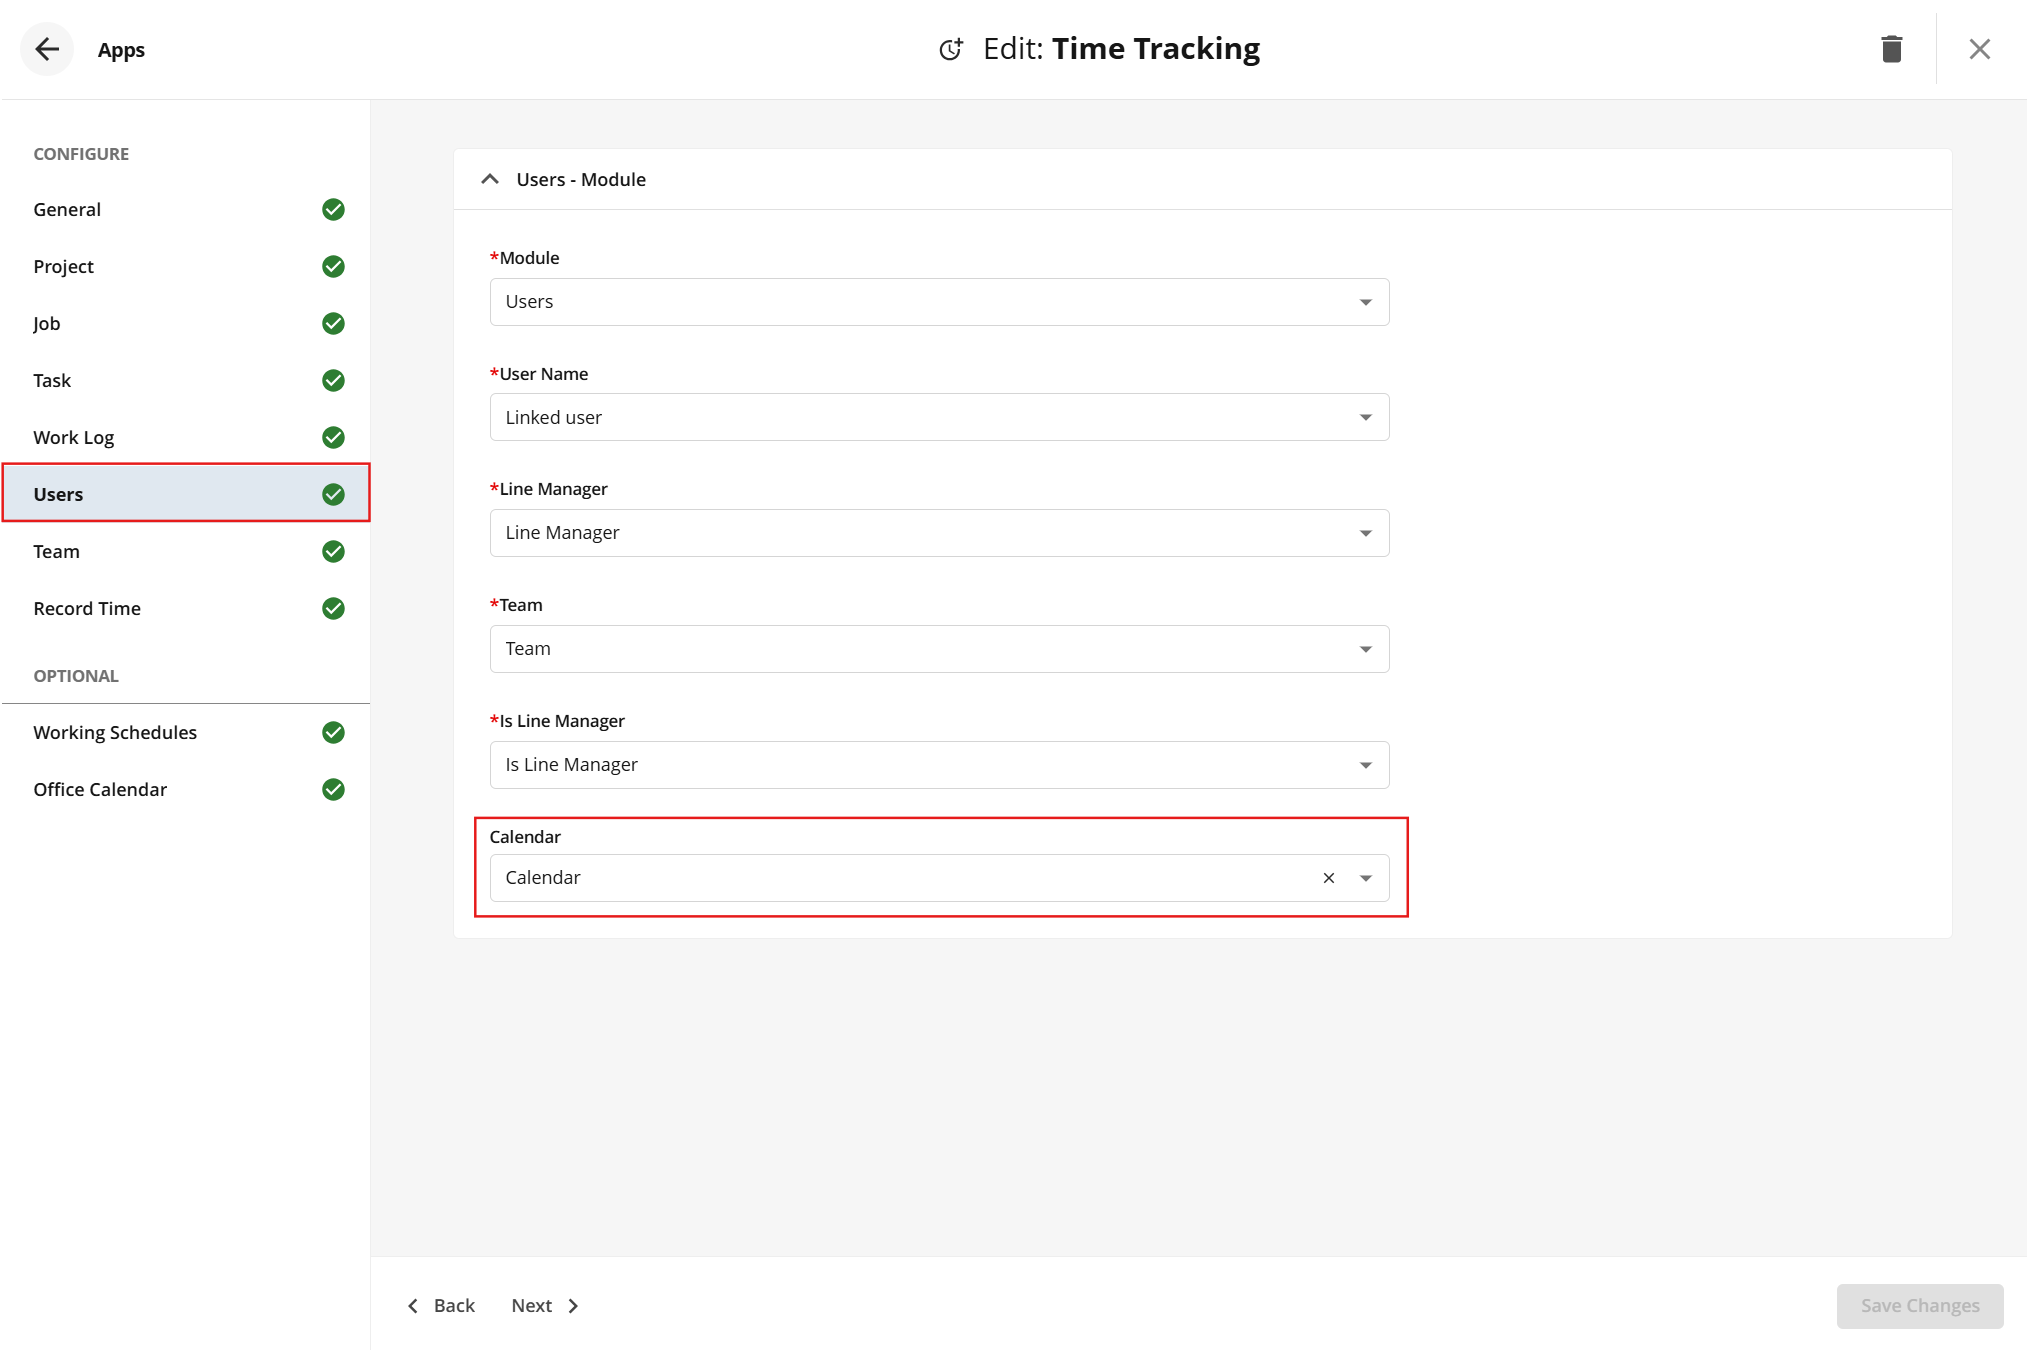
3. Select the Users tab
4. In the Calendar dropdown, select the Calendar field created in Step 3.
4. Next, in the Optional section, select the Office Calendar tab.
5. Switch on Enabled.
6. In the Office Calendar module, select the Calendar module in the module dropdown.
7. In the Non-Business Days module, select the Non-Business Day module in the module dropdown. Then select the Calendar field in the Office Calendar dropdown, and the From, To and Name fields in their matching dropdowns.
8. Click Save Changes.
Step 5: Configuring Module and Item Views
Create module and item views for the Calendar and Non-Business Day modules, so that their items can be viewed and managed. See here how to configure Module and Item views.
Step 6: Adding Calendars and Non-Business Days
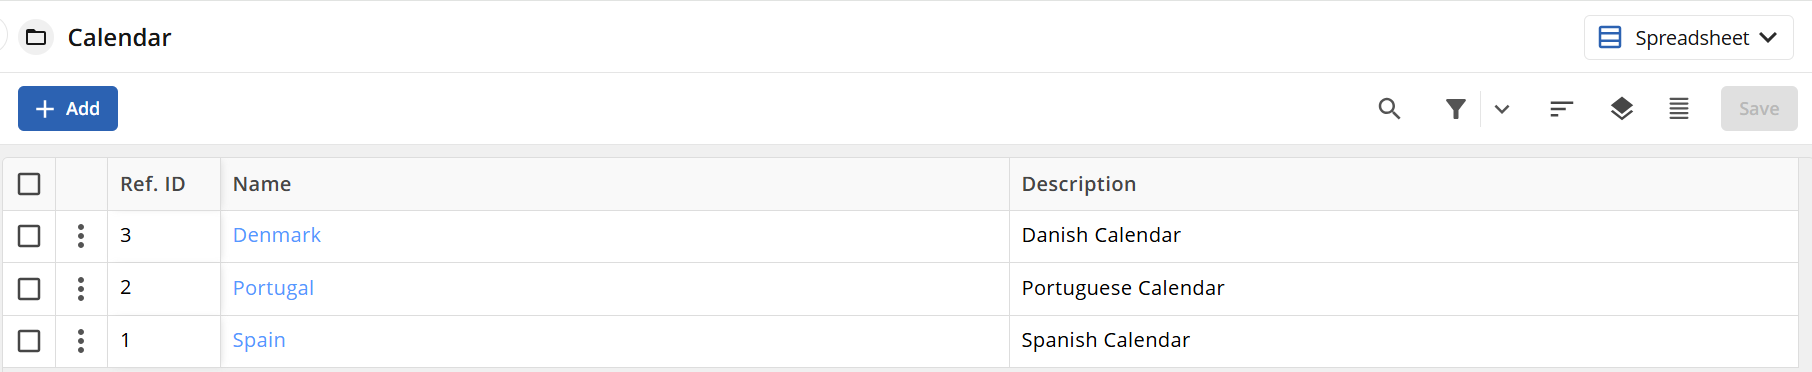
Navigate to the Calendar module and click + Add
Enter a Name (e.g. ‘Denmark’)
Enter a Description (e.g. ‘Danish Calendar’).
Save the Item.
Navigate to the Non-Business Day module and click Add.
Enter a Name (e.g. ‘Christmas Day’),
the From and To dates and times (e.g. From 00:00 To 23:59)
Select one or more Calendars.
Save the item.

Navigate to Users module
Open each relevant user
Select their Calendar (e.g. ‘Denmark’).
Save the item.

In Calendar Week View, non-business days are displayed for every user linked to the calendar. Non-business day events of 20 hours or more are displayed in the all-day row; shorter events are displayed in the time grid for the hours they cover.
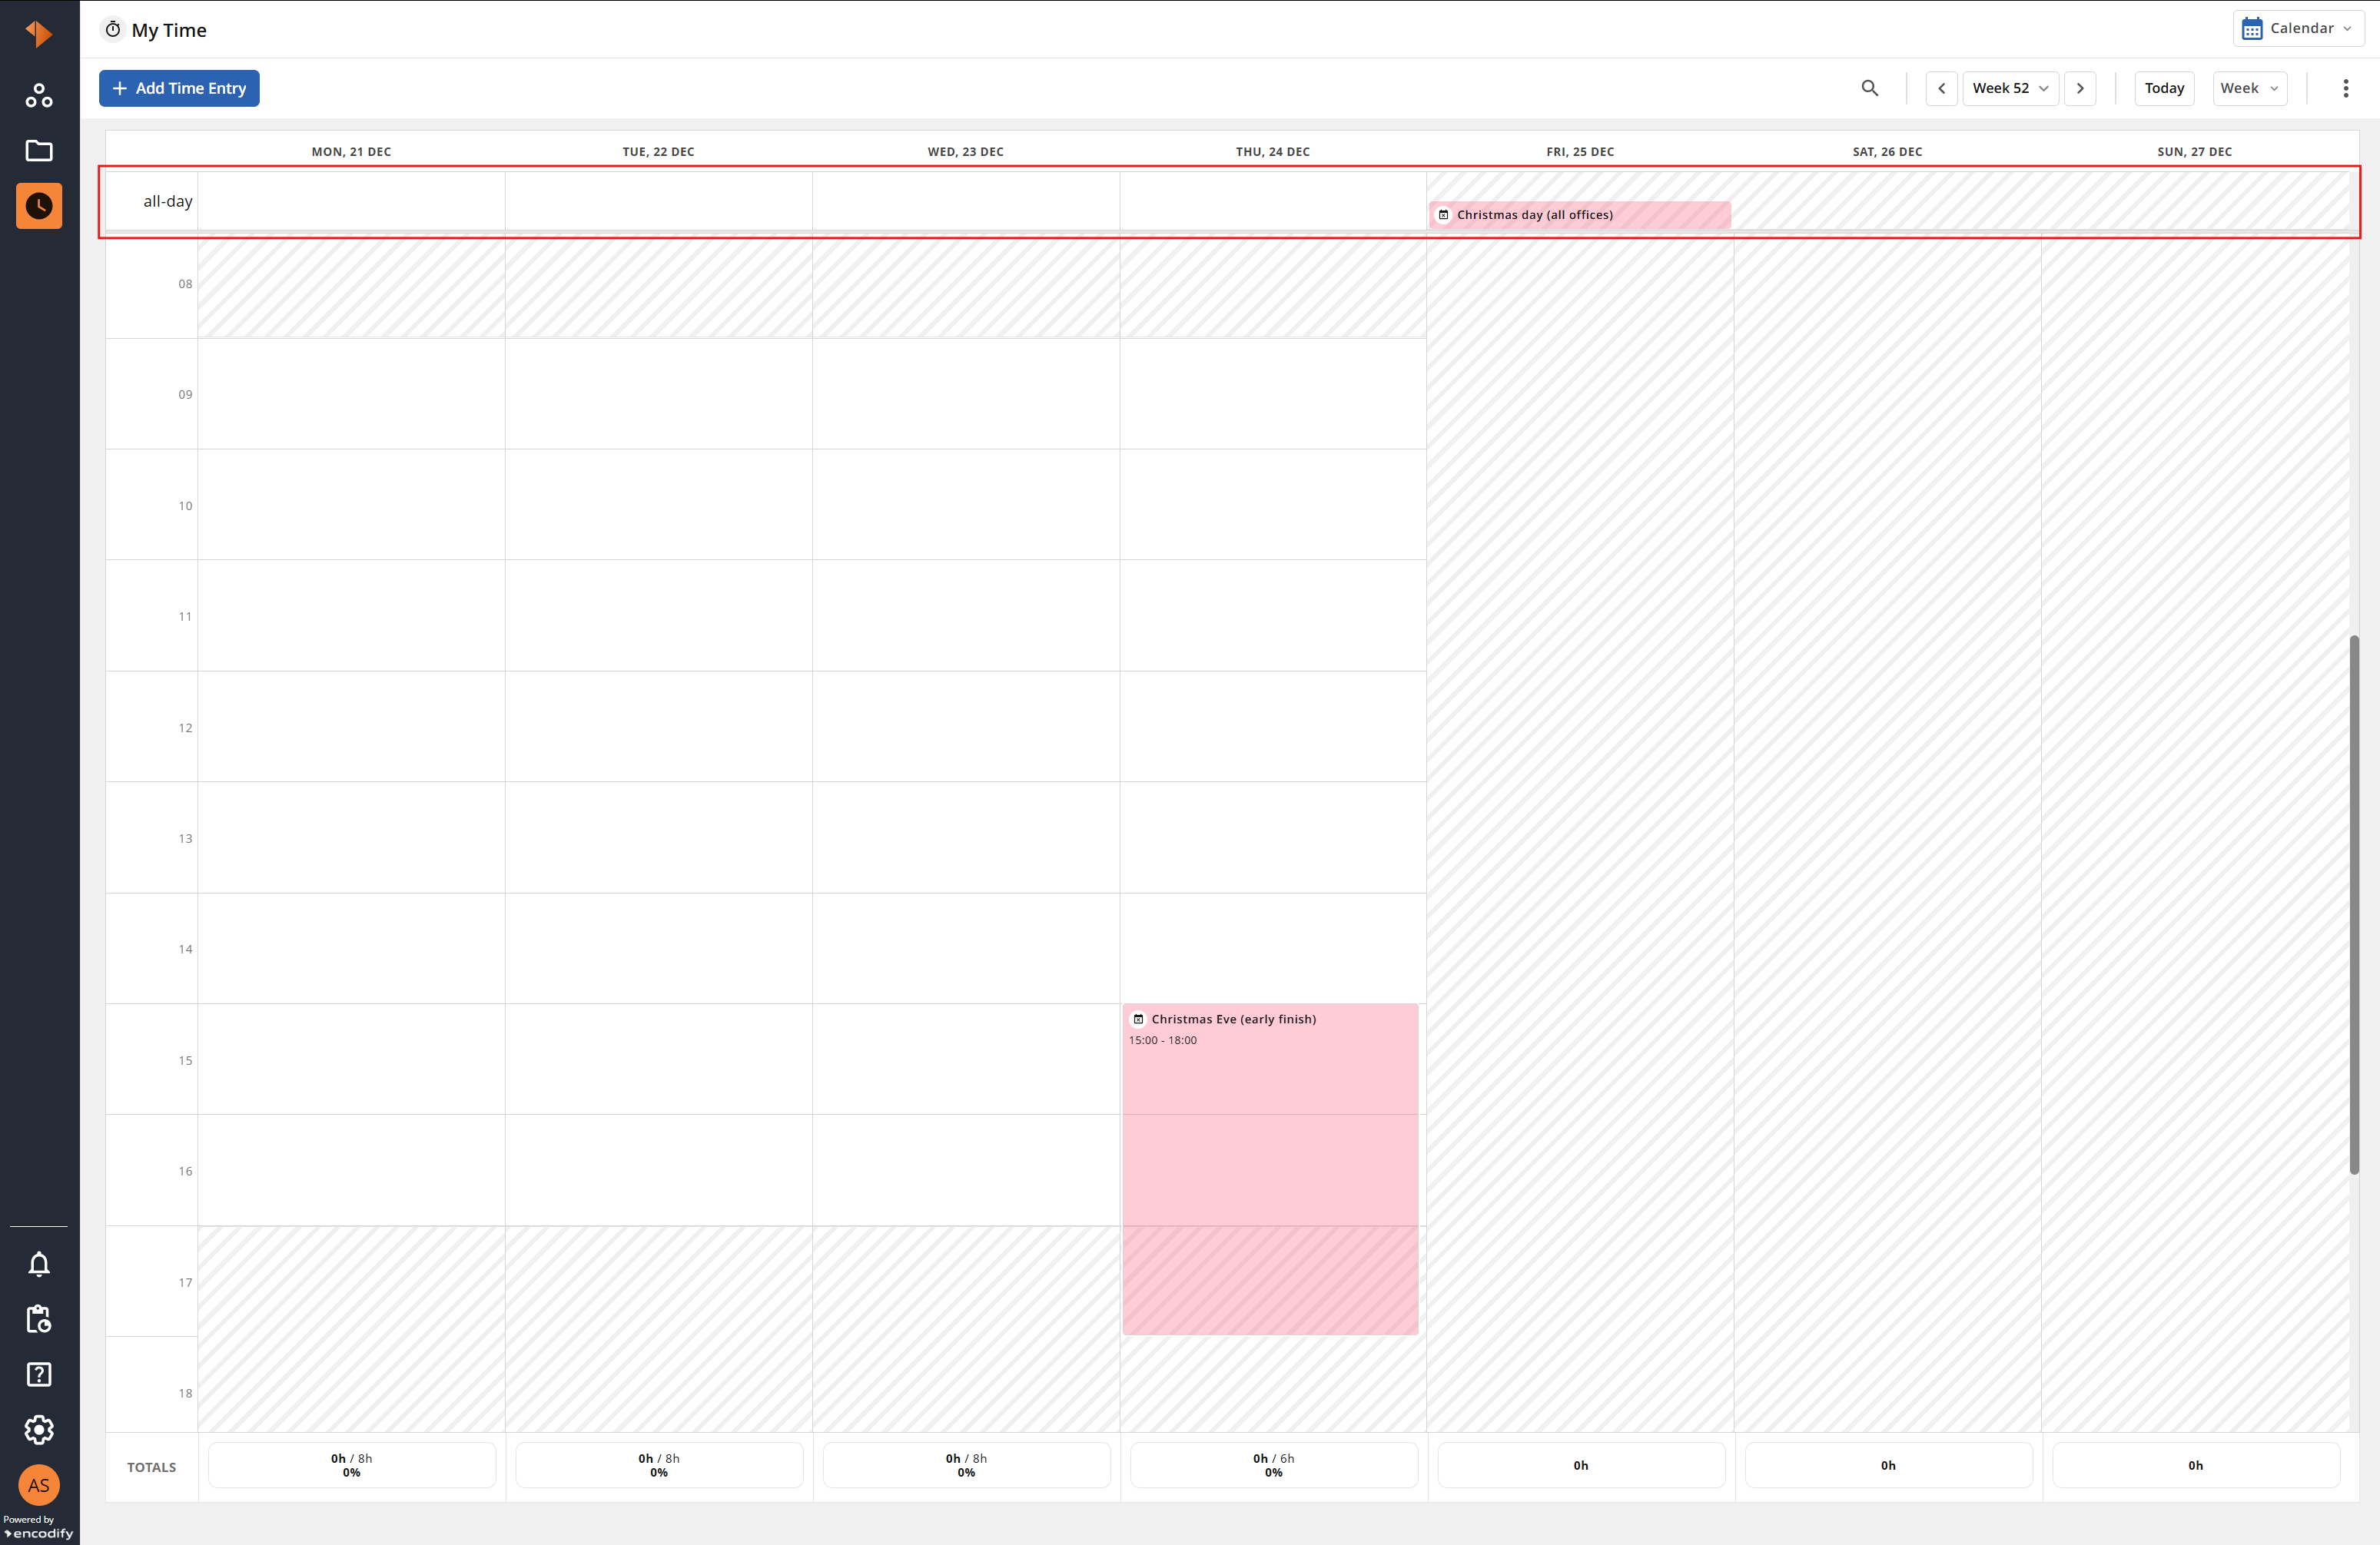
An image displaying a full-day and a partial non-business day in Calendar Week View
In Calendar Month View, non-business days are displayed as events in the day cell. A full-day non-business day is displayed at the top of the cell and the whole day is crossed out. A partial non-business day is displayed with its start time (e.g. 15:00 Christmas Eve (early finish)) and the day remains available. The weekly target in the Totals column is reduced accordingly (e.g. 30h instead of 38h).
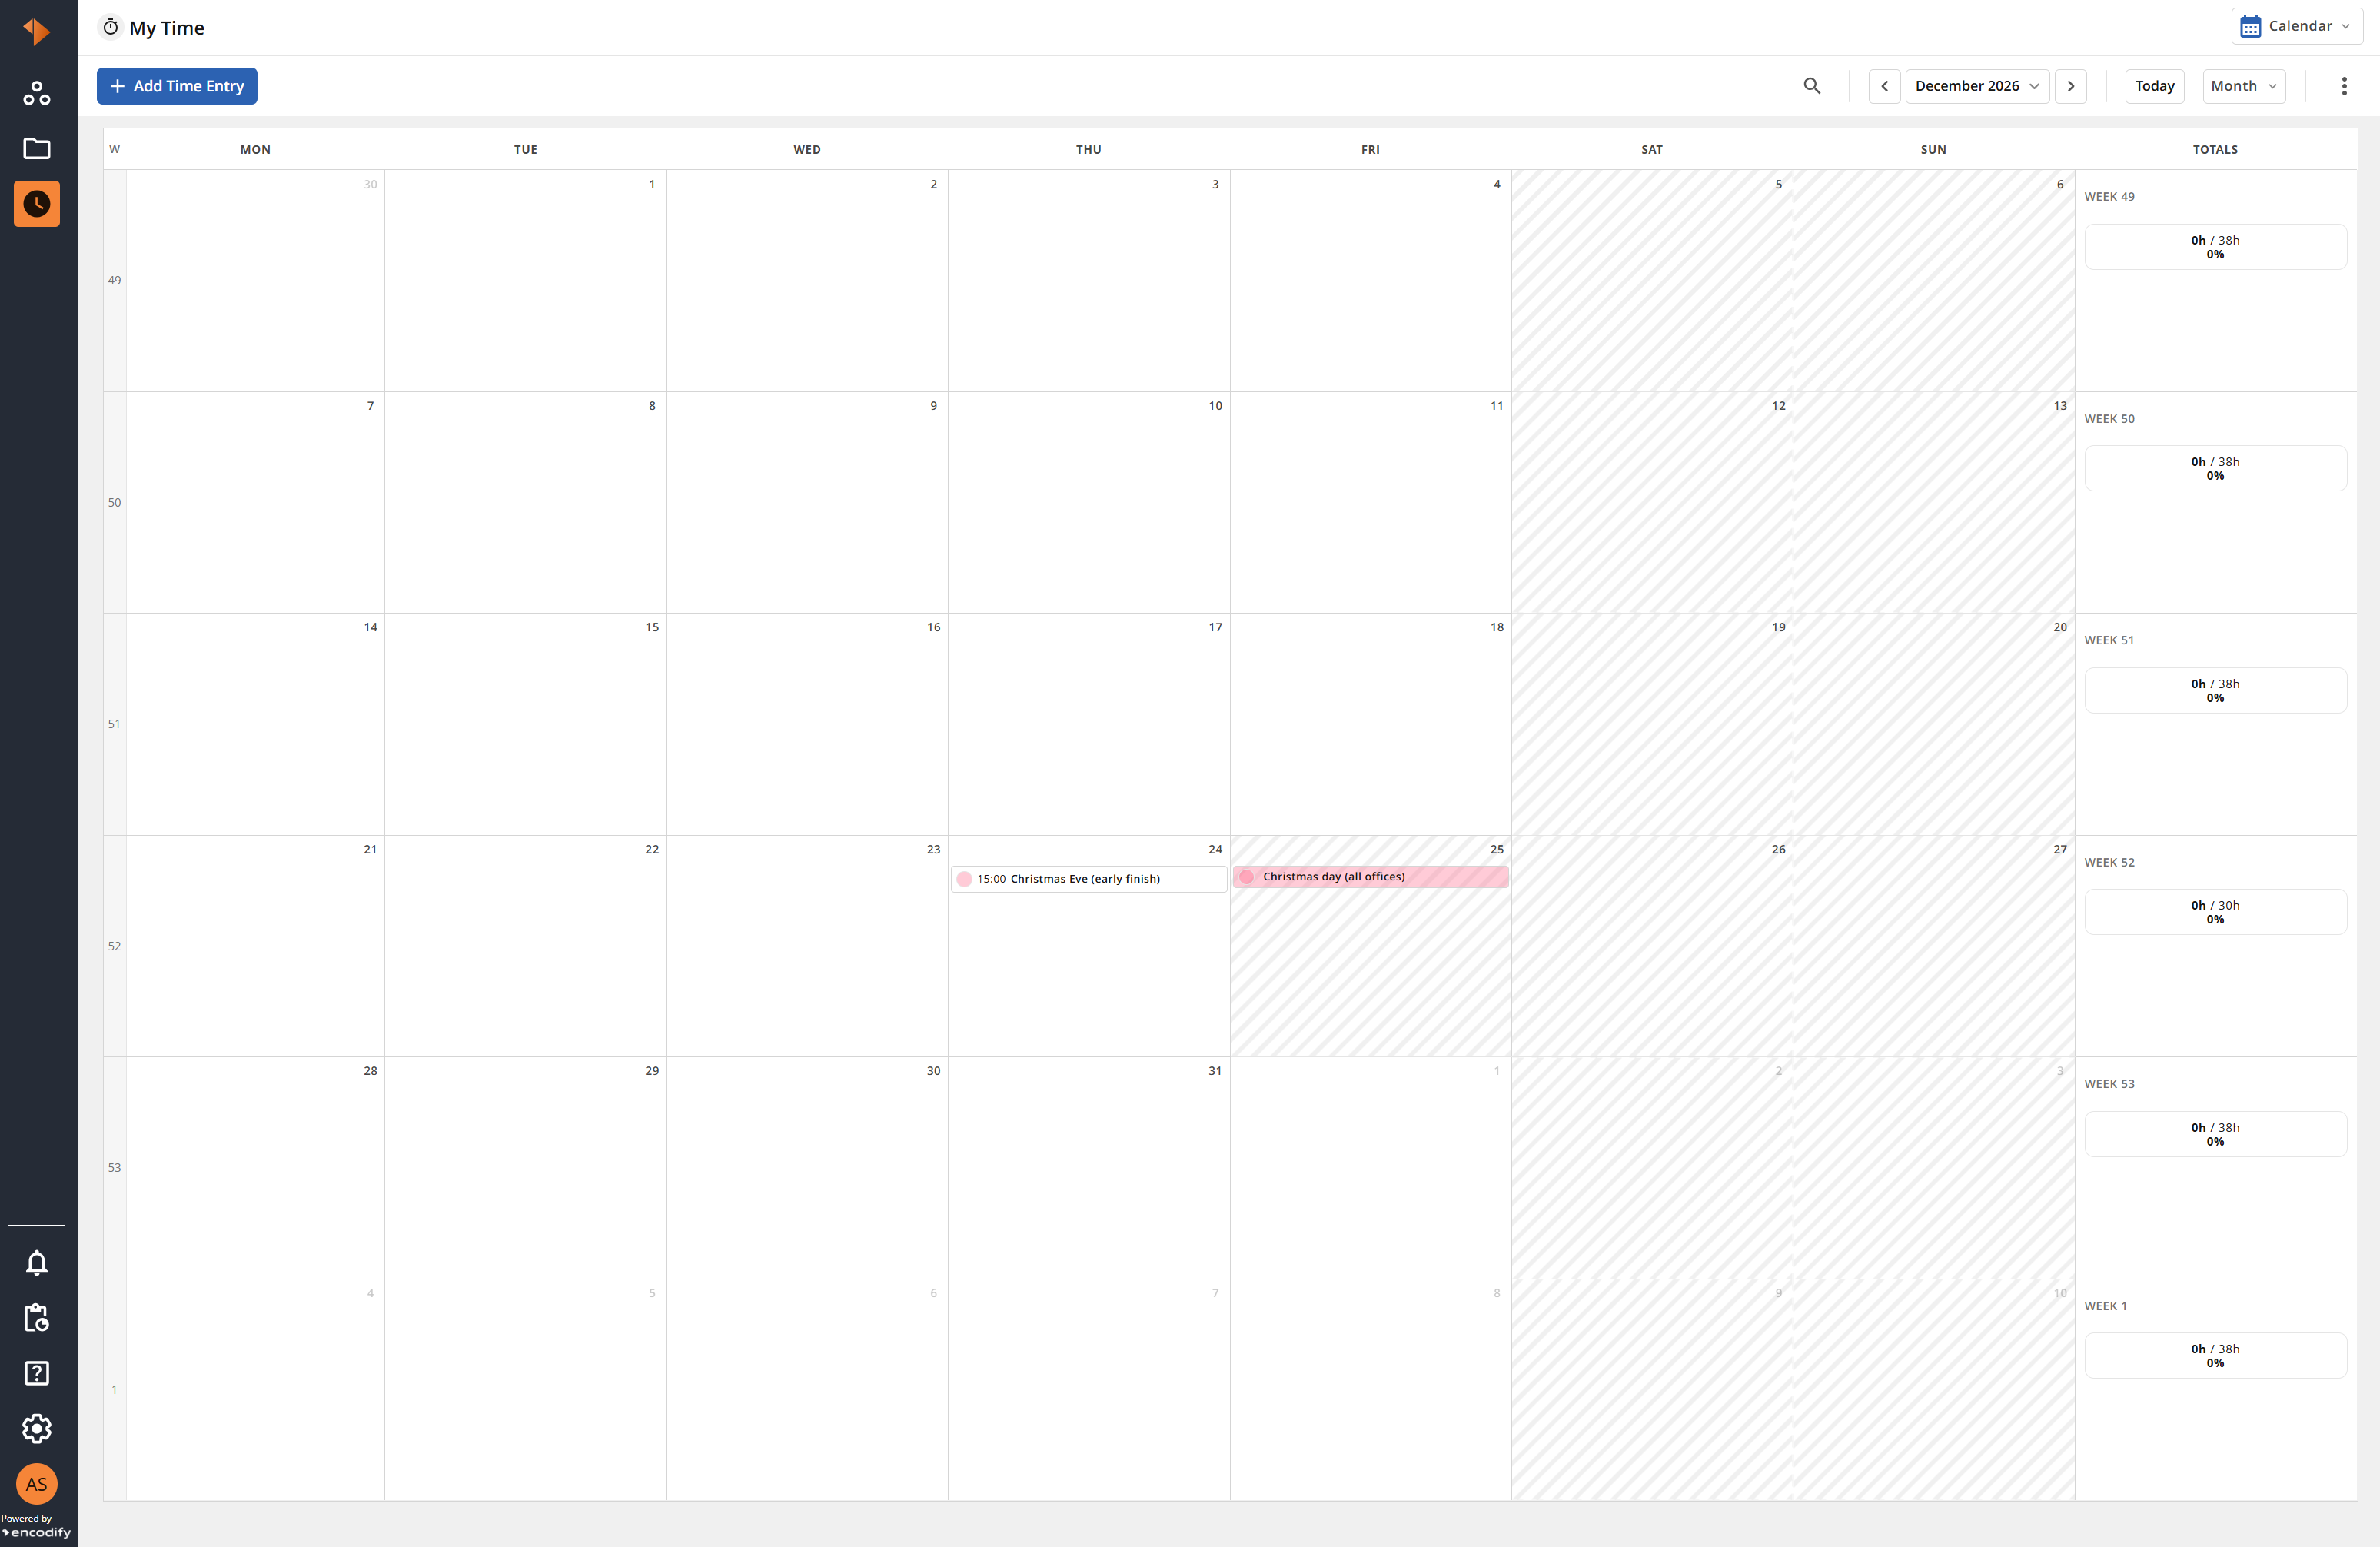
An image displaying a full-day and a partial non-business day in Calendar Month View
In the Timesheet view, the date header of each non-business day is highlighted. Hovering over a highlighted date header displays a tooltip with the details of the non-business day, e.g. Christmas Eve (early finish), 15:00 - 18:00. On a partial non-business day, the cells remain available and the daily target is reduced by the hours covered (e.g. 6h instead of 8h). On a full-day non-business day, the cells and the daily total are crossed out and no target is displayed. The weekly total only includes the expected working time that remains.
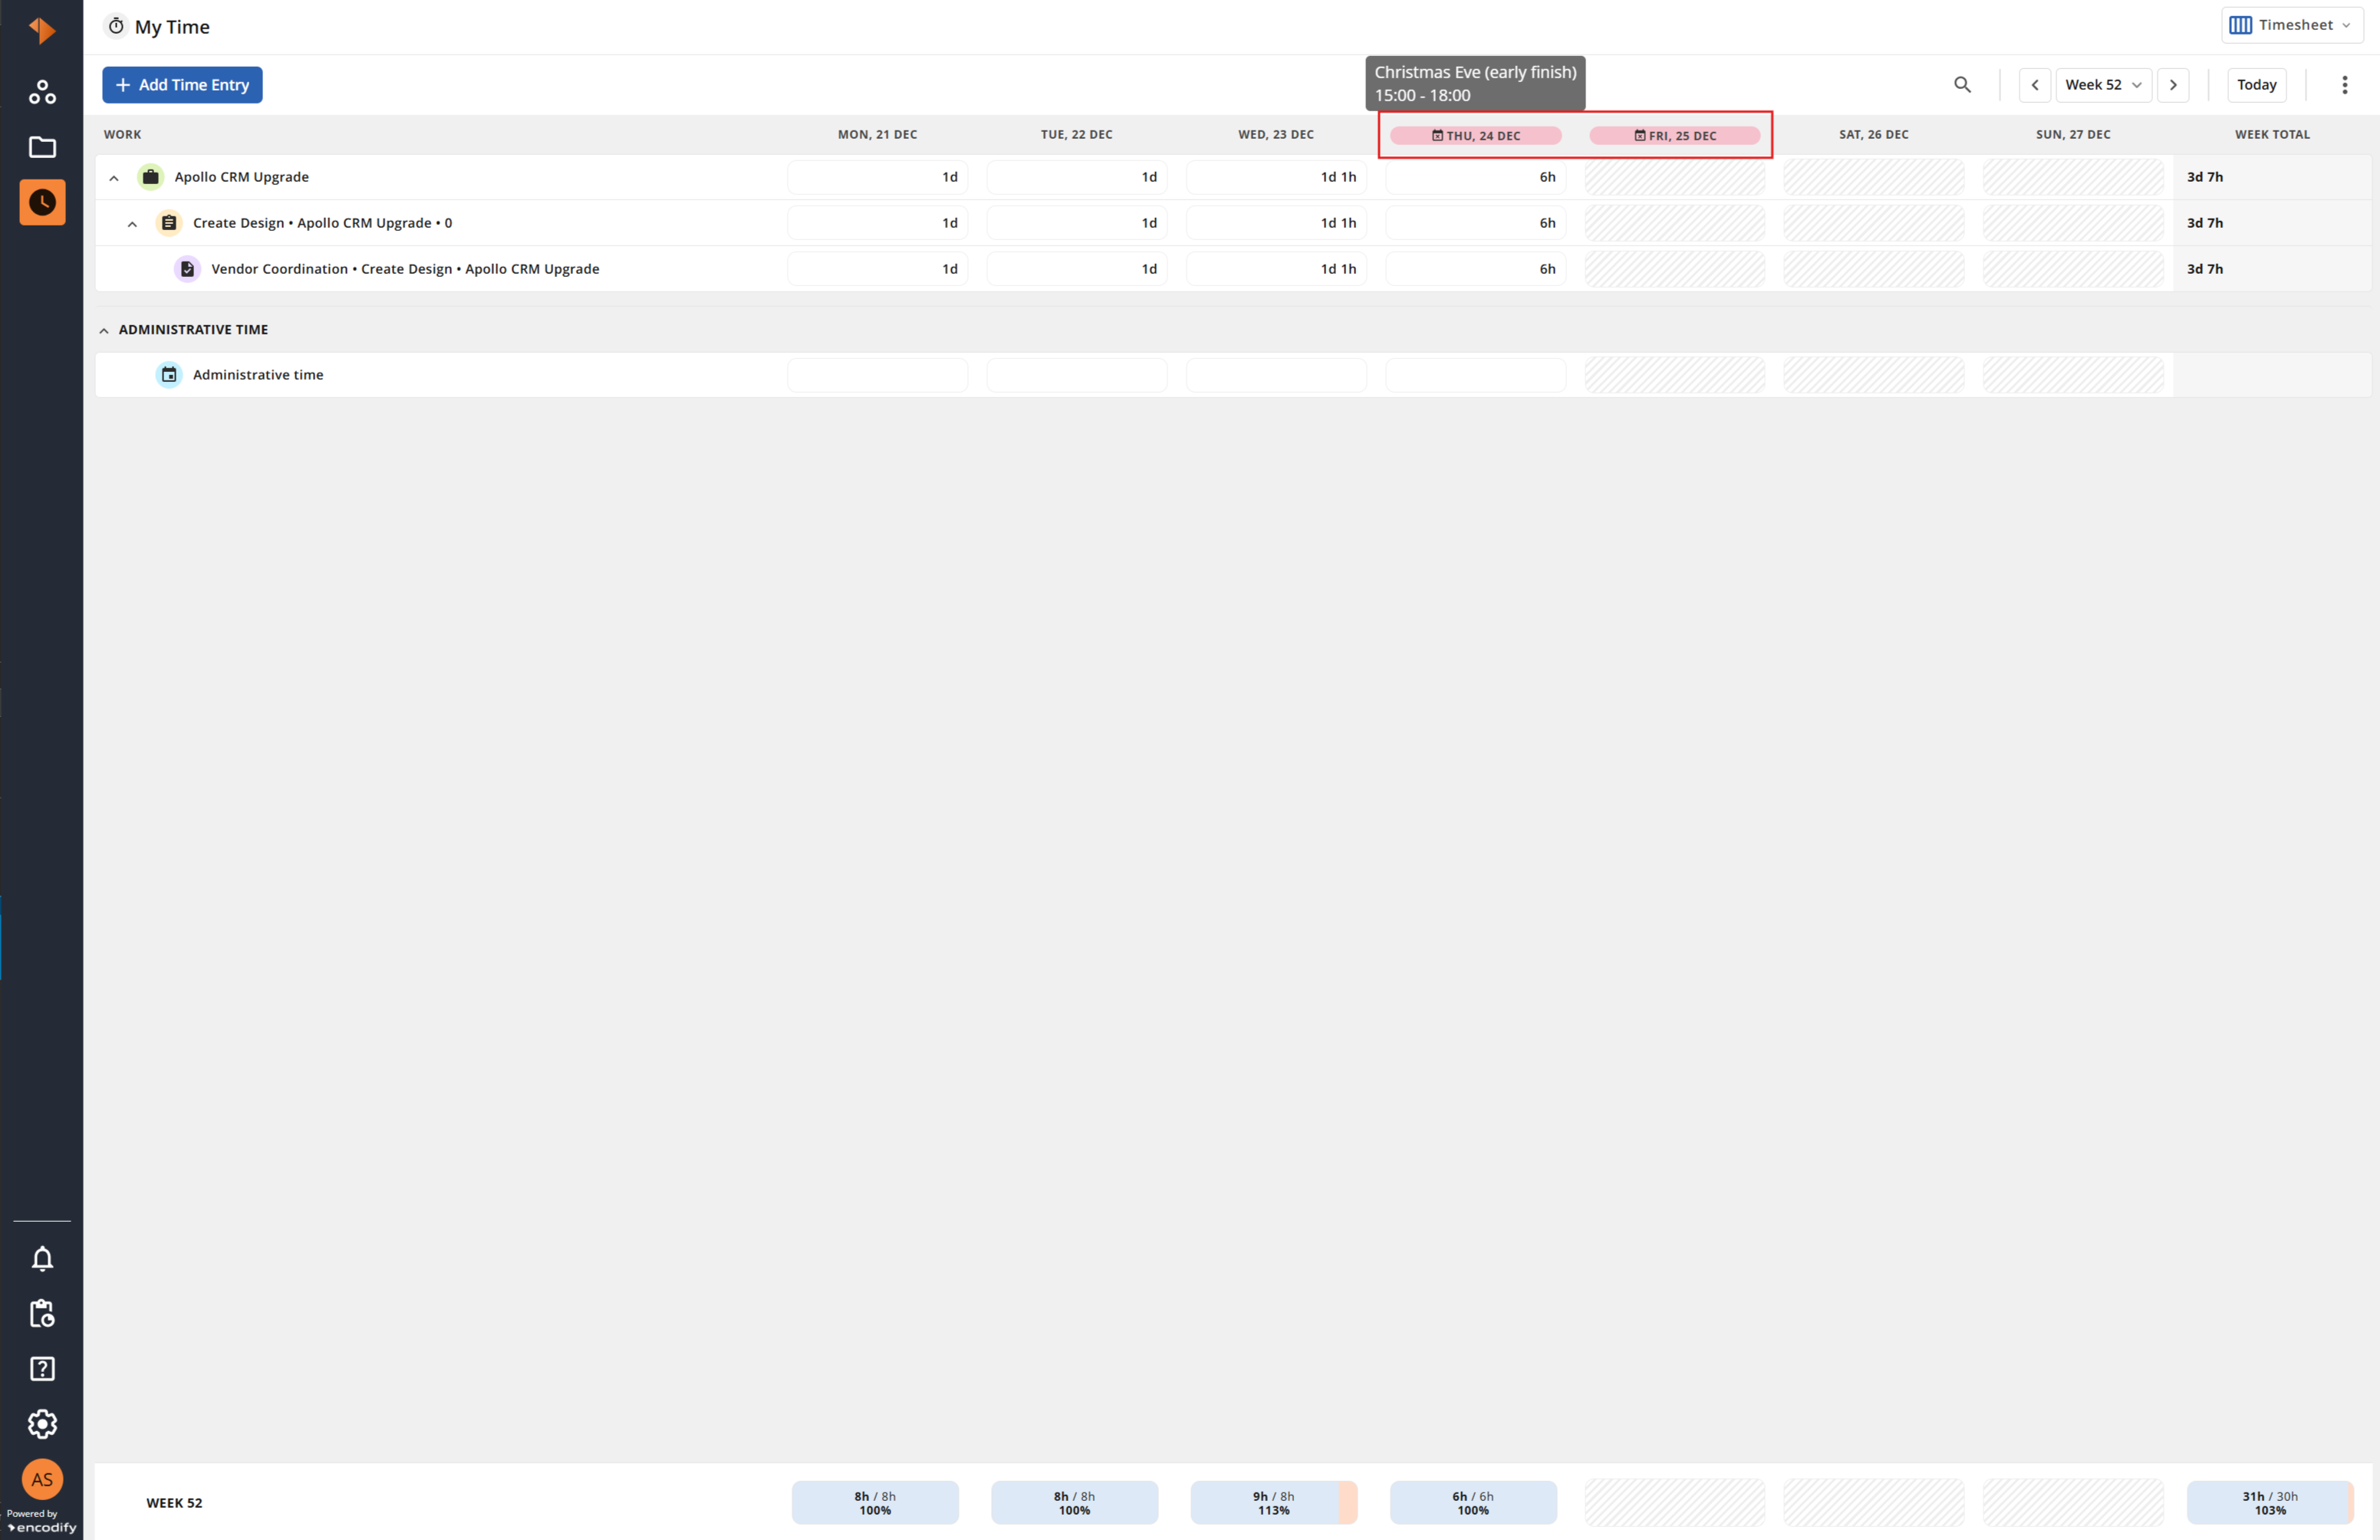
An image displaying a full-day and a partial non-business day in Timesheet View
Access Rights
All users can see their own working schedule and non-business days in My Time without "Read" access to the Working Schedules, Business Days, Schedule Assignment, Calendar or Non-Business Day modules. Admins who create and maintain schedules and calendars need access to these modules.
Known Behaviour
Non-business days cannot be edited, moved or resized from the calendar. Time can still be logged on those days.
Non-business days of 20 hours or more are displayed in the all-day row of Calendar View - Week View.
If all working time in a week is covered by non-business days, the date headers of the days the user would normally work are not crossed out.
If no working schedule is assigned to a user, no targets are displayed and no time is crossed out.