When the Time Tracking App is configured, clicking the respective icon in the side navigation takes the user to “My Time,” where they can access the timesheet to manage their time.
.png)
An image displaying the Timesheet
Timesheet Overview
Action | Visual Guide |
|
|
|
|
|
|
|
|
|
|
|
|
Please refer to the article "Time Spent and Estimation" for more information. |
|
|
|
| Day Total:
Week Total:
|
|
|
| Timer Active:
Timer Running — Time Already Logged:
|
|
|
|
|
|
|
.png)
.png)
.png)
.png)
.png)
.png)
.png)
.png)
.png)
.png)
.png)
.png)
.png)
.png)
.png)
(1).png)
Logging time in Timesheet
When adding time entries at the project level, you must complete the fields specified in the app configuration.
Note: When entering a duration, you can use the following format:
m,h,d, orwto represent minutes, hours, days, or weeks respectively. For example,2dwill be saved as24h.
The table below provides steps for logging time at the project level in the Timesheet.
Description | Visual Guide |
|---|---|
In the Timesheet, you can add a new work log entry from two different locations:
|
|
Or a work log can originate from a running timer.
Once the timer has started on Timesheet, a Stop Timer button will be displayed in the timesheet. |
|
.png)
.png)
.png)
The Timer Function
Once the timer has been initiated by clicking the Start Timer button, the running timer will be displayed by default at the bottom right of the page. 
From the Timesheet, users can perform the following actions:
Collapse the timer - Minimises the timer, showing only the Stop button and time spent.
Expand the timer - Maximises the timer to display the Stop button, time spent, task name, and Open Item icon.
Reposition the timer - Drag the timer horizontally to a preferred location — this position will be remembered for future sessions.
View time spent - Displays the total time tracked on the current task.
View the current task name - Shows the name of the task being tracked.
Open Item icon - Opens the task directly in the Item Info Sheet.
Stop icon - Stops the timer and ends time tracking for the task.
Adding Time Using Keyboard
You can add time using the keyboard at the Project, Job and Task levels. Navigate to a duration cell using the arrow keys or the Tab key, then type a duration directly into it. The cell shows the total time logged for that item on that day. When you type a higher value, a save button appears and a new entry is added for the difference between the new total and the current total.
Example: an item with entries of 0.5h, 2.5h and 1h shows 4h in the cell. Typing 7h adds a new 3h entry (7h minus 4h), giving a new total of 7h.
.png)
Note: clicking a duration cell with the mouse opens the Record Time panel instead. To edit existing time entries, use the Record Time callout in the Time Entries section.
As mentioned before, when entering a duration, you can use the following format: m, h, d, or w to represent minutes, hours, days, or weeks, respectively.
Duration Exceeds Working Hours
If the entered or tracked duration exceeds your configured Working Hours, a confirmation dialogue will appear. This does not prevent you from saving the entry — it simply prompts you to confirm before proceeding.
Important: This behaviour depends on the Working Hours field configured in your profile. If no working hours are defined, the dialogue will not be presented.
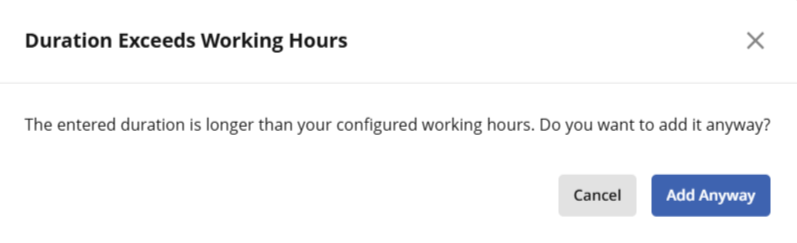
When adding time manually: If the entered duration is longer than your configured working hours, the "Duration Exceeds Working Hours" dialogue is displayed, asking whether you want to add the entry anyway.
Add Anyway — saves the time entry as entered.
Cancel — closes the dialogue without saving the entry.
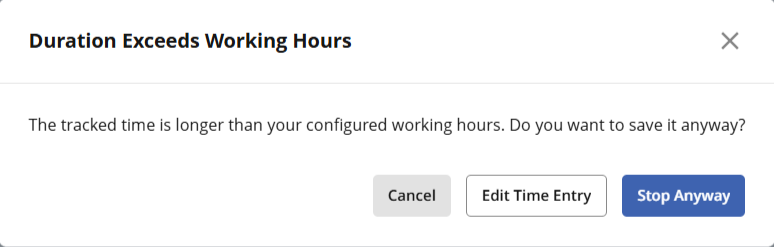
When stopping a running timer: If the tracked time is longer than your configured working hours, the "Duration Exceeds Working Hours" dialogue is displayed, asking whether you want to save the entry anyway.
Stop Anyway — stops the timer and saves the entry as tracked.
Edit Time Entry — allows you to amend the duration before saving.
Cancel — closes the dialogue without stopping the timer.
Duration dialogue limitations:
The confirmation dialogue is not currently supported on Calendar View when adding or updating a time entry by selecting a duration on the calendar, including all-day events.
It is not currently supported for the ‘Add Time Entry’ option in the Hours app, or the ‘Record Time Entry’ option on the Module view.
When editing an existing time entry and increasing its duration beyond the configured working hours, the warning is not re-triggered.
The confirmation dialogue is not triggered when a running timer is automatically stopped as a result of starting another timer.
"Show Assigned to Me" Items in Timesheet View
To facilitate the time logging experience when no prior time registration has been done for a given item, users can use the option Show Assigned to Me to view items assigned to them. By toggling this option ON, all items relevant to the user are displayed, even if no time entries associated with them exist in that period.
When disabled, only items with logged time for that period are displayed.
Configuring the Assignee Field
Before users can filter by assigned items in the Timesheet view, an administrator must map the appropriate Assignee fields for the Project, Job, and Task modules.
Navigate to Time Tracking App settings under Apps Configuration.
Select the Project, Job, or Task tab.
In the Optional section, locate the respective Assignee dropdown field.
Select the custom field used to track assignees for that module.
.png)
Note: Only User Module link fields of type Select Box and Multi Select Field are supported for the Assignee field mapping.
Other field types—such as User Field Content, Radio Buttons, Checkboxes, and Status Field—are not supported.
Once the configuration is complete, ensure that Projects, Jobs, or Tasks are actively assigned to specific users within their respective modules.
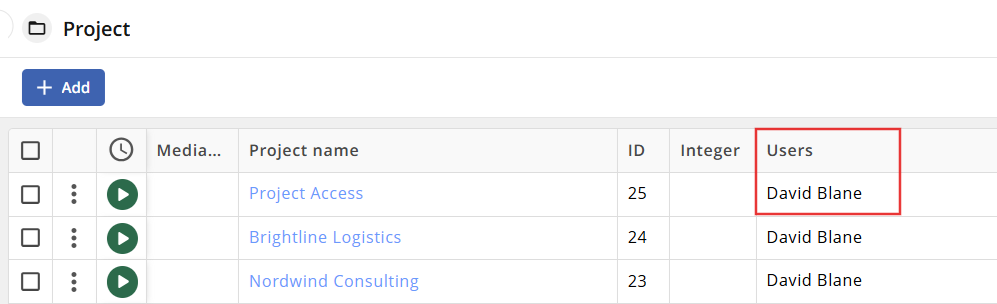
Viewing Assigned Items in Timesheet
To display assigned items on your timesheet:
Open My Time and select the Timesheet view.
Click the Ellipsis icon located in the top-right corner of the timesheet header.
Turn on the Show Assigned to Me toggle switch.
.png)
‘Show Assigned to Me’ Toggle Enabled
How it Works
Toggle Enabled (ON): Displays all items in the mapped modules and assigned to the logged-in user for the selected time period, including items with no recorded time.
Toggle Disabled (OFF): Displays only the items that have existing time entries recorded within the selected period.
.png)
‘Show Assigned to Me’ Toggle Disabled - Only Logged Time Displayed
Work Log Description in Timesheet View
The Work Log Description field allows users to add a description to a time entry, giving extra context on the work carried out. Where configured, this description can be viewed directly from the Record Time panel via the description icon, without needing to open the item.
The View Work Log icon then allows users to navigate directly to the item if further detail is needed.
.png)
Configuring the Work Log Description Field
Before the description icon can be displayed against a time entry in the Record Time panel, an administrator must map a Work Log Description field of the appropriate type.
Navigate to Time Tracking App settings under Apps Configuration.
Select the Work Log tab.
In the Optional section, locate the Work Log Description dropdown field.
Select the custom field used to store descriptions for time entries.
.png)
Once configured, the work log description icon will appear next to any time entry with a recorded description, allowing users to preview its content without leaving the current view.
Note: Only fields of type Text Field and Text Box (with content type Text) are supported for the Work Log Description field mapping.
Other field types—such as Decimal numeral, Integer, Select Box, and Date—are not supported.
Known Behaviours
The start timer functionality will only be available for the current day
A user cannot have more than one timer running at once
When clicking Start Timer while a timer is already running, the previously started timer will be stopped, the work log will be updated with the corresponding duration, and the new timer will start automatically.
A running timer will not be stopped automatically if the user navigates away from the view, logs out of the application, or, in the extreme case, when the server is restarted. In all these cases, the timer needs to be stopped manually.
A running timer will display “1” in the is running field within the work log module.