Overview
Important: Before enabling Email Connected Service, an Encodify administrator must first ensure that it’s enabled within your infrastructure.
Functionality Overview
Connected service of the type "Email" allows to sync the incoming content of the email account with module items in Encodify.
As the majority of the connected services in Encodify, configuration of the integration consists of:
Creating a module with fields in Encodify where the incoming email messages will be synced to
Creating and configuring of connected account and connected service
Creating action
Configuration
Module Configuration
After creating a module for email synchronization, the following fields can be configured for synchronizing properties of the incoming email messages. Created fields will be mapped in connected service.
Field | Field type |
|---|---|
Message ID | Text |
Sender | Text |
CC Contacts | Text |
Subject | Text |
Body | Text / Text box |
Attachment | Multiple file field (note, that single file fields are currently not supported for email integration) |
Connected Service Configuration
Enable Feature Flag
For the connected service of the type "Email" to be available in Site Configuration > Connections > Connected Services, feature flag needs to be enabled in webapp.yaml
encode:
 webapp:
   connections:
     list:
       - type: EMAIL
         enabled-sites: '*'
Create and Configure Connected Service
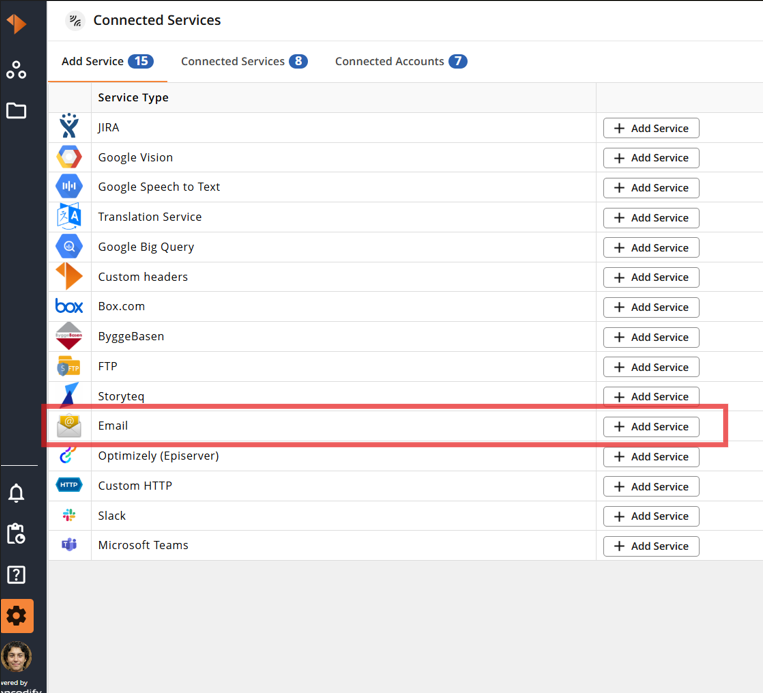
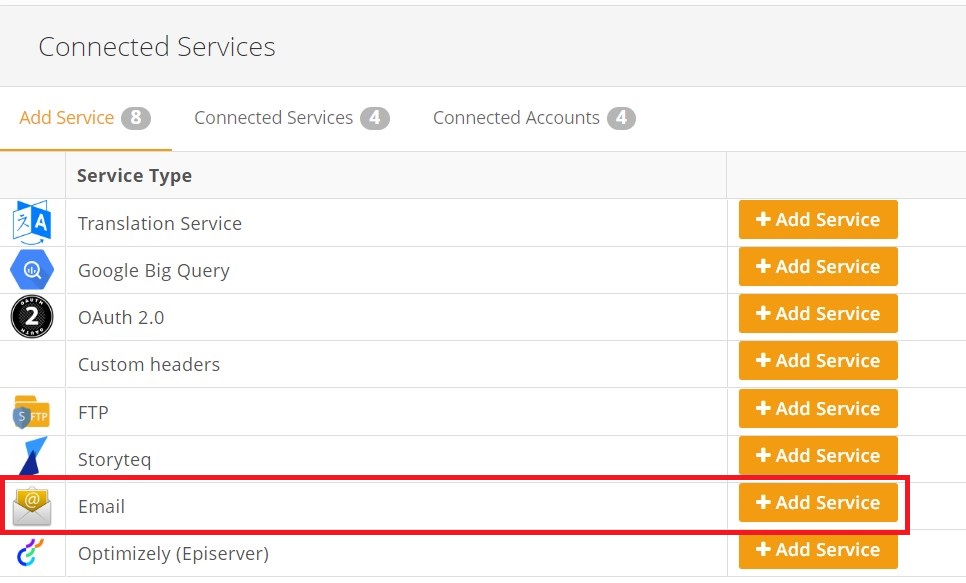
Go to Sidebar → Configuration → Connected Services and click "Add Service" next to the "Email" connected service type.
Step 1
The first step of the Email Connected Service configuration is the configuration of the connected account. In case the email connected service and account have been configured before, it will be available for selection in the "Account" drop-down.
Leave the default selection "Create New" in the "Account" select box to create a new account and fill in the following required fields:
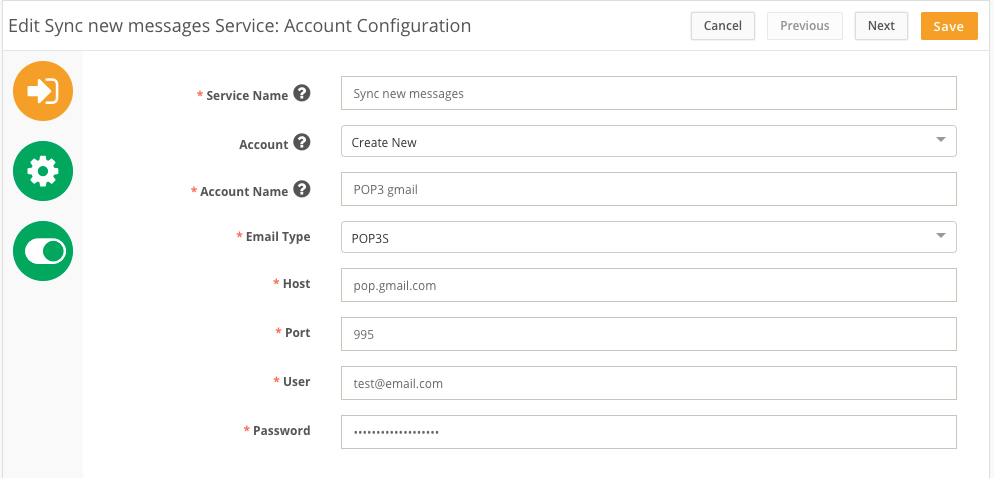
Service Name | Descriptive name of the connected service. The name will be displayed in the configuration of the "Sync with Connected Service" action. |
Account Name | Descriptive name of the connected account. The name will be displayed in the list of connected accounts on the Connected Accounts tab. |
Email Type | Currently, the following 4 types are supported:
POP3S and IMAPS are used to support secure protocols for synchronisation. When selecting POP3 or IMAP type, note the difference in the way messages are synced. * There may be limitations related to the non-secure IMAP protocol. Even though we list this protocol as supported, it has not been tested due to internal technical limitations. |
HOST | Email server host |
PORT | IMAP/POP3 port |
User | Email account email address |
Password | Password for the email account |
Step 2
On step 2, it is necessary to select a module to be used for syncing messages to and map the Message ID field. All other options are not required, but also useful. Please refer to the table below for more information.
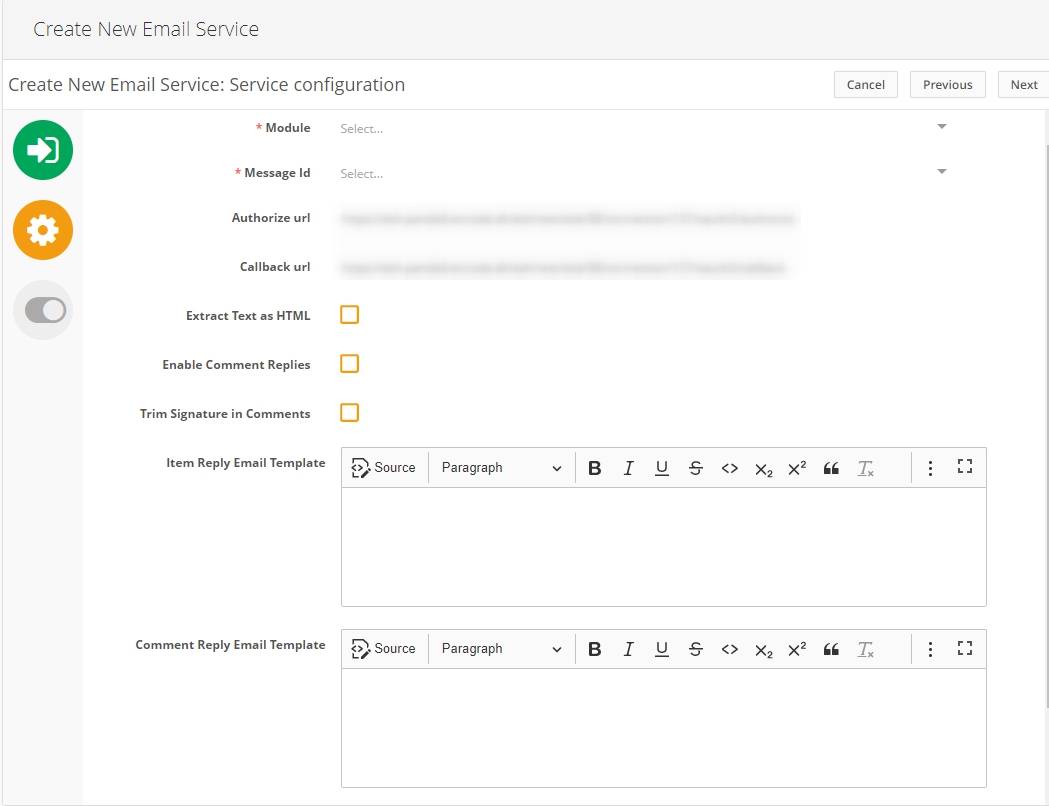
Module* | A module to be used for syncing messages to |
Message ID* | Unique identifier for each synced message |
Extract Text as HTML | Option to be respected in parsing the mail body. Disabled by default
|
Enable Comment Replies | An option that defines whether comments and replies will be a part of synchronisation. Disabled by default
|
Trim Signature in Comments | An option that defines if the signature will be visible in comments when created via email. Disabled by default |
Item Reply Email Template | Template to be used in the messages to be sent on Item(s) Creation *Required only when Enable Comment Replies is enabled |
Comment Reply Email Template | Template to be used in the messages to be sent on Comment(s) Creation *Required only when Enable Comment Replies is enabled |
Step 3
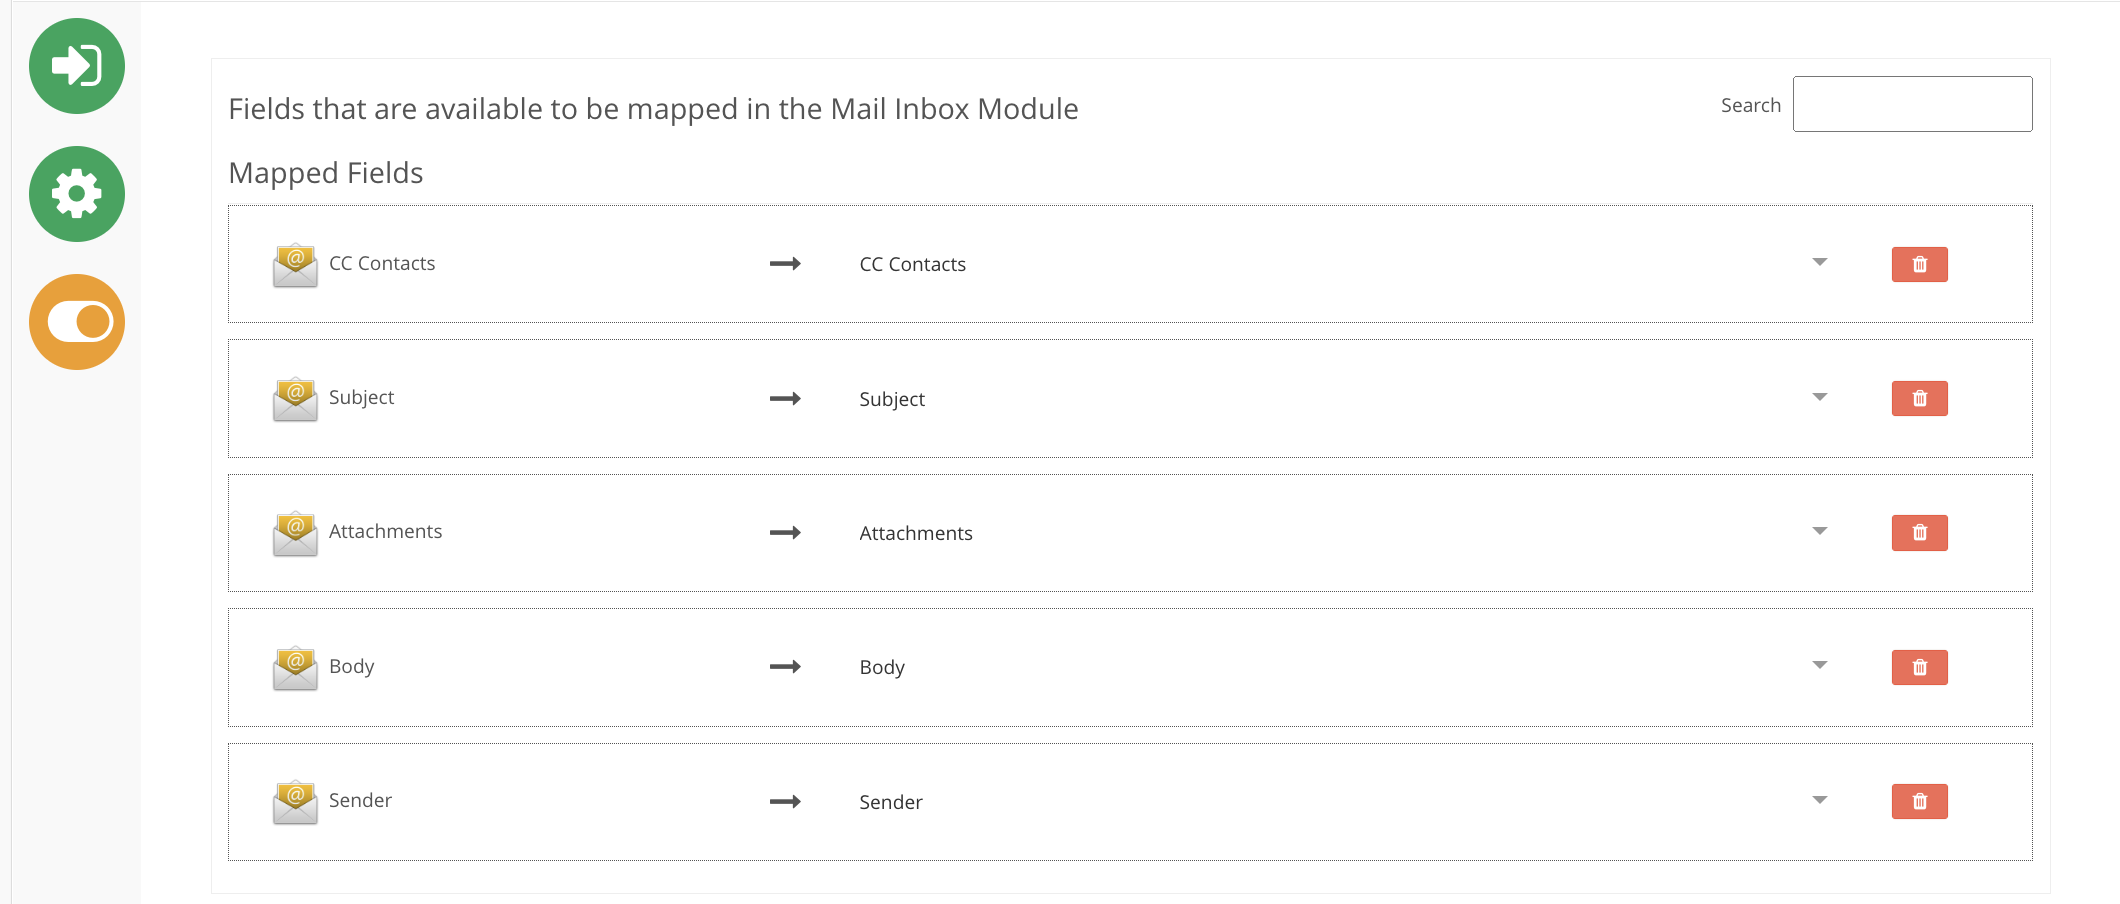
On step 3, map the fields from the selected module to the email attributes.
Please note the following while doing mapping:
There are no required fields, but at least 1 field must be mapped; otherwise, validation will be triggered, preventing the saving of a connected service
"Attachment" attribute should be mapped to the multiple file field type, as single file fields are currently not supported for syncing attachments.
After completing mapping and clicking "Save" the connected account will be validated and a connected service created.
After creation, the corresponding connected account will appear in the list of existing connected accounts and all standard CRUD(Create, Read, Update, Delete) operations for the connected service will be available.
Action Configuration
The final step in the configuration of Email service integration is the creation of actions. To create an action, follow the steps described below:
Go to the configuration of the module mapped in the Email connected service, click the "Actions" menu.
Click "Create Action" on the Actions toolbar.
In the new action configuration window, enter a name for the action.
Select "Scheduled" in the "Event" select box.
Select "Sync with Connected Service" in the "Action" select box.
Select the configured email connected service in the "Connected Service" select box.
In the "Type of Schedule" section, configure the interval for synchronisation.
Save the action.
.png)
Synchronization
With the interval specified in action properties, the inbox will be scanned for the incoming messages and corresponding items or comments (if enabled in Proofing settings and Email Connector settings) will be created in the mapped module.
MessageID field stores a unique identifier for each synced message to prevent duplicate synchronisation. This means that when configuring the connected service and mapping modules, the "1 module = 1 account" rule should be followed.
Message sync depending on the selected type
POP3/POP3S - all messages in the inbox will be synchronised with items, and the "delete" flag will be sent after syncing with Encodify.
Note!
Some mail services allows to specify starting from which point in time email messages should be synced and how they should be treated after having been synced.
Example of GMAIL POP3 settings:
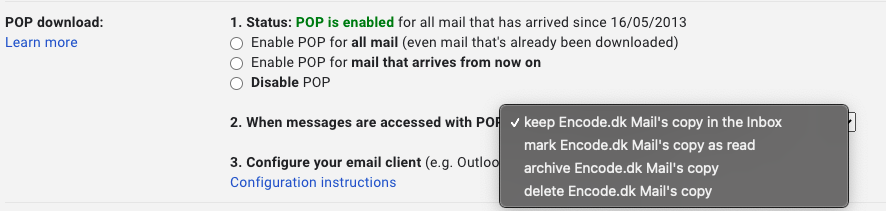
IMAP - only unread messages will be synced, and the "Seen" flag will be sent after synchronisation.
OAuth 2.0 Mechanism for Gmail and Outlook IMAP
Available in version 14.0.0
Google has announced via Less secure apps & your Google Account - Google Account Help that starting May 30, 2022, they will no longer support third-party apps or devices which ask you to sign into your Google Account using only your username and password. Starting from version 14.0.0, Encodify will follow the recommended way to access mail from 3rd party providers OAuth 2.0 Mechanism | Gmail | Google Developers .
In order to configure email connected service using the OAuth 2.0 mechanism, there are a few additional steps that are required to generate OAuth2 Client ID and OAuth2 Client Secret keys in the Developer Console.
Below are the steps to generate keys in both Google Developer Console (Gmail) and in Azure Developer Console (Outlook).
Note: Follow Option 1 for Gmail and Option 2 for Outlook configuration.
Option 1: Gmail Configuration in Google Developer Console
Step 1
Open Google Developer Console and log in with an existing Gmail account that will be used for the connected service configuration later on.
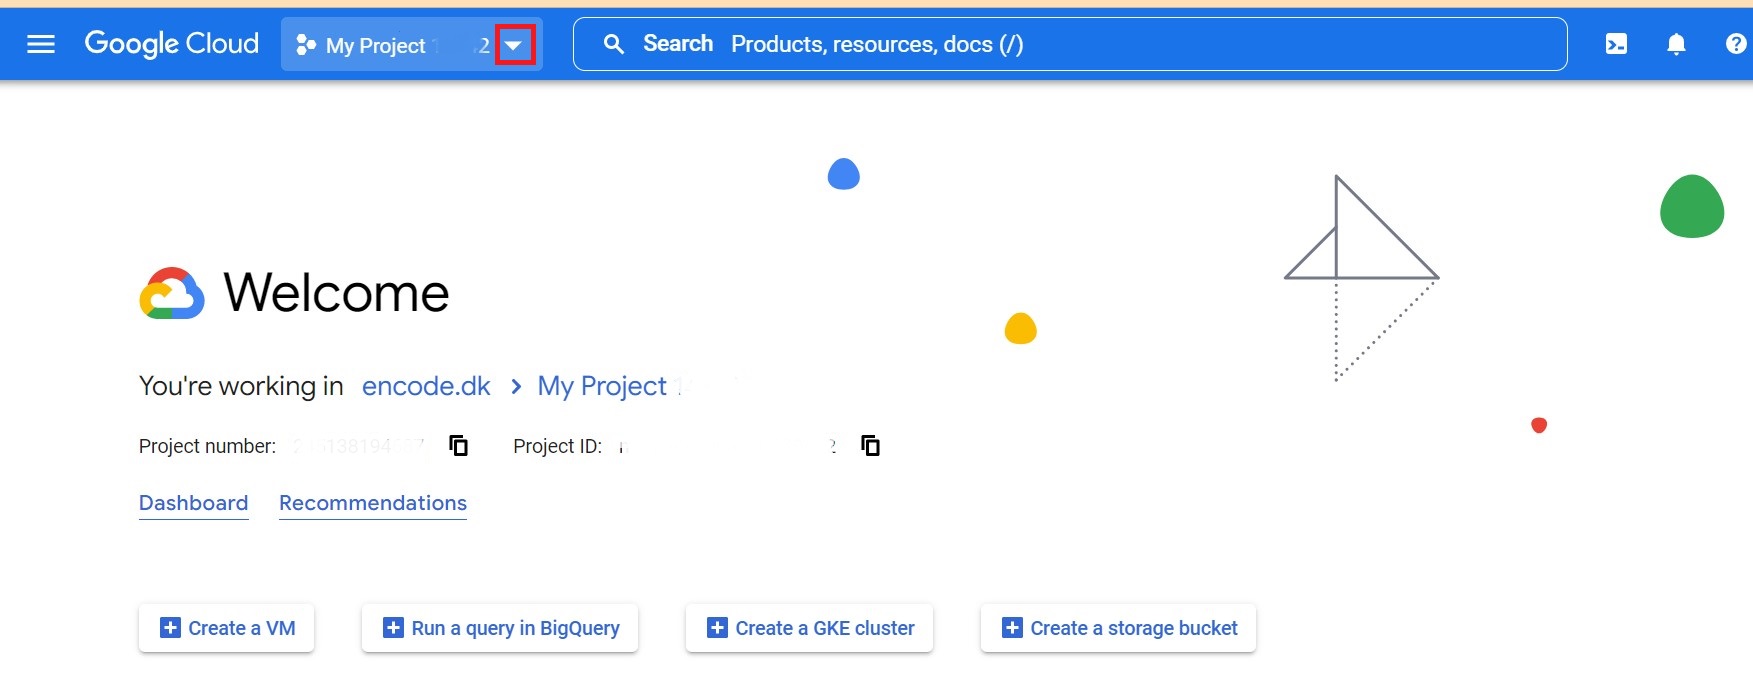
Step 2
Create a new project or open an existing project from the 'My Projects' dropdown:
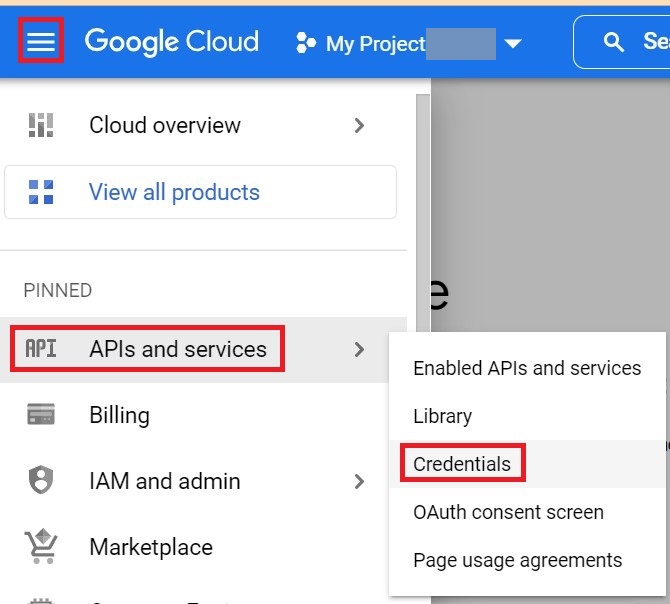
Step 3
Navigate to Menu > Open API's and Services > Credentials
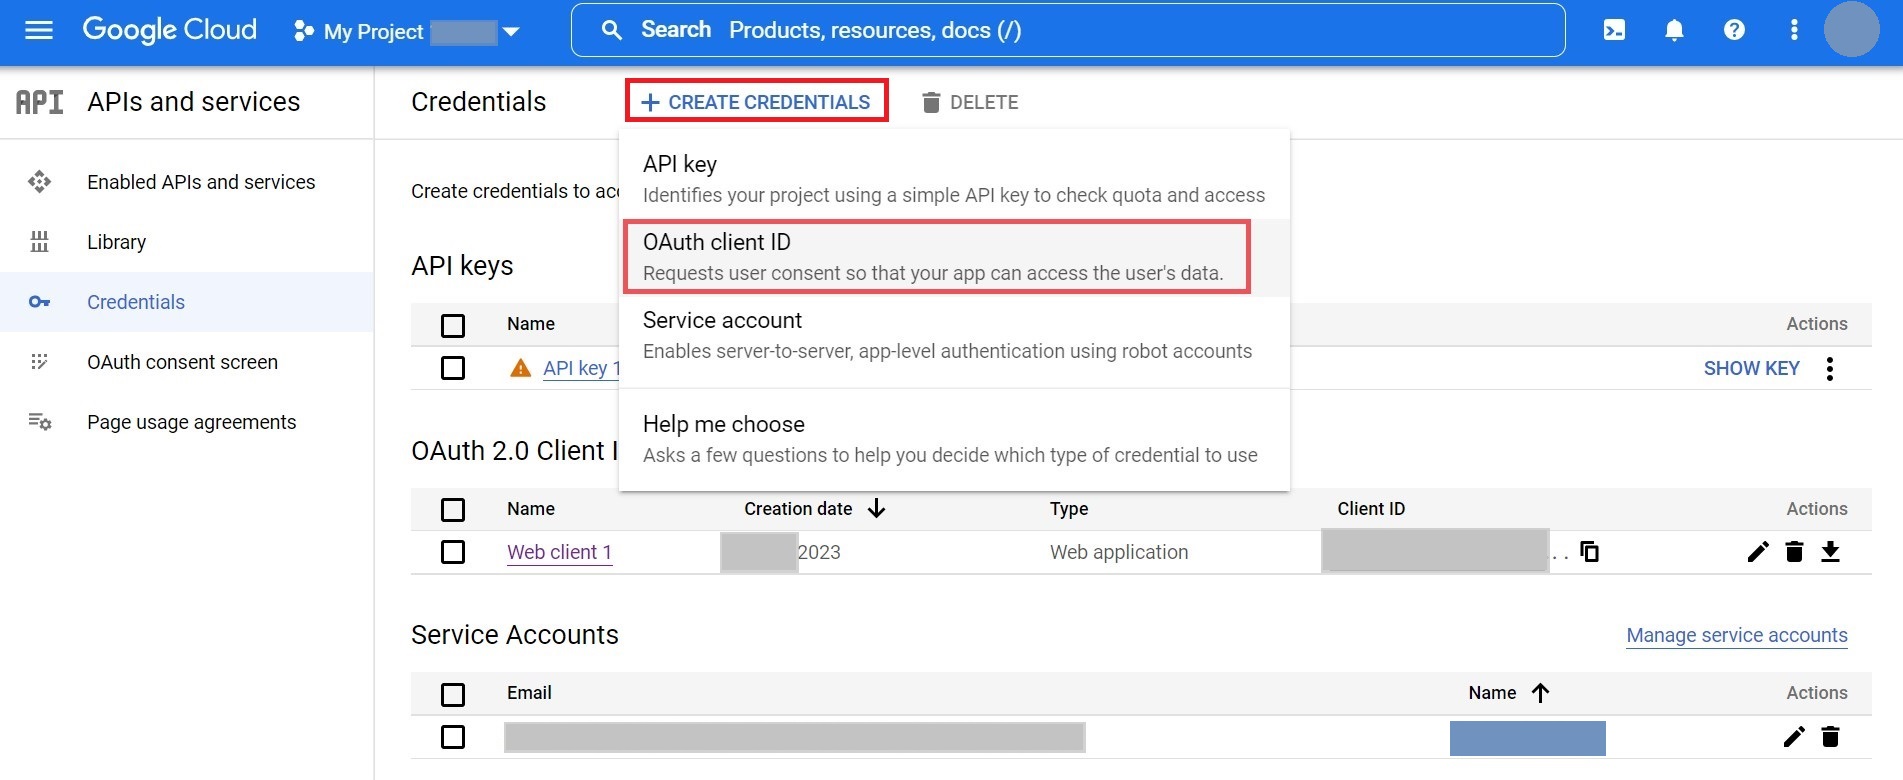
Step 4
Click '+CREATE CREDENTIALS' and select 'OAuth client ID'
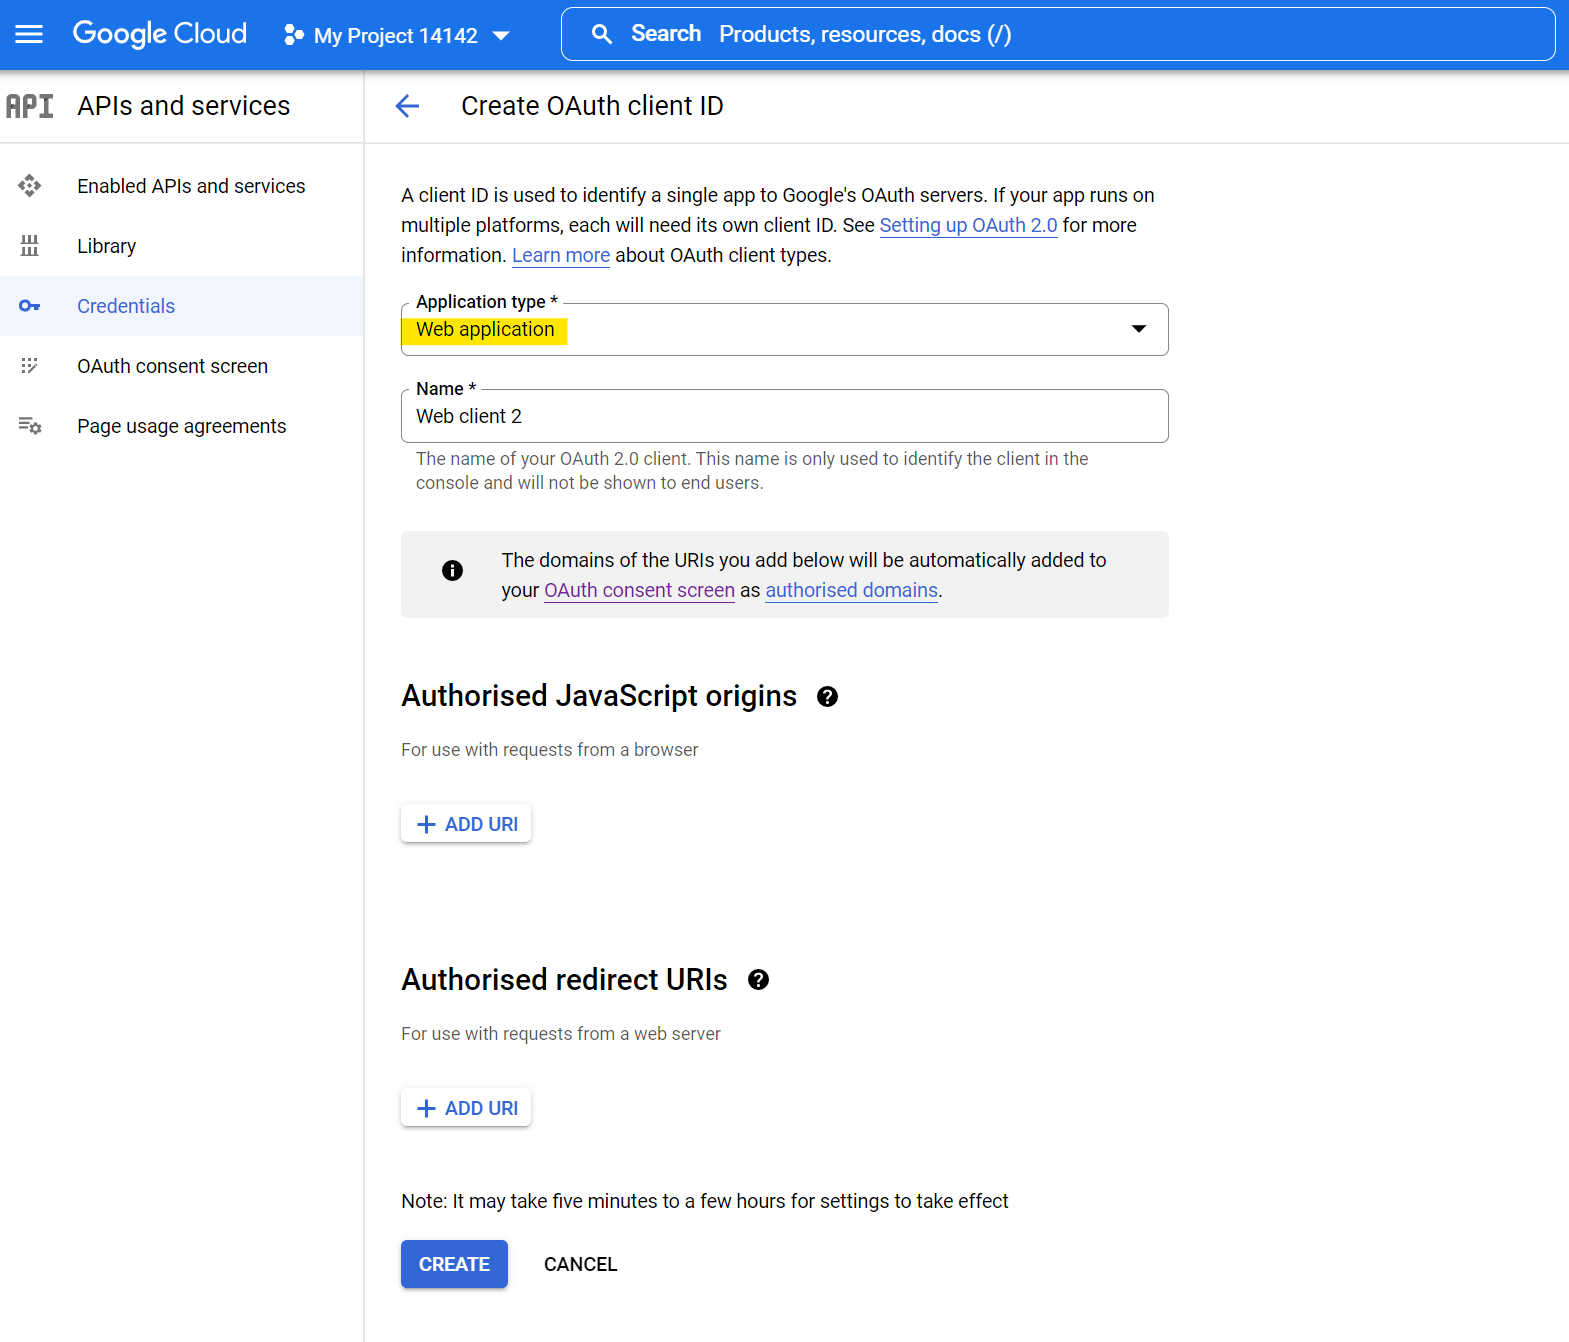
Step 5
Select Application type: Web Application
Change the Name for the app (optional)
Click 'CREATE' button
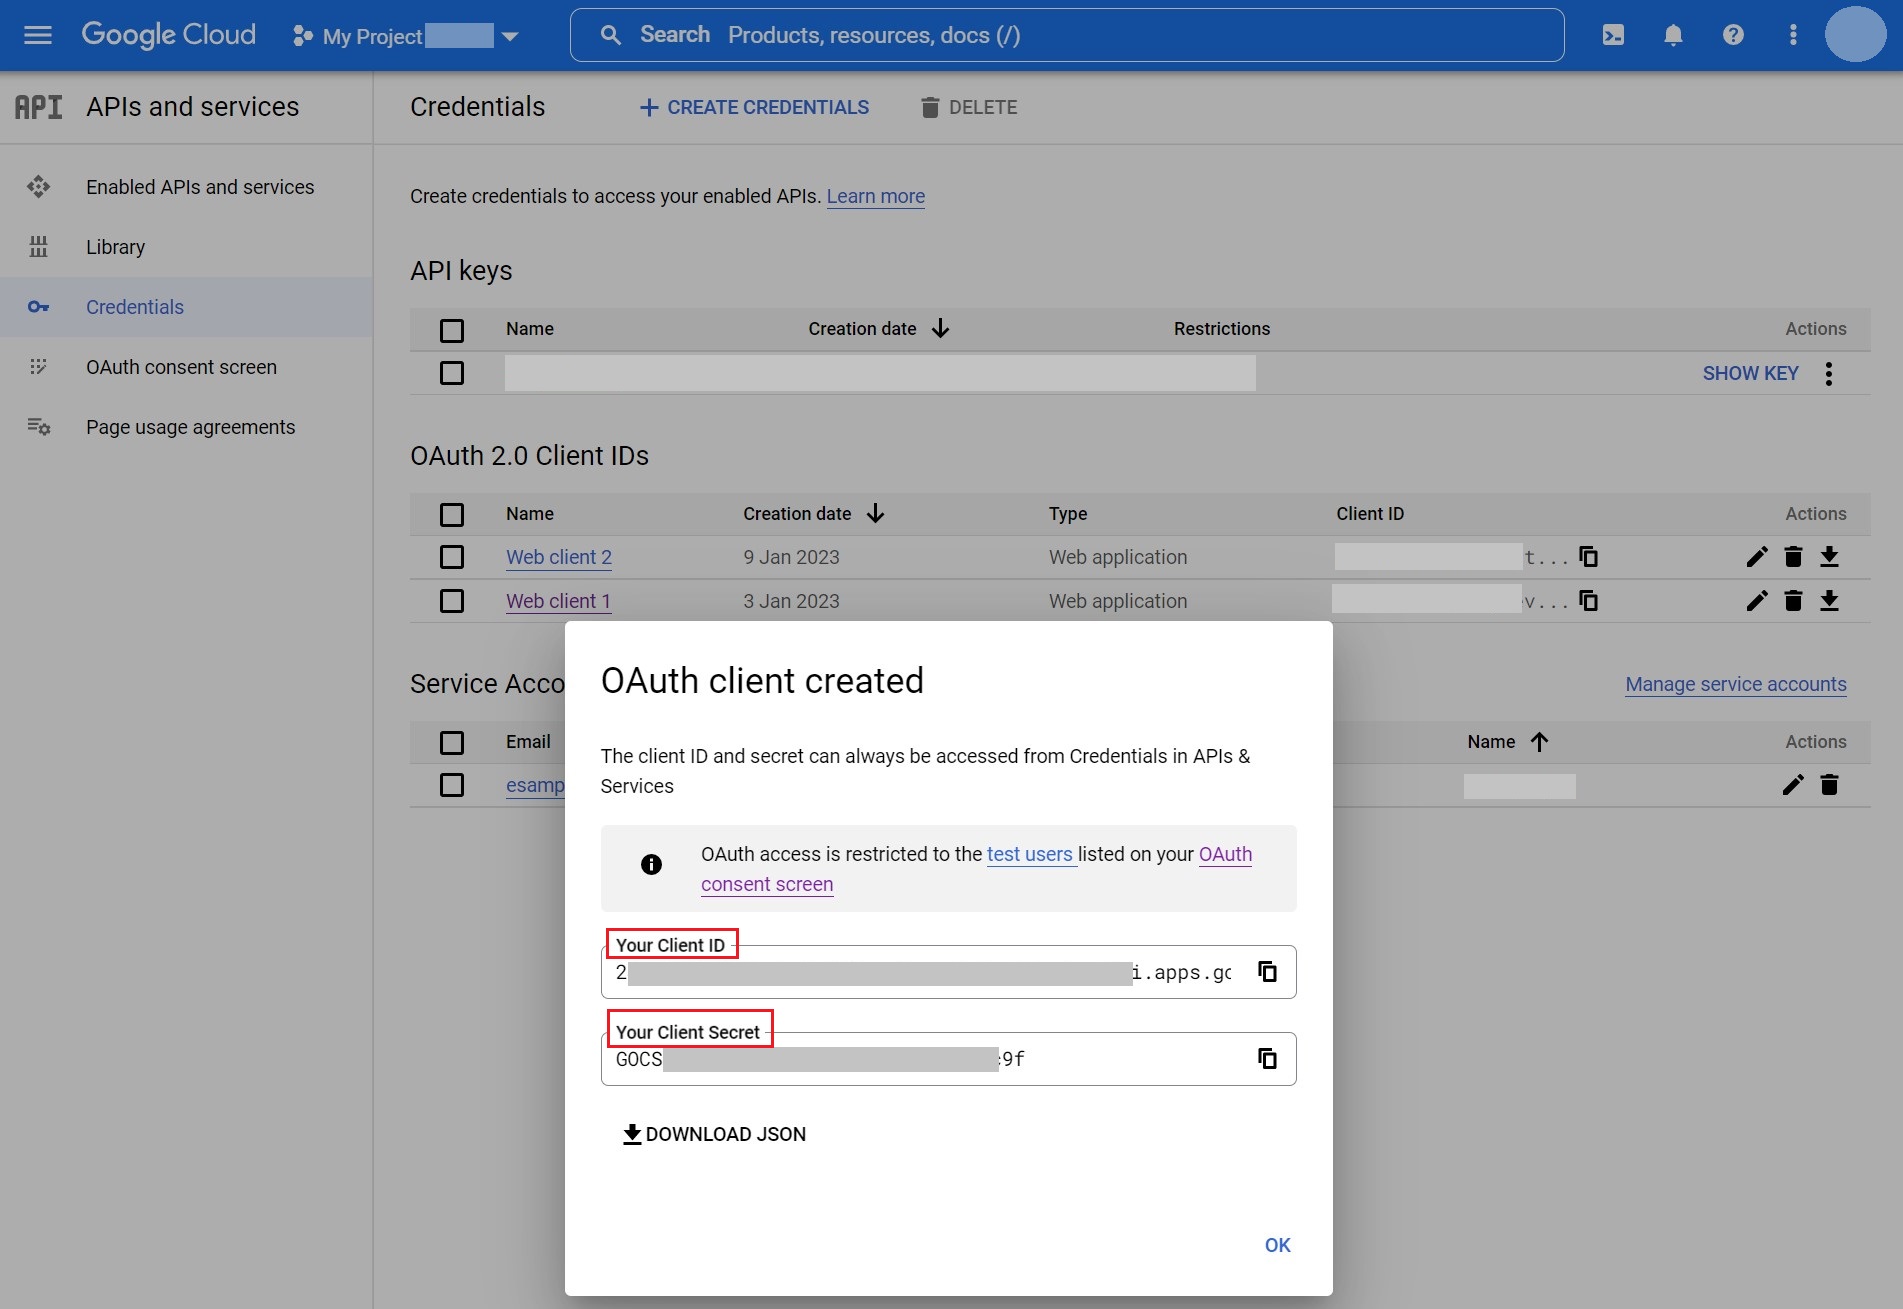
Step 6
The Client ID and Client Secret have now been generated and can be downloaded in JSON format for later use.
The next step is to configure the Web App Connected Service using OAuth 2.0 mechanism. ( Skip the configuration below for Outlook in case of configuring a connected service for Gmail ).
Option 2: Outlook Configuration in Azure Developer Console
Step 1
Open Azure Developer Console and log in with an existing Outlook account that will be used for the connected service configuration later on.
( In case of configuring Gmail, follow the steps in Option 1 above )
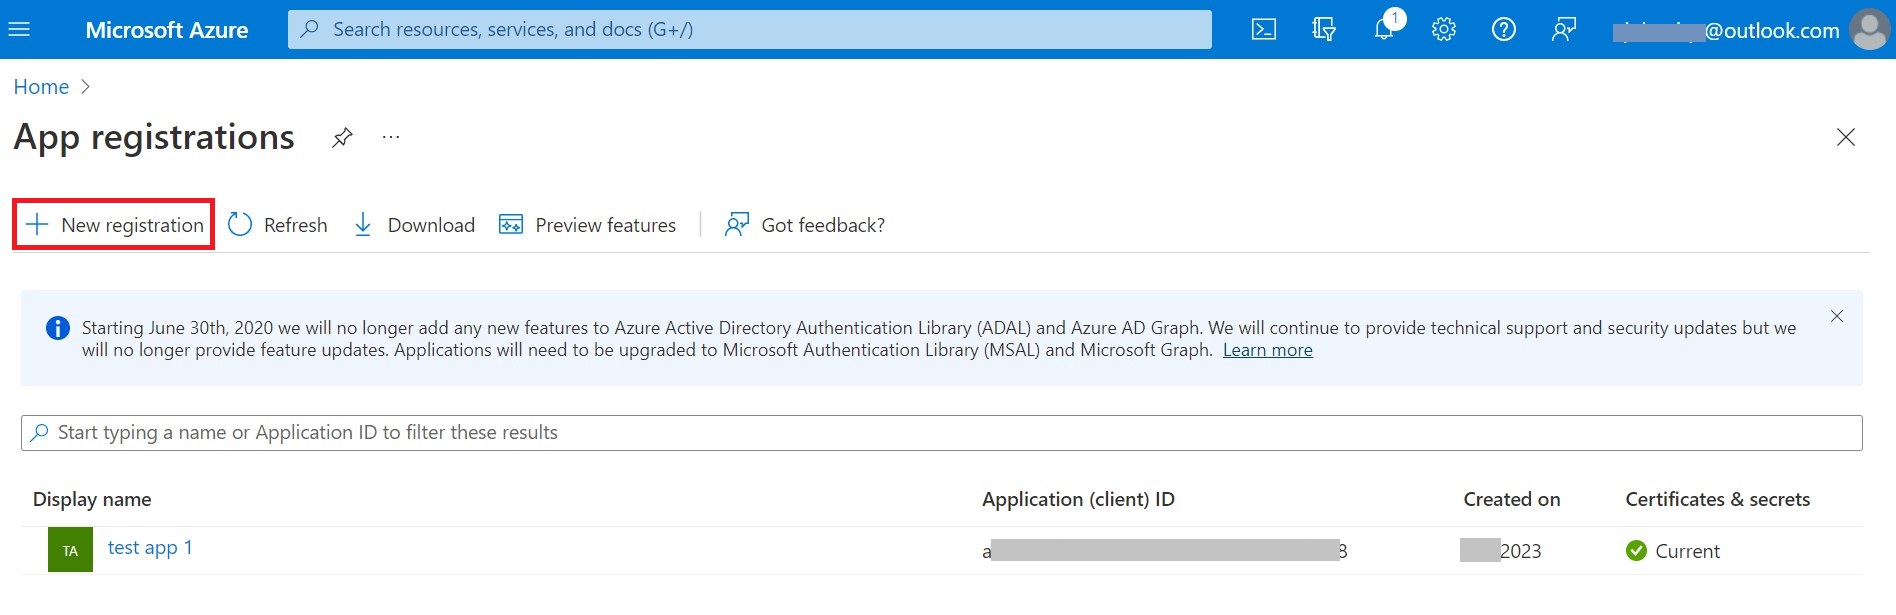
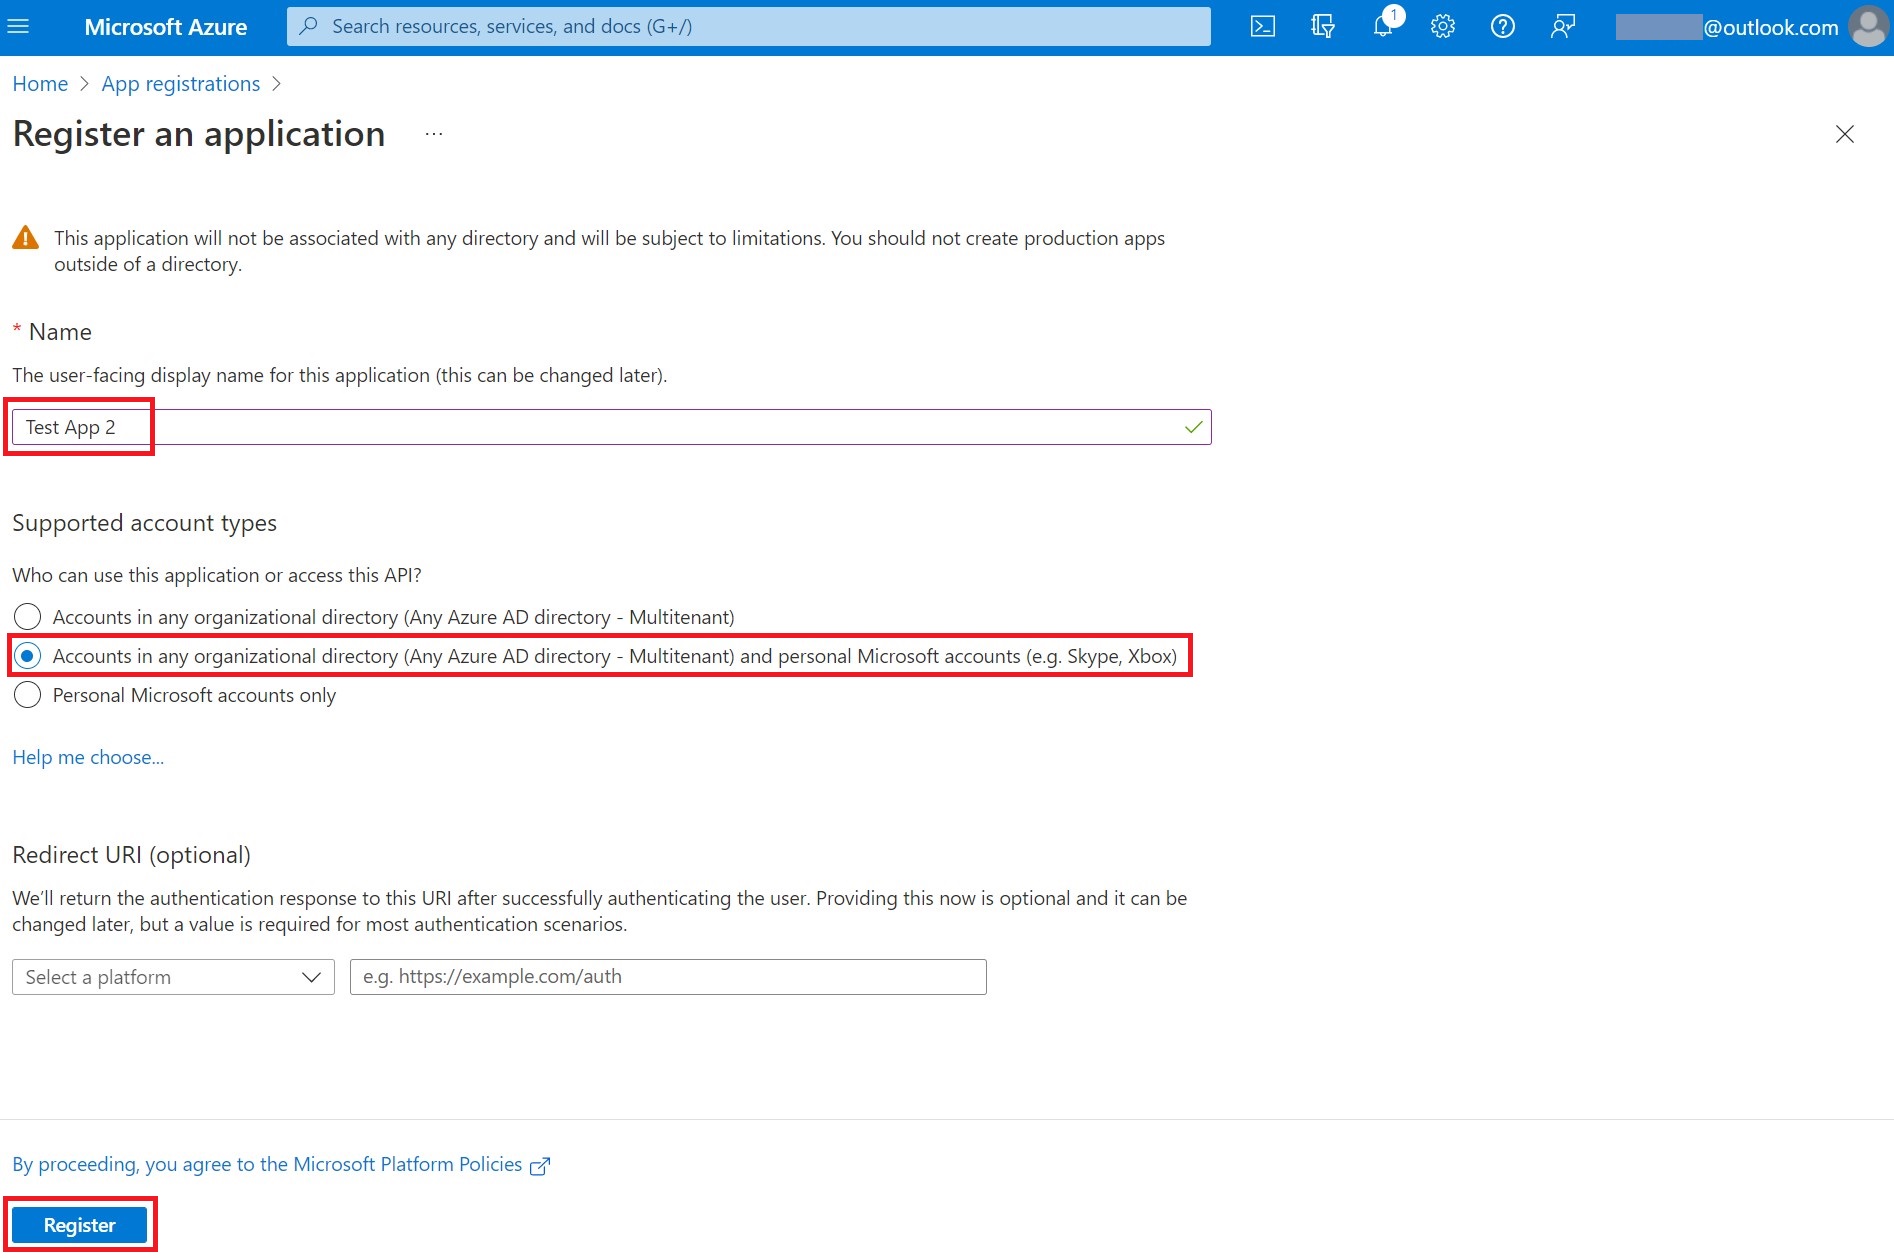
Step 2
Name the App
Selected 2nd Supported Account Type: "Accounts in any organisational directory (Any Azure AD directory - Multitenant) and personal Microsoft accounts (e.g. Skype, Xbox)"
Click 'Register'
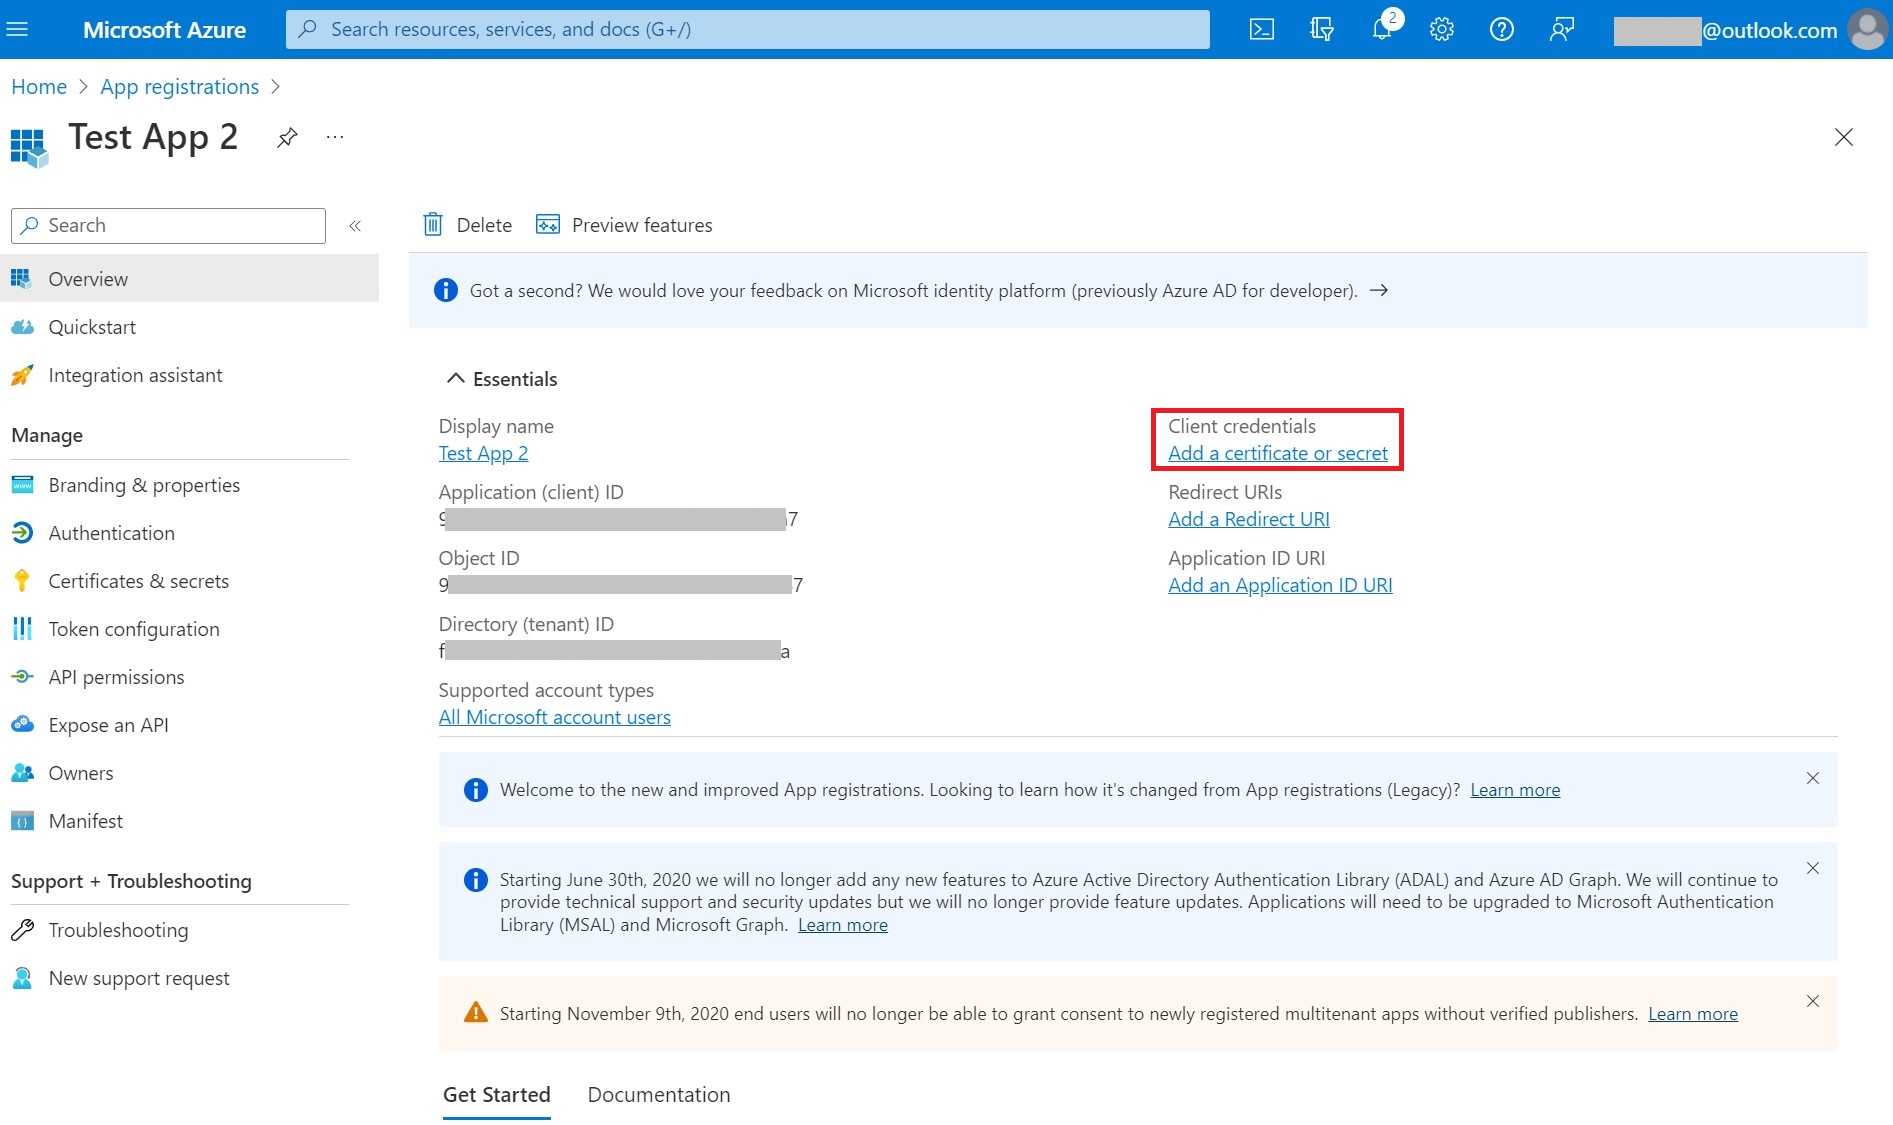
Step 3
Click Client Credentials > 'Add a certificate or secret' From the App page.
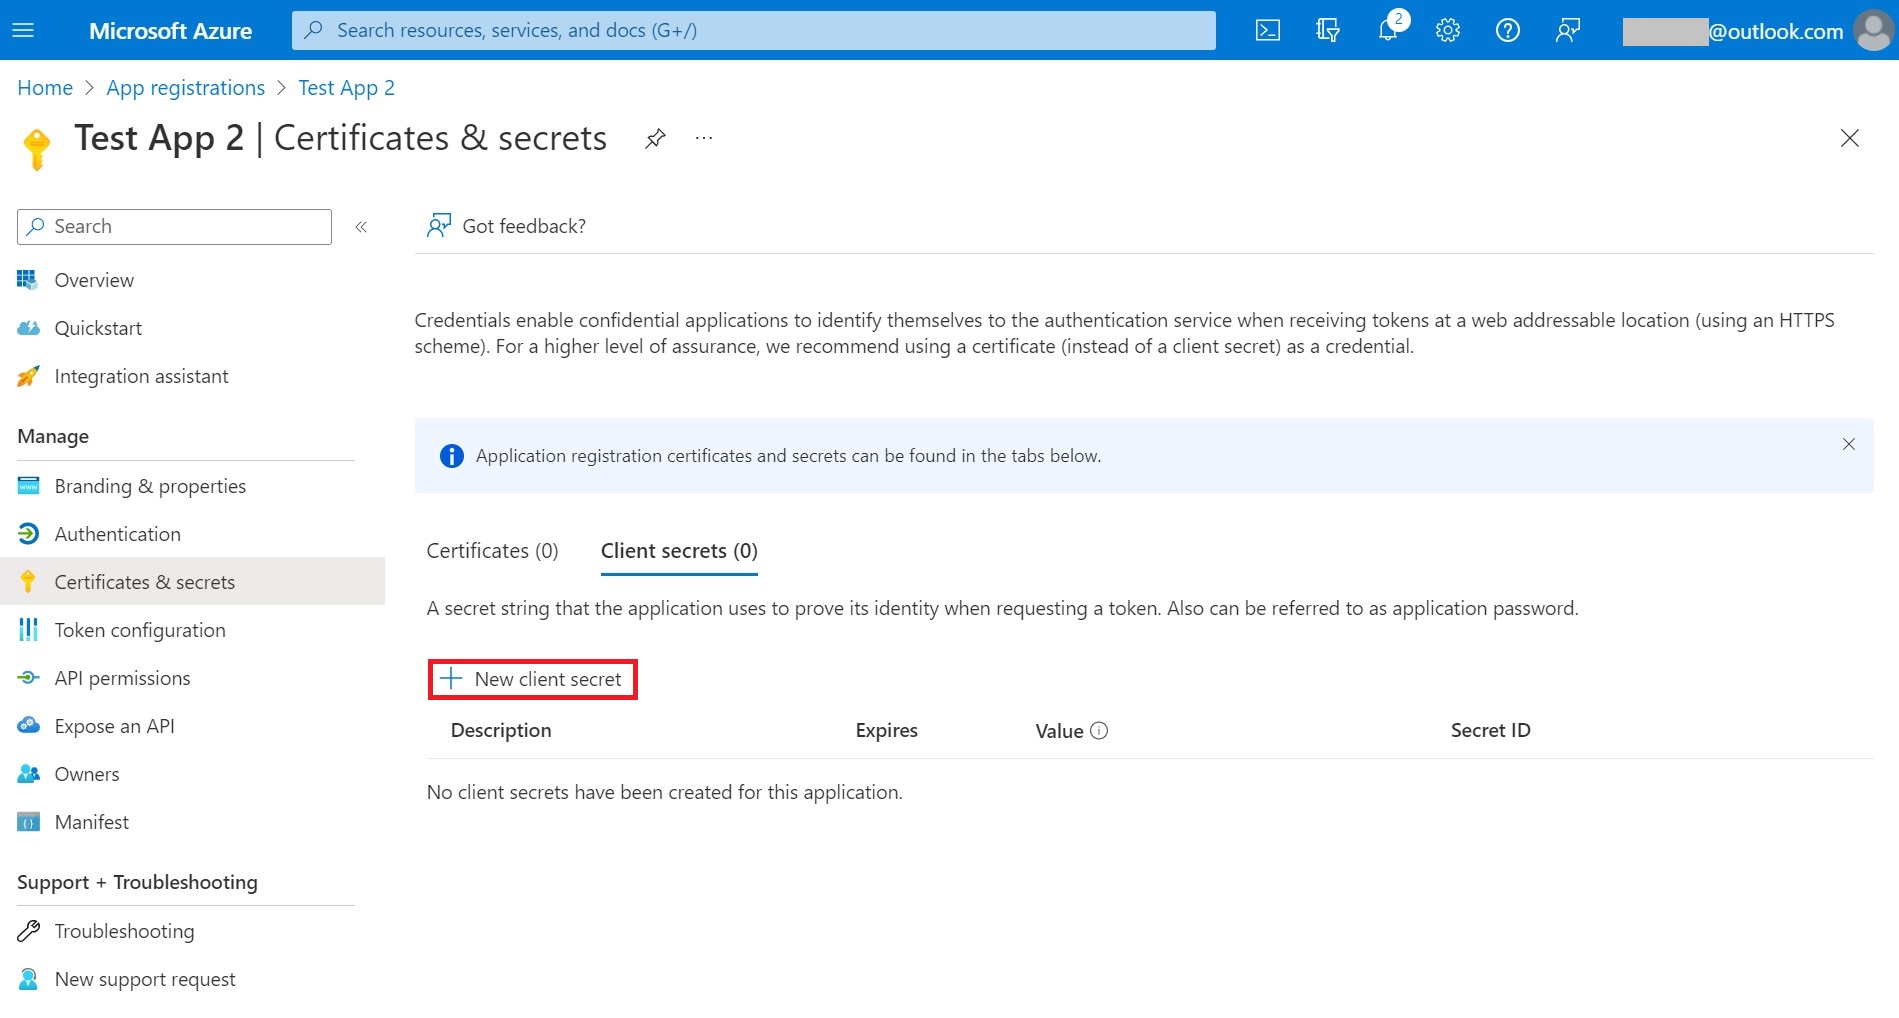
Step 4
Click '+ New client secret' from the Certificates & Secrets page.
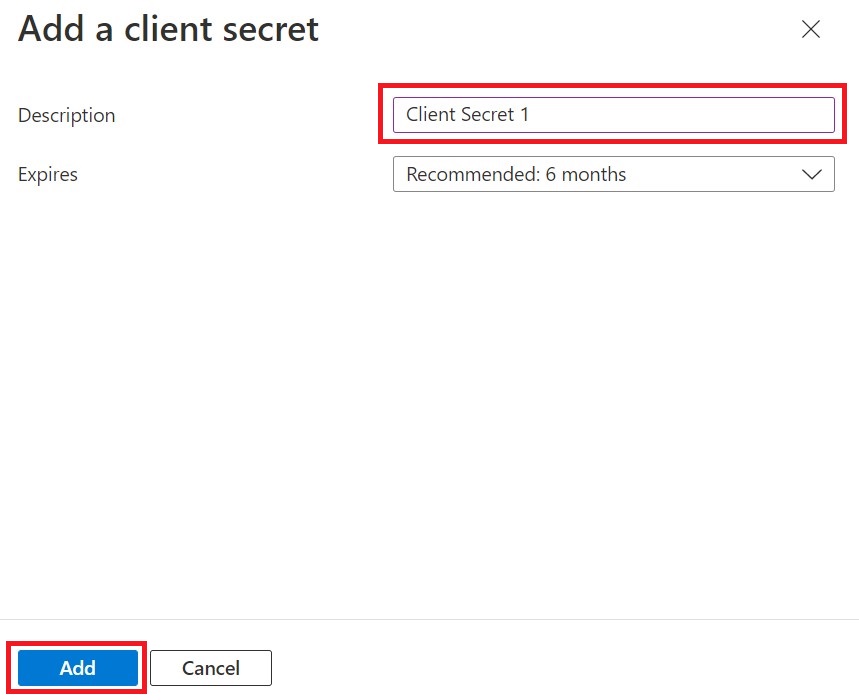
Step 5
From the pop-up window:
Add 'description' ( e.g. 'Client Secret')
Click the 'Add' button
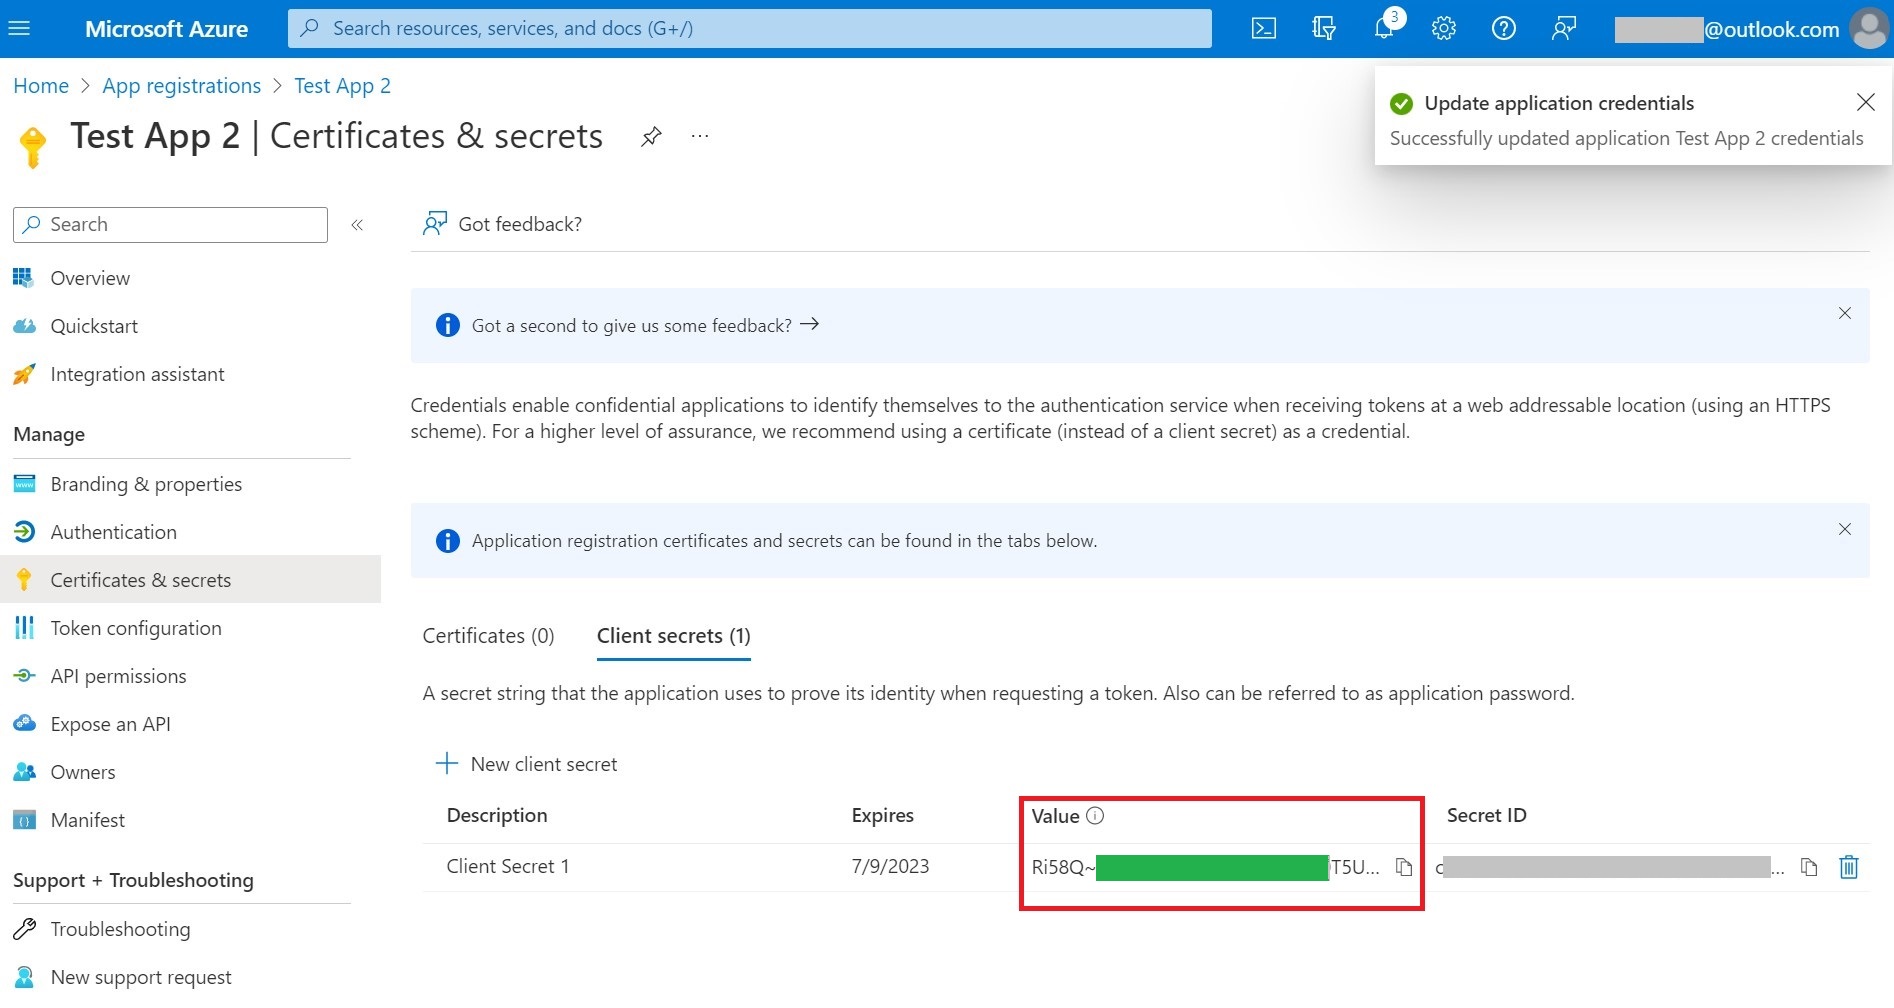
Step 6
The Client Secret has now been generated and should be copied from the Value field ( not Secret ID) for later use.
Note: This value will only be displayed once and will be hidden next time the page is loaded. In the case the value was not copied, the client secret can be deleted, and a new one should be created.
Step 7
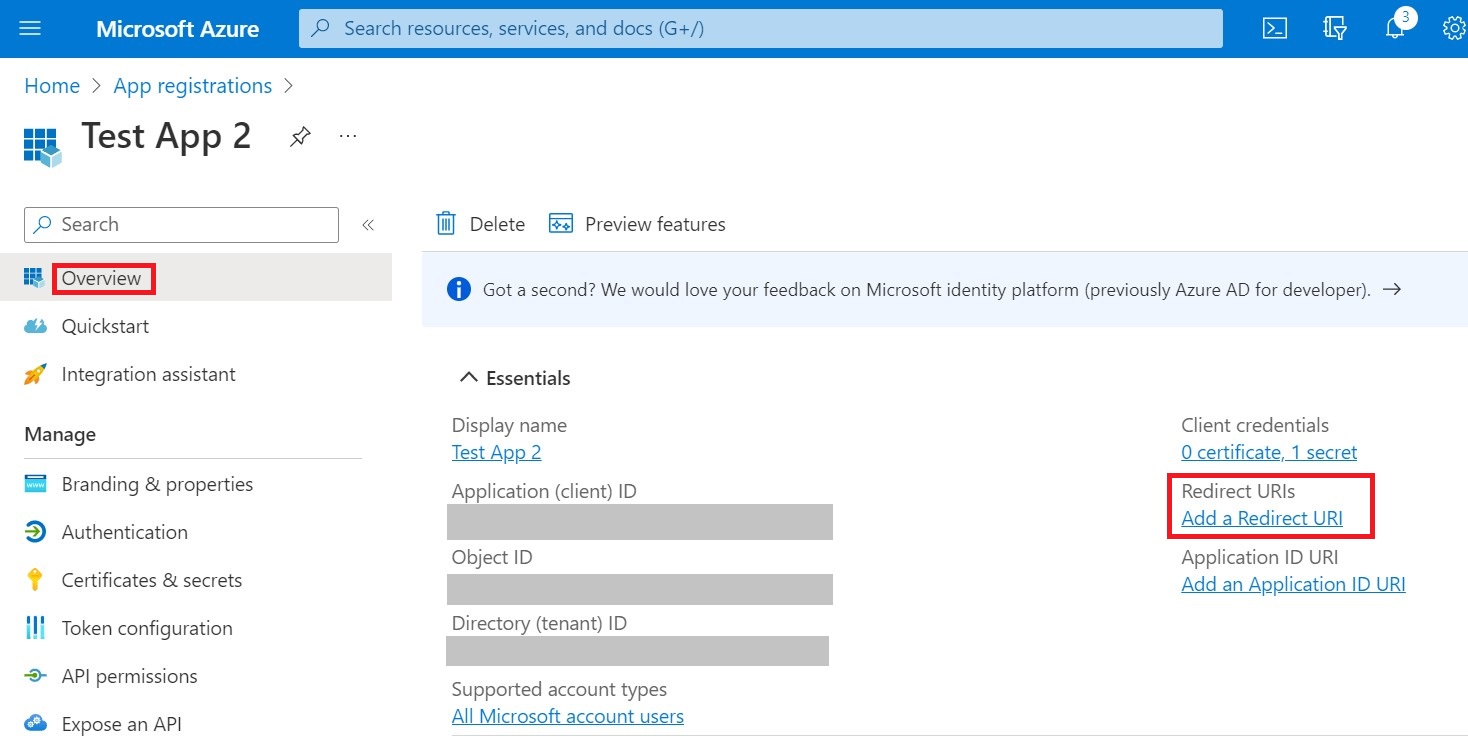
The Client ID can be found from the Overview page:
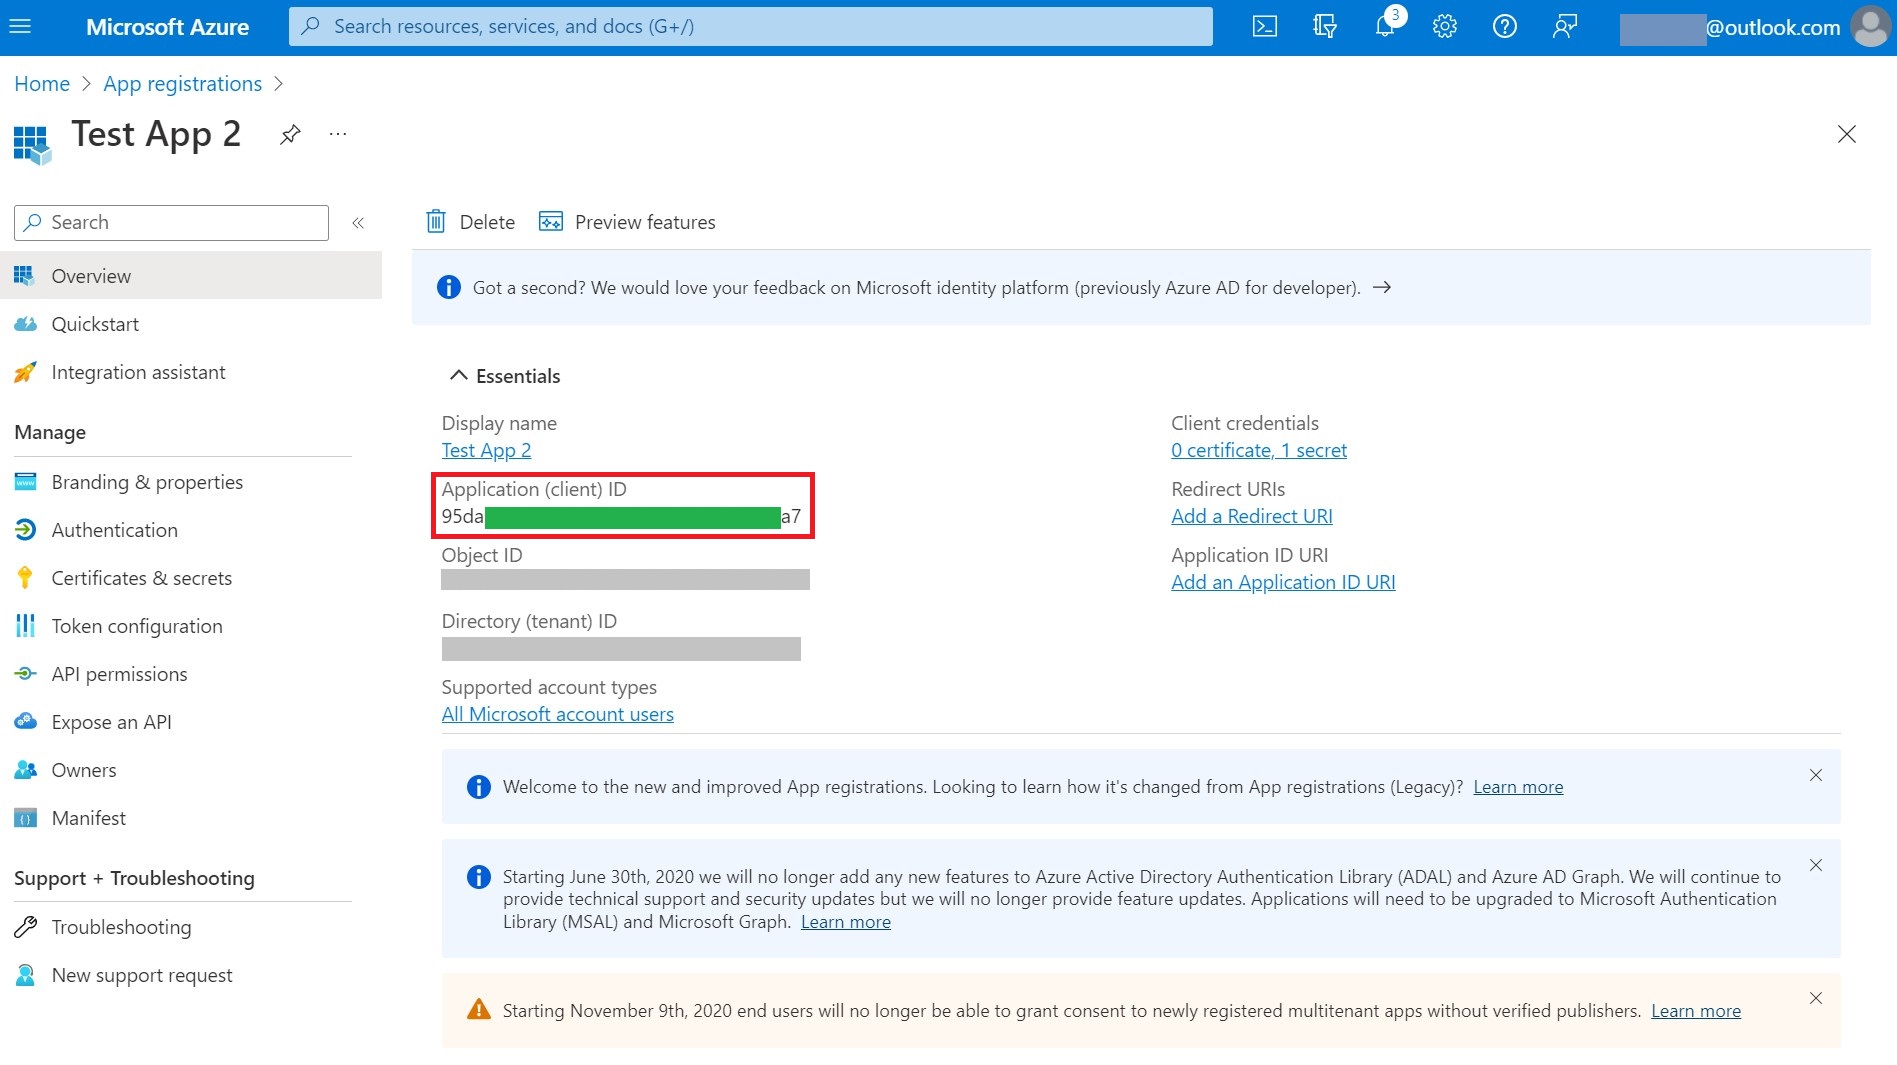
The next step is to configure the Web App Connected Service using OAuth 2.0 mechanism.
Create and Configure Connected Service using Oauth 2.0 Mechanism
Go to Site Configuration > Connections > Connected Services and click "+ Add Service" next to the "Email" connected service type.
Step 1
The first step of the Email connected service configuration using OAuth 2.0, is the configuration of the connected account. In case the email connected service and account have been configured before, it will be available for selection in the "Account" drop-down.
Leave the default selection "Create New" in the "Account" select box to create a new account, fill in the following required fields and click 'Next'.
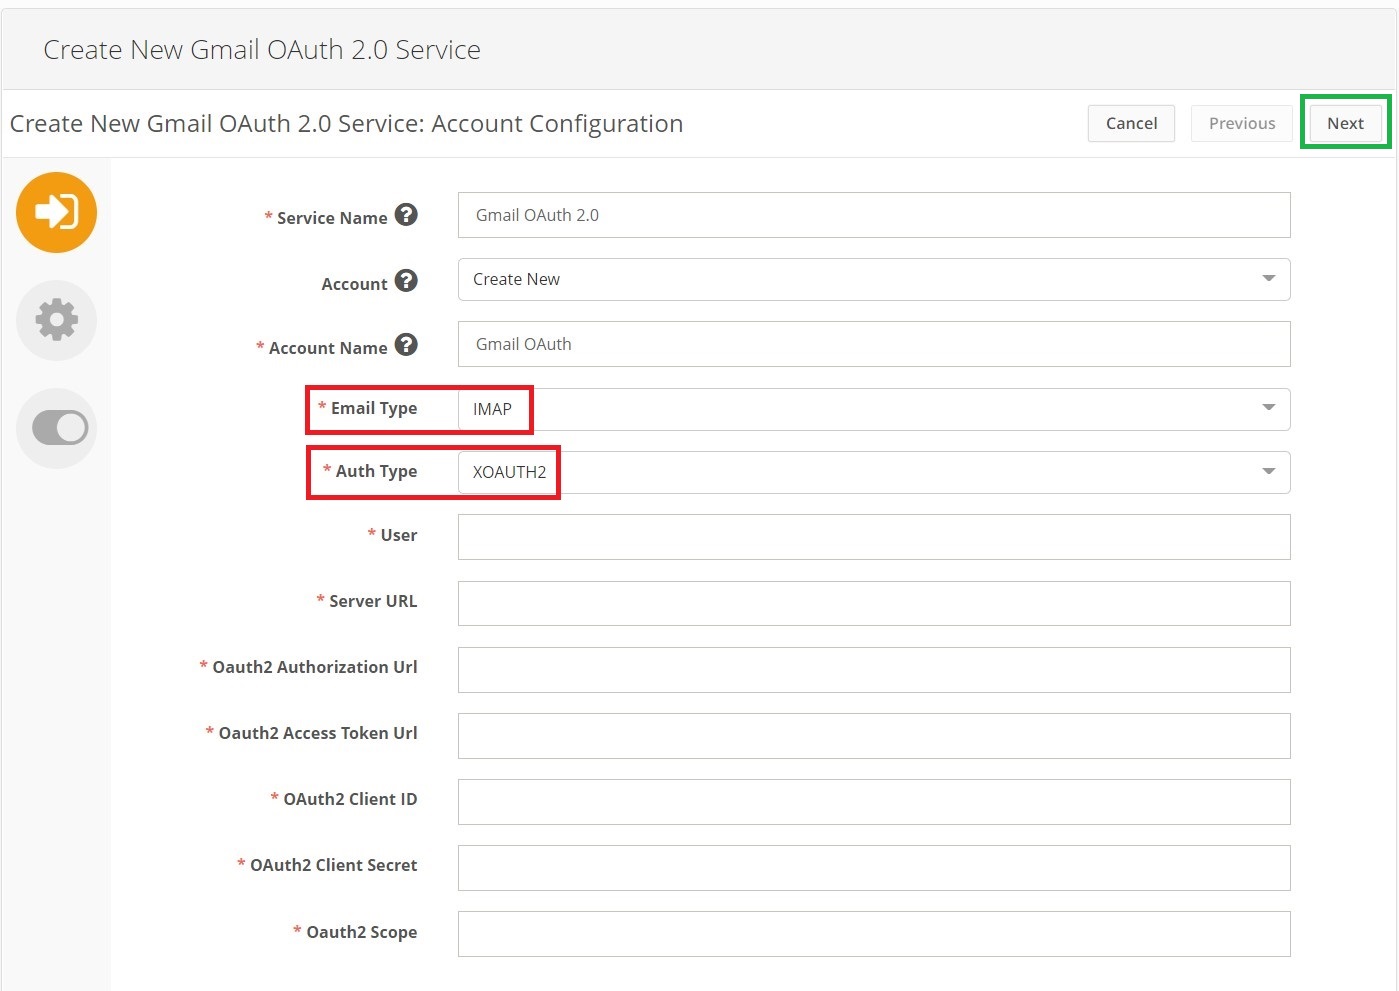
Note the differences for Gmail and Outlook configuration:
Property Name | Google Gmail | MS Outlook |
Email Type | IMAP | IMAP |
Auth Type | XOAUTH2 | XOAUTH2 |
User | e.g. user@gmail.com (account linked with Google Developer console) | e.g. user@outlook.com (account linked with Azure Developer console) |
Server URL |
|
|
Oauth2 Authorization Url |
|
|
Oauth2 Access Token Url |
|
|
OAuth2 Client ID | Should be taken from the application created in Google Developer Console (see steps above for Gmail) | Should be taken from the application created in Azure Developer Console (see steps above for Outlook) |
OAuth2 Client Secret | Should be taken from the application created in Google Developer Console (see steps above for Gmail) | Should be taken from the application created in Azure Developer Console (see steps above for Outlook) |
Oauth2 Scope |
|
|
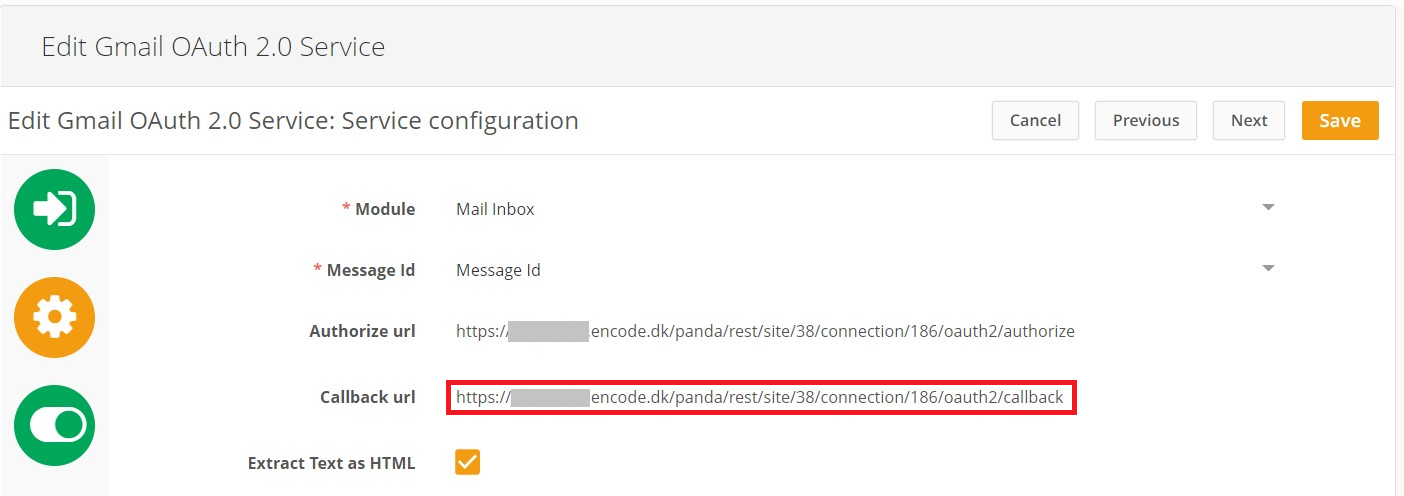
Step 2
Copy the 'Callback URL' from the service configuration page
Navigate to Google or Azure Developer Console
Add the 'Callback URL' to the list of Redirect URL
Copy 'Callback URL'
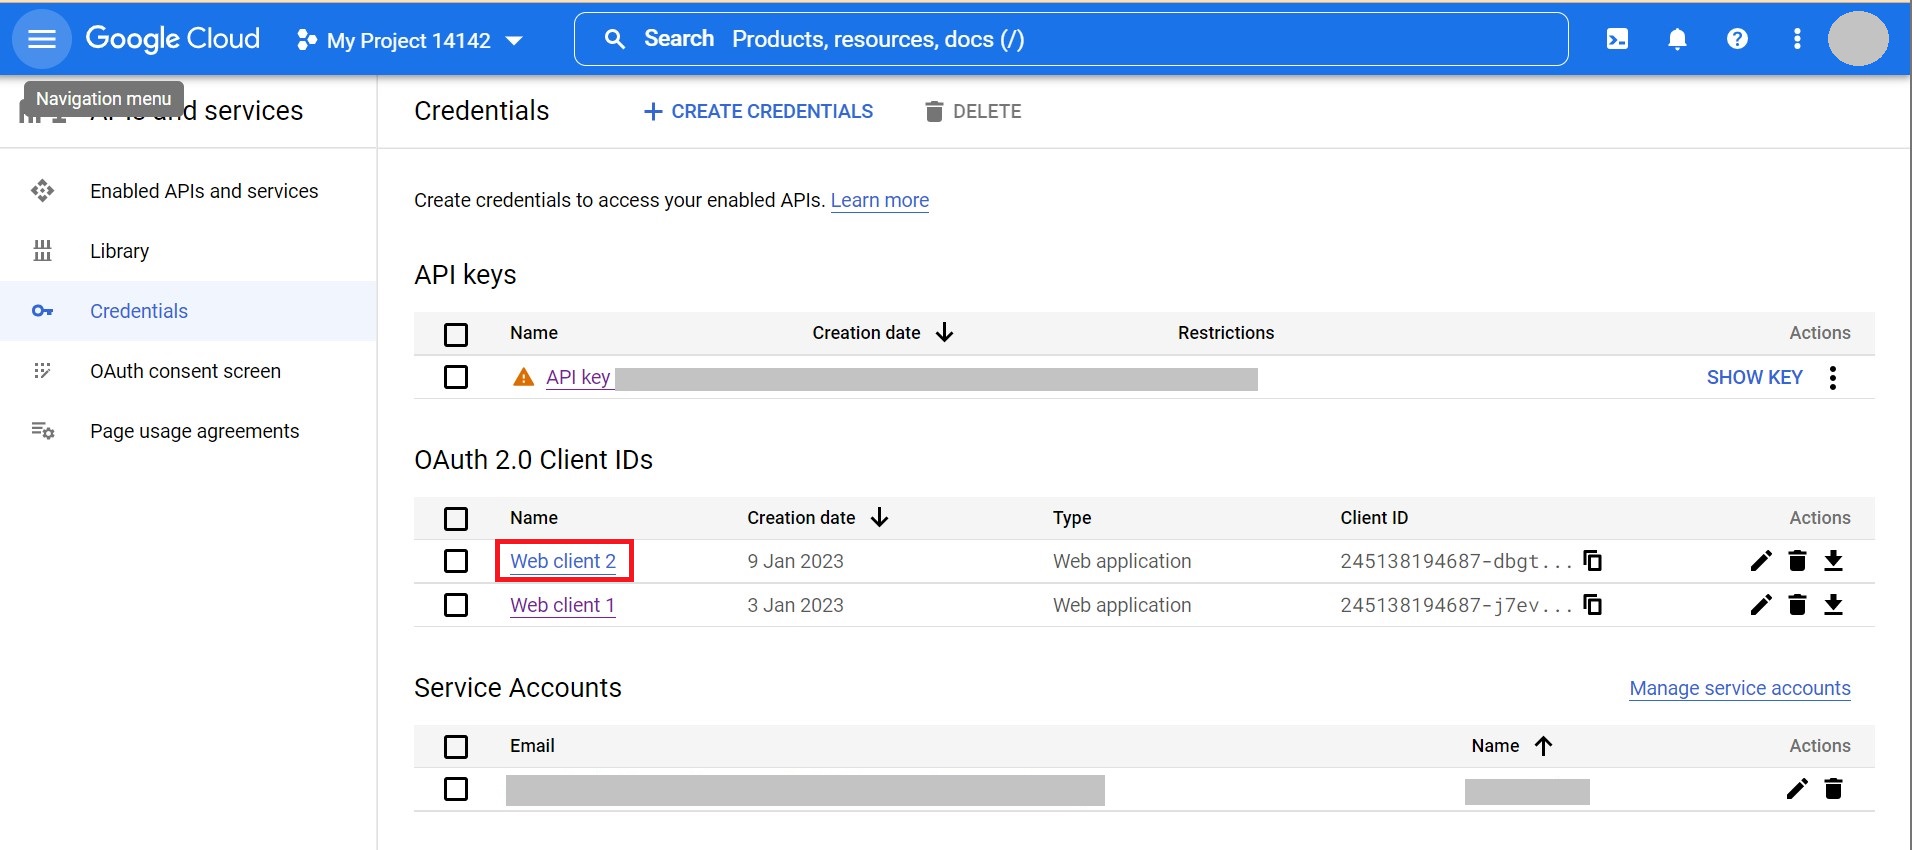
Option 1: In Google Developer Console:
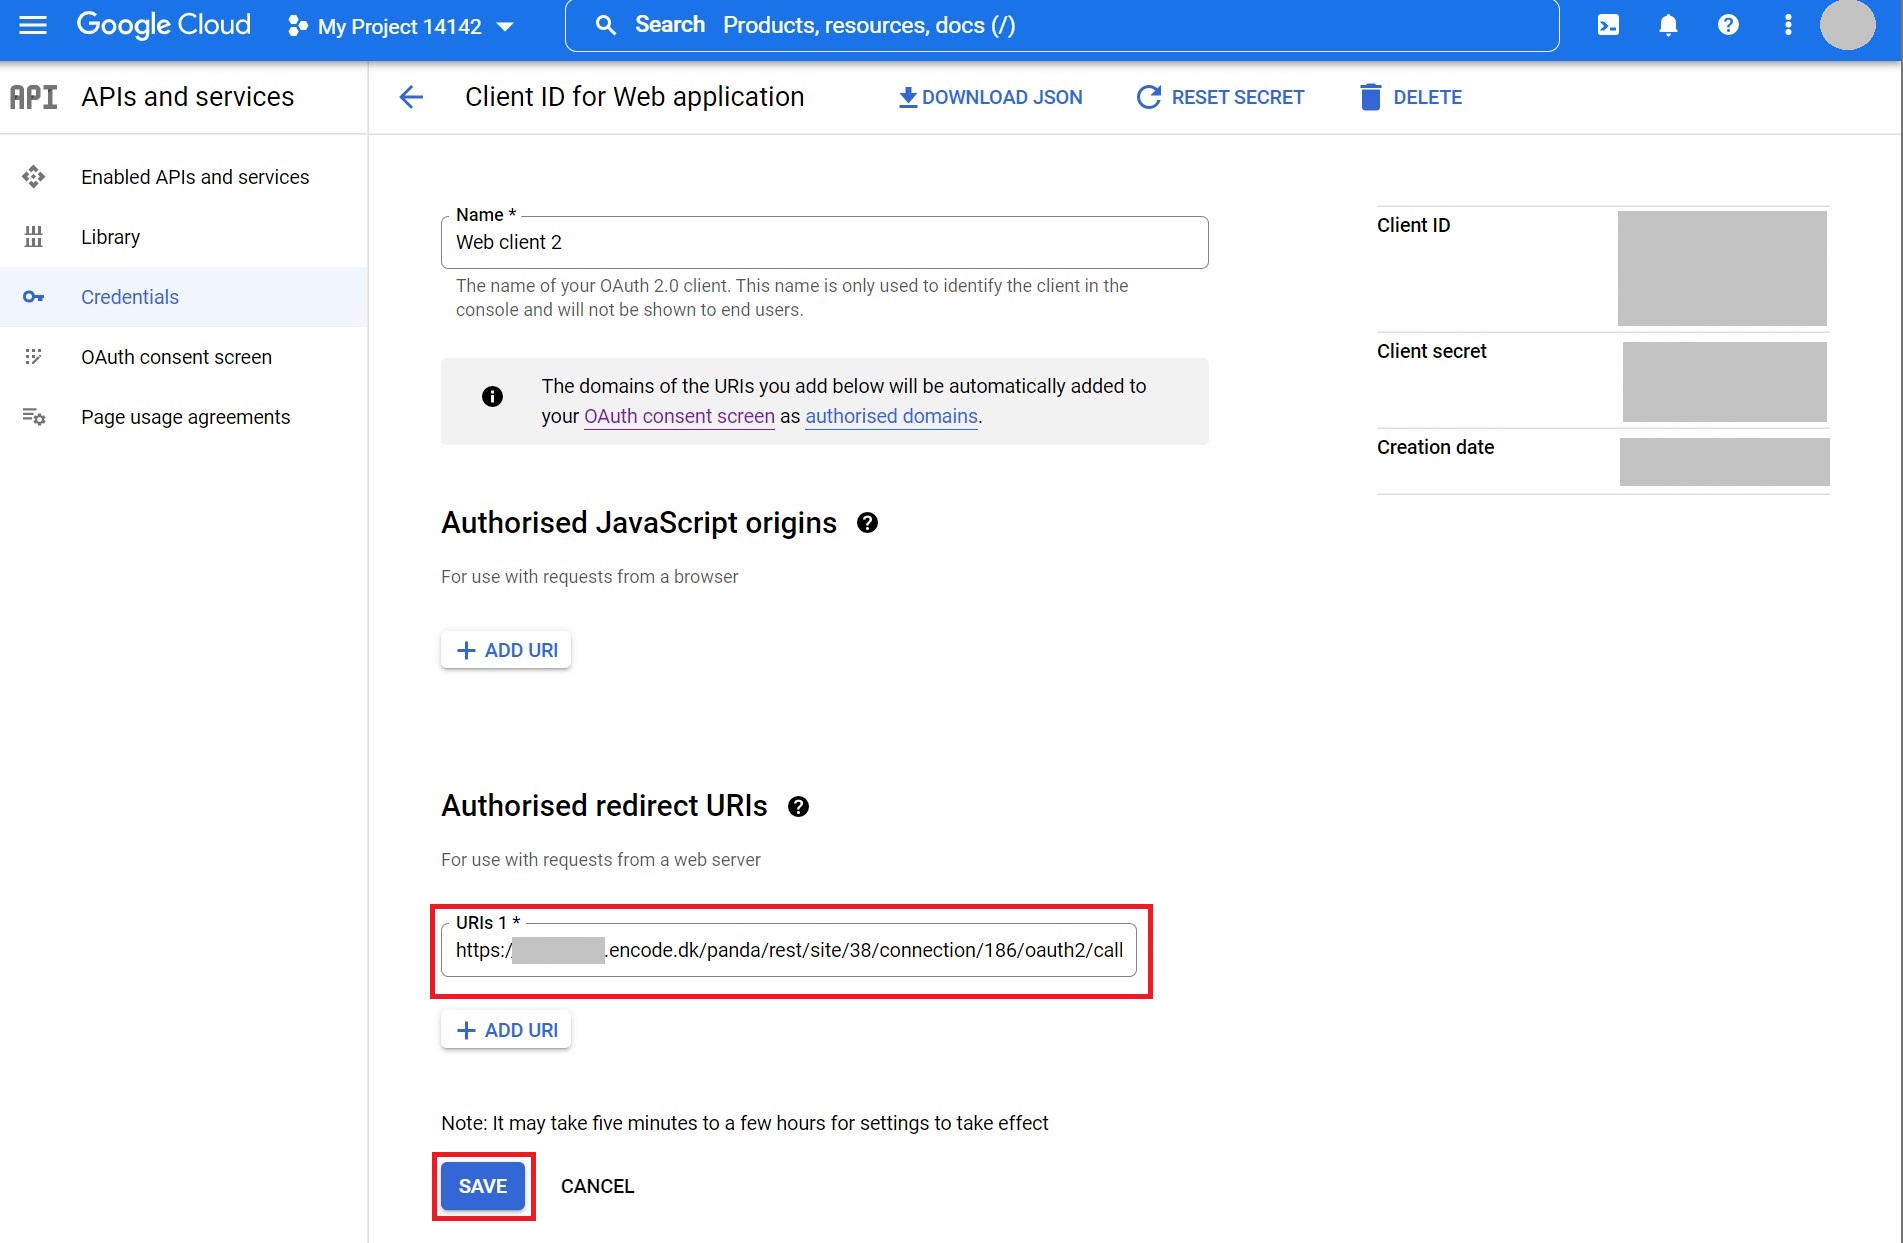
Navigate to API's and services > Credentials > OAuth 2.0 Client IDs > {Name}
Paste the Callback URL to 'Authorized redirect URLs'
Click SAVE
Return back to Encodify Web App > Site Configuration > Connections > Connected Services
Option 2: In Azure Developer Console:
1. Navigate to Overview > Add a Redirect URL
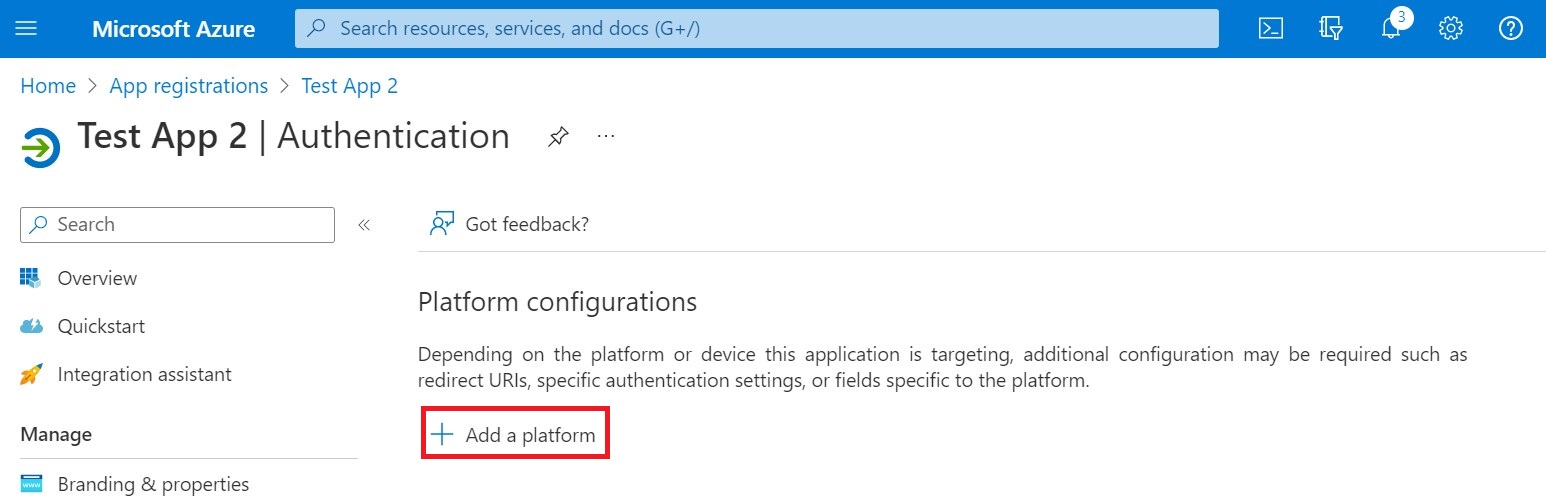
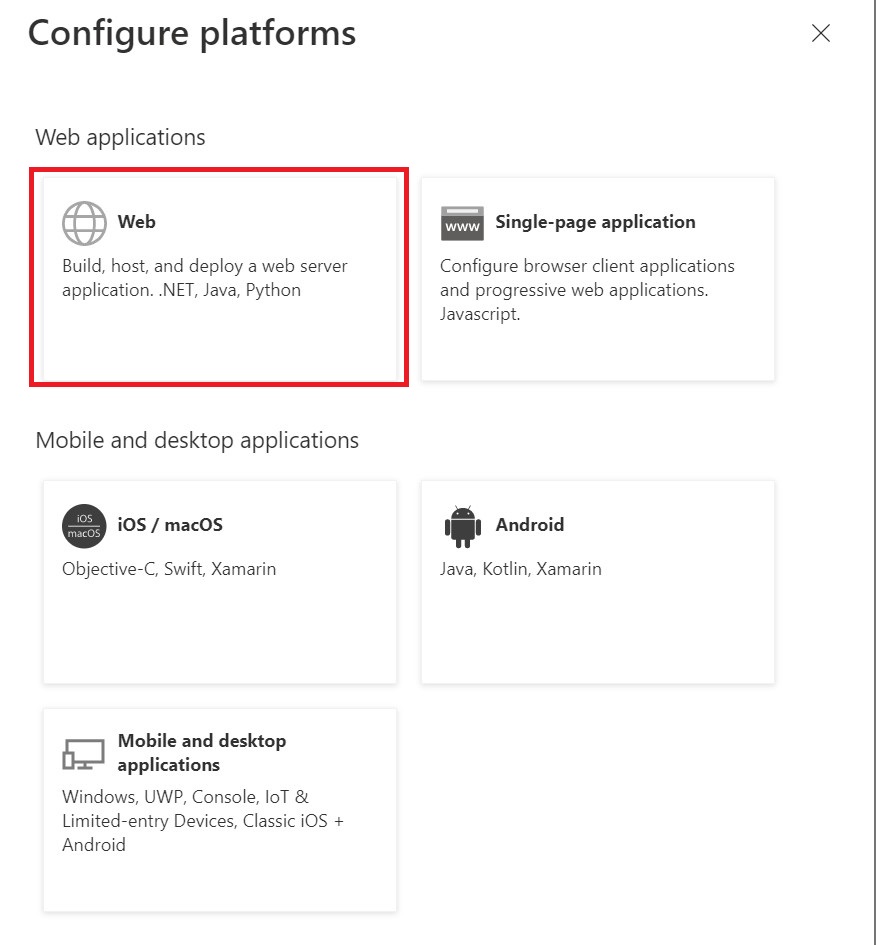
2. Click '+ Add Platform'
3. From Web applications, select 'Web'
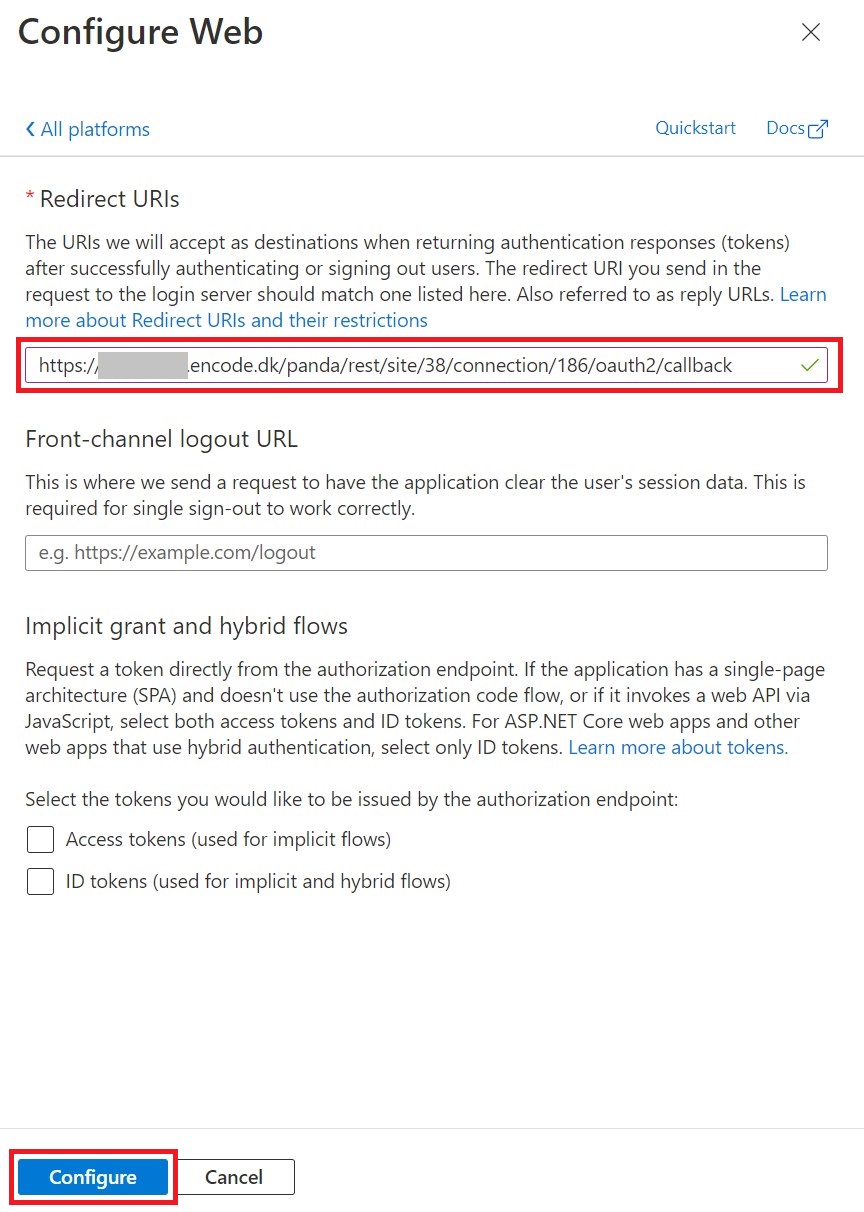
4. Paste the Callback URL to Redirect URLs field
5. Click Configure
6. Return back to Encodify Web App > Site Configuration > Connections > Connected Services
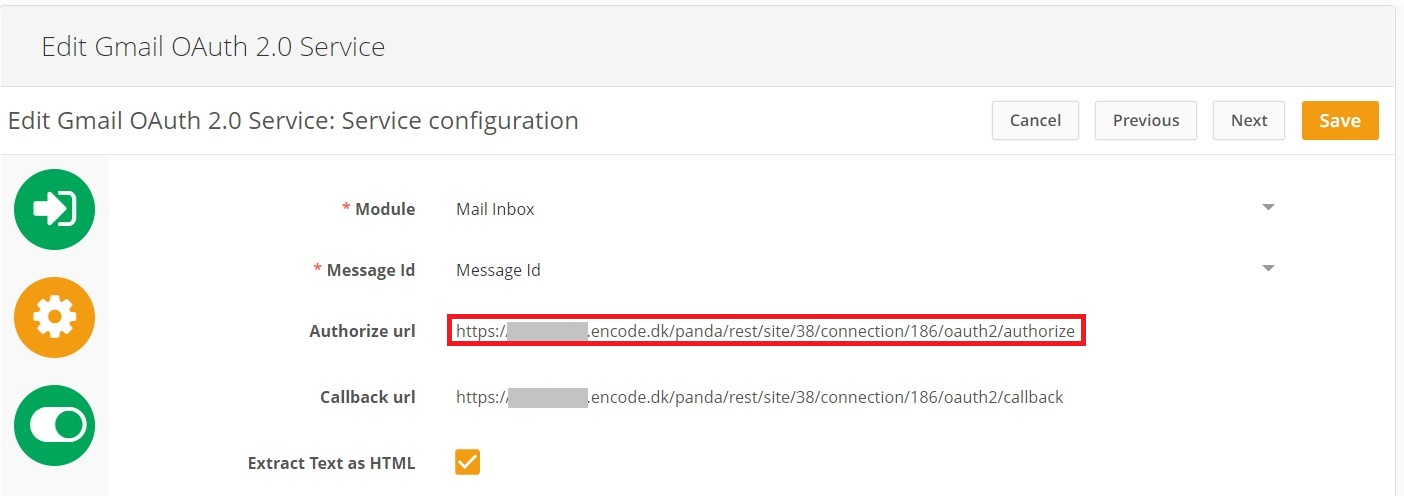
Step 3
Copy the 'Authorise URL' from the service configuration page
Open a new tab in the same browser
Paste the authorised URL
Press Enter
Expected Response:
{"result":"Auth code was successfully processed"}

Callback Authorised:

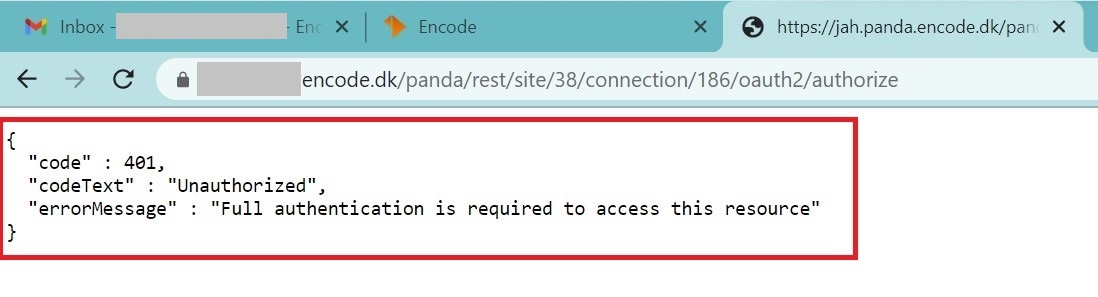
Troubleshooting:
NOT authorised: 401 Error message:
Solution: Make sure the user is logged in to the WebApp in the same browser:
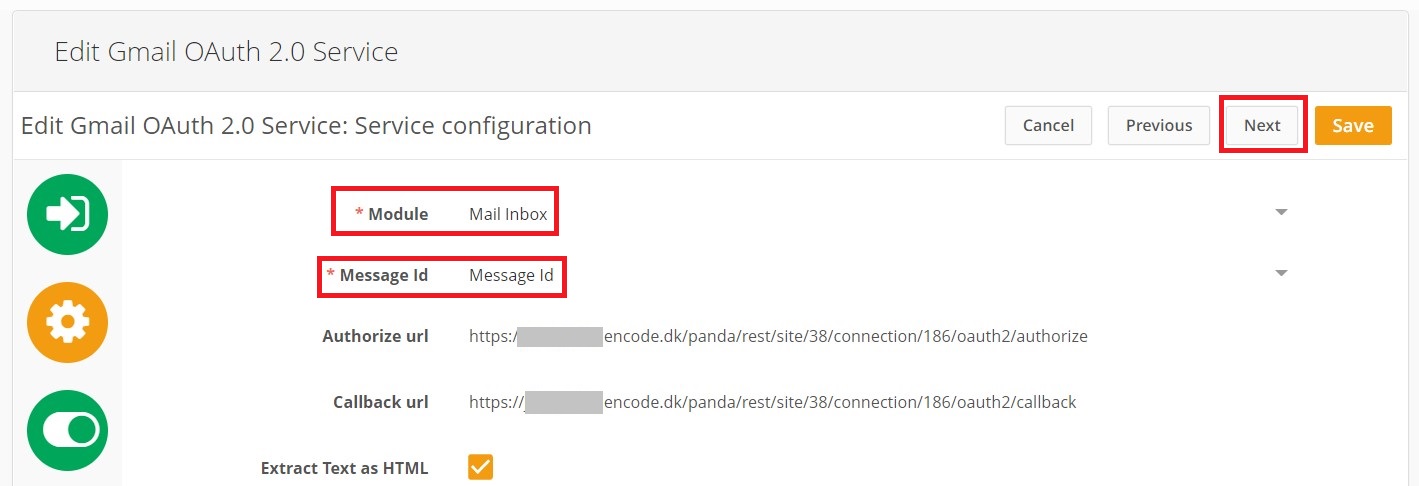
Step 4
Select a module to be used for syncing messages and map the Message Id field.
All other options are not required, but also useful. More information in the beginning of this article.
Select 'Module'
Select the 'Message ID' field
Click NEXT
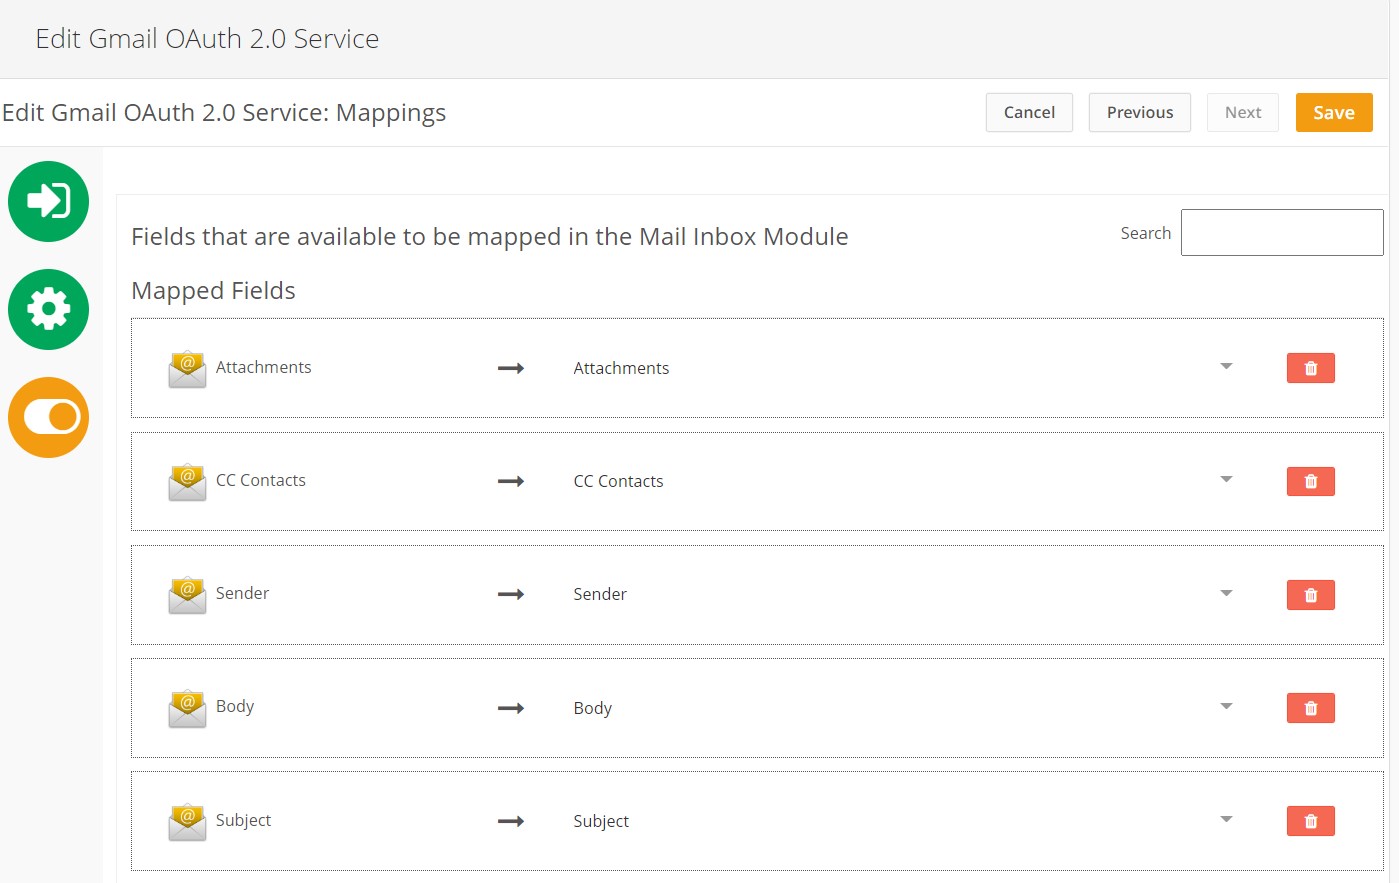
Step 5
Map the fields from the selected module to the email attributes.
After completing mapping and clicking "Save" the connected account will be validated and a connected service created.
After creation, the corresponding connected account will appear in the list of existing connected accounts and all standard CRUD(Create, Read, Update, Delete) operations for the connected service will be available.
Step 6
The final step in the configuration of Email service integration is the creation of actions. For more details, please refer to the beginning of this article(Actions Configuration).
Known Behavior
During synchronisation, all types of applicable validation for item creation (required, unique, field type) will take place. In case validation is triggered, synchronisation will fail.
Default values configured for fields will not be saved (e.g. Created date, Created by, etc.).
When saving body text to the field, if the field is RTE, HTML will be escaped.
Comment creation with a large attachment (>10 MB) will lead to the failed synchronisation (email will not be sent).
Comment creation with restricted file formats (like exe) in attachments will lead to the failed synchronisation (email will not be sent to some providers).
All comments will generate an email when Encodify Inbox is configured for the module (agreed on demo 2.11.2022)
Pasted media (files added via the “Insert Media” option into the Reply Email Template fields) cannot be rendered in the received email
Emojis cannot be shown in comments created from the Yahoo Mail provider
Yahoo, Outlook: Table properties, Font and Font Background colours from the template are not applied in the received message
Comment with links sent via mail at the end of ${CommentContent}
Inline images are not inserted into comments as attachments or links
Behaviour for POP3/IMAP is different:
POP3 - all messages will be downloaded, after processing, messages will be deleted (the only supported Flag for POP3 - DELETED)
IMAP - only “Unseen” messages will be downloaded, after processing, the flag “Seen” will be set for them (search with criteria SEEN=false is used for filtering messages)