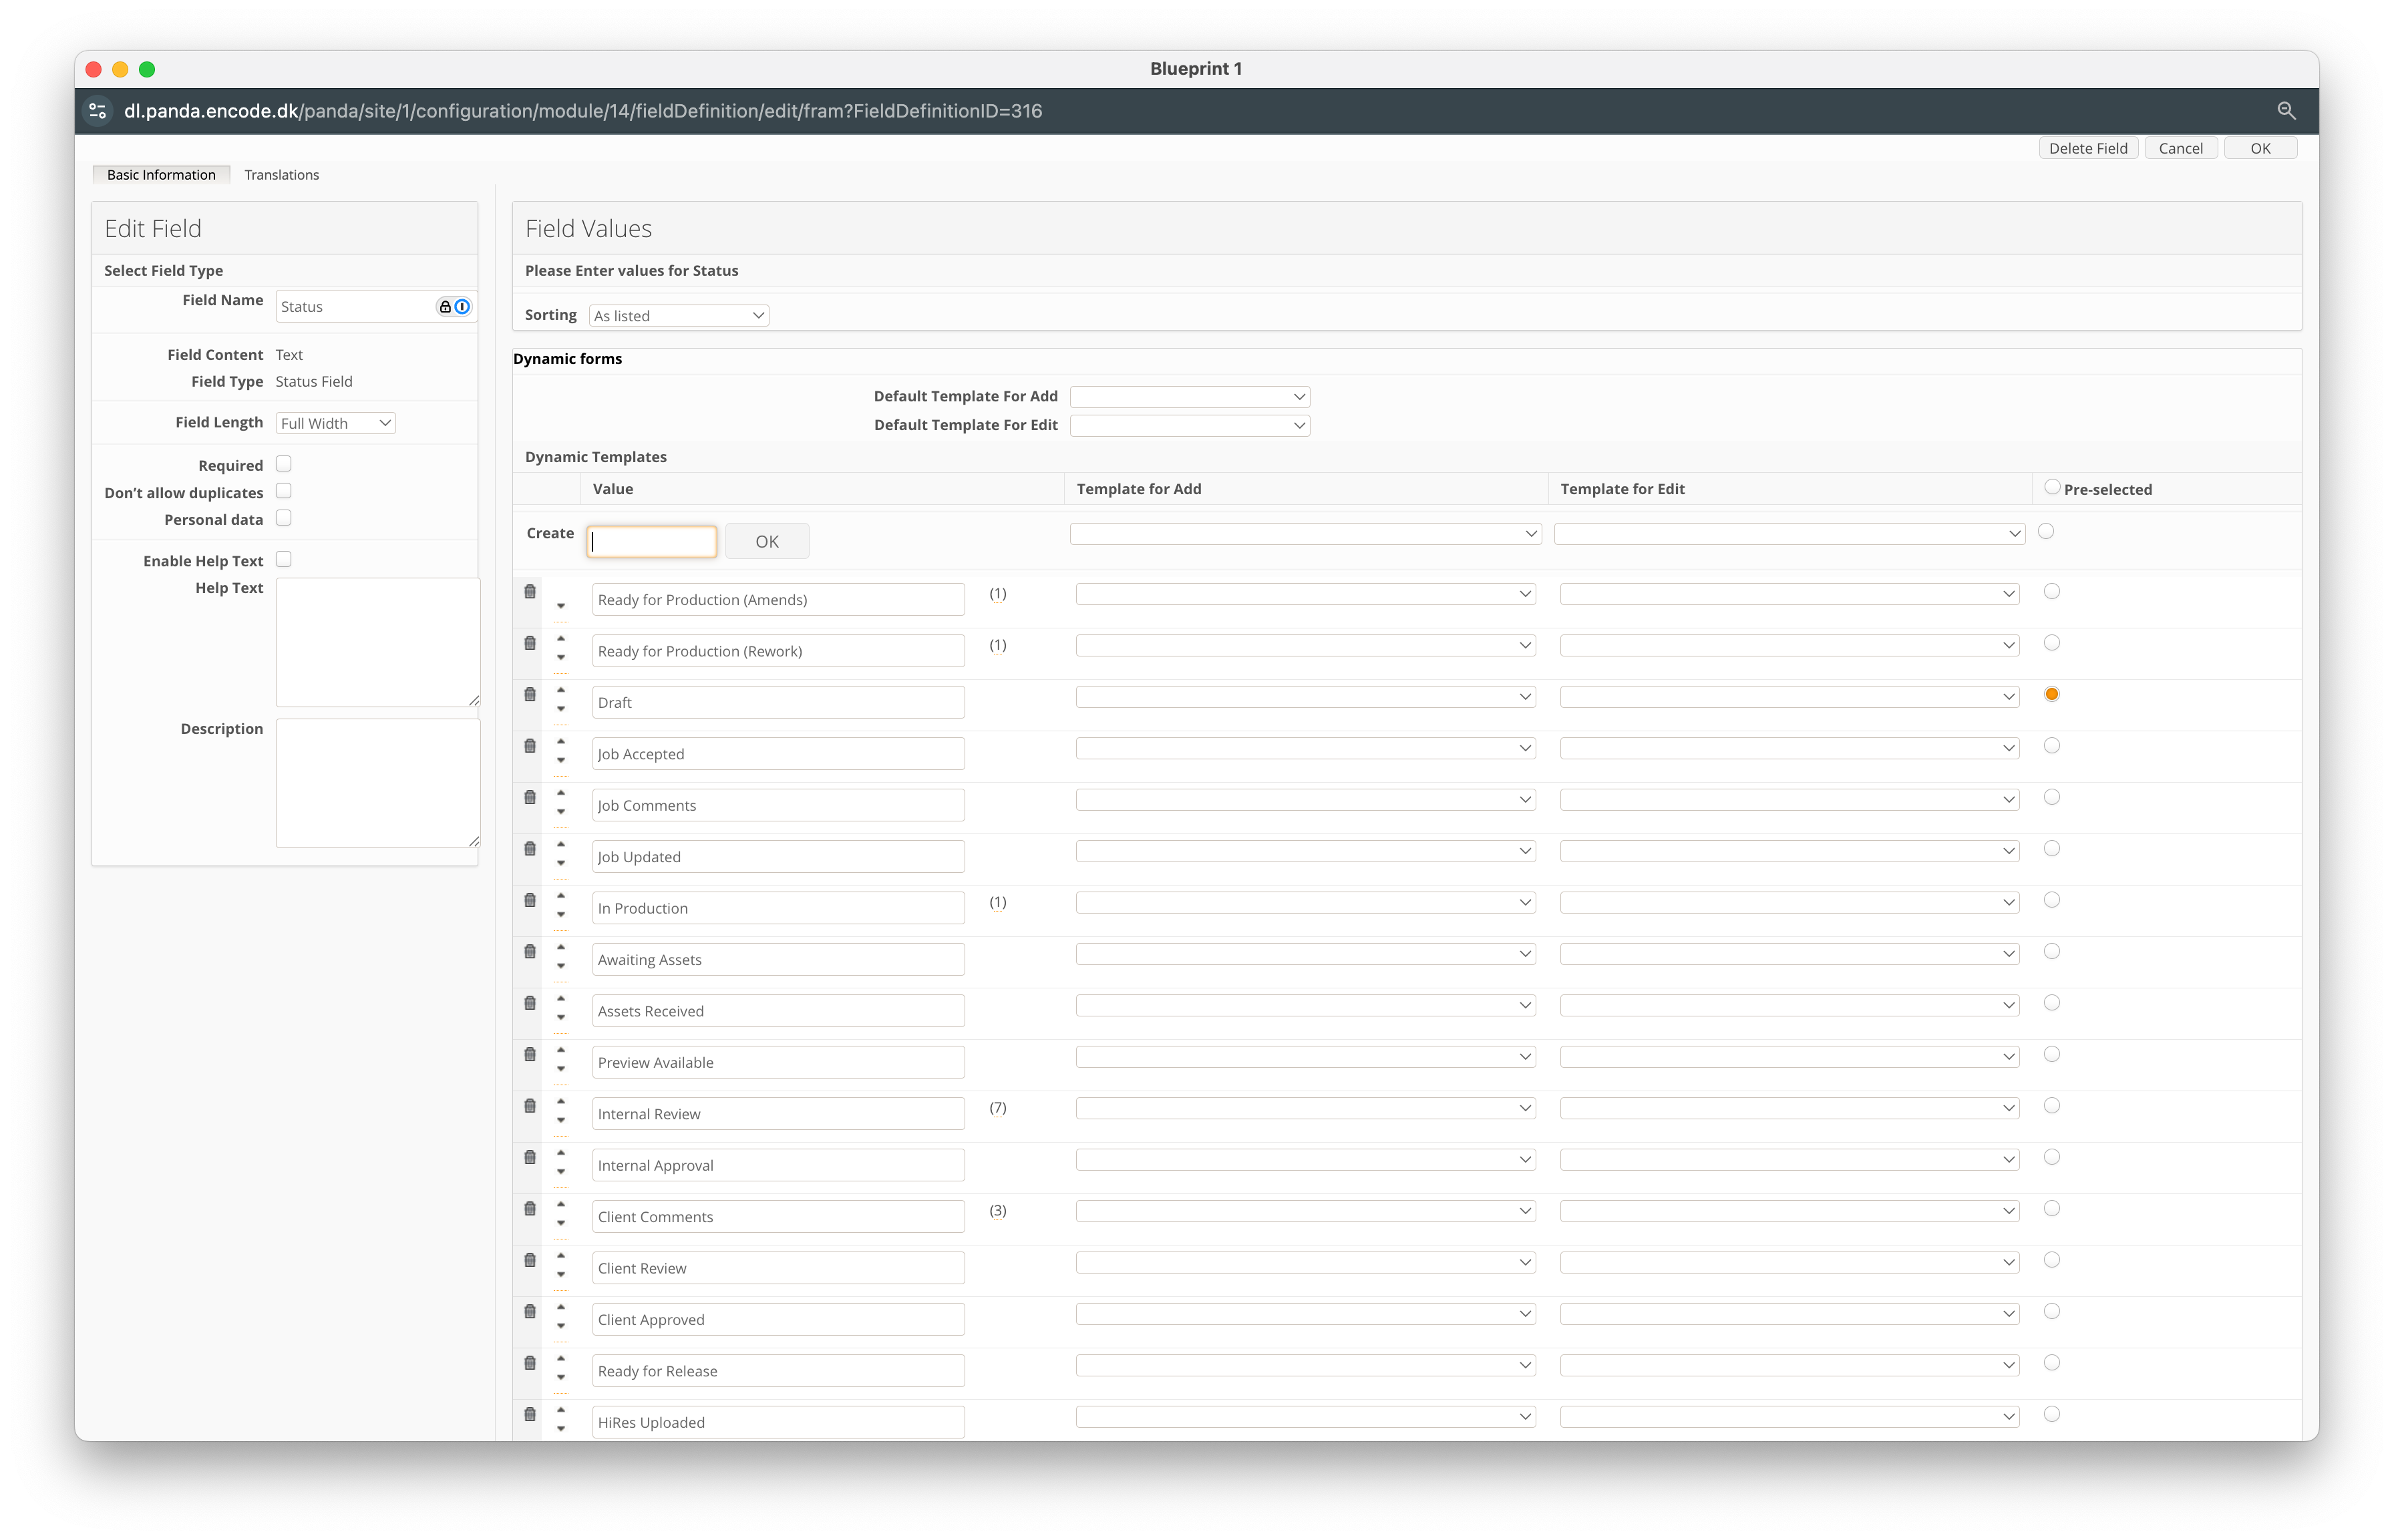
How to configure a Status Field
To enable a workflow, you must first create a status field. Follow these steps:
Navigate to Site Configuration → {Module} → Field Definition.
Click New Field.
Enter a Field Name.
Select the value Status Field from the Field Type dropdown.
Locate Create, then add each required status value, selecting OK to confirm.
Define whether a specific status value should be pre-selected.
Click OK to finalise the field creation.
Alternatively, you can create a field with Field Content set to Module and Field Type set to Status Field. With this approach, each status value should be created within the specified Module as an individual item.
An image highlighting the configuration of a status field with defined stages
How to configure a Workflow Settings
Next, you will need to configure the Workflow Settings by navigating to Site Configuration → {Module} → Workflow and clicking on Workflow Settings.
The table below highlights each option:
Option | Default | Description |
|---|---|---|
Enable Workflow | Disabled | This must be enabled for the workflow to become configurable. |
False | Controls whether the 'Status Change' button is locked based on form validity. When enabled, users must complete all required fields and correct formatting errors (e.g. Email) before a status transition is permitted. For consistency, this is active by default on migrated modules but remains inactive for any newly created modules or workflows. | |
User Configuration | User Access | The system can be configured to grant users the ability to use a workflow from one state to another, either based on their User Access Rights or the User Groups assigned to them. |
Workflow Filter Field | No Names, One Workflow Only | Select a single or multi-select field to enable a conditional workflow. This means the workflow transitions will depend on the value entered in this field within the item, allowing the system to adjust and route the process differently based on the specified criteria. |
{Status field} | Not selected | A list of fields of the type Status Field that exist in the module. When you select the checkbox next to a field, the statuses defined for it become states in a workflow. If more than one status field is selected, a list box will appear in the Create Workflow dialog prompting the user to select a specific status field. Each status field represents a separate workflow and one cannot go from a state involved in one workflow to that of another. |
Disabled | This option allows the system to make a copy of elements when a designated workflow transition is used. When enabled, a list of other modules with Workflow enabled will appear. If a module is selected, a new menu will appear allowing you to map fields between the source and target modules to copy content. |
How to configure a Workflow Transition
To create a workflow transition:
Click Create Transition
Define the transition by entering the Status From and Status To values.
Specify a Transition Label
Define whether you wish to Send to other Module (see Copy elements to other modules for more details)
In Run Actions select any specific actions that should be triggered during the transition
In Run Notification Rules select any specific automation rules that should be triggered during the transition
Specify whether you wish to Enable bulk status change
In Use Field Template you can specify a select whether any fields should be displayed during the transition.
Define whether you wish to Enable Reasons (see Reasons for more details)
Select whether you wish to Enable Comments
Users who can perform this status change allows you to specify which access rights or user groups will have permissions to perform the transition.
Click OK to finalise the transition creation
An image highlighting an example configuration for a workflow transition
Our system provides a range of configurable options to tailor workflows to your specific business needs. These options allow you to define how items transition between statuses, control access permissions, and automate key processes to ensure efficiency and consistency. The available configuration options include:
Status From | Status To | Description |
|---|---|---|
No Status | {Status Value} | ‘No Status’ is a system-generated state that an item is placed in before a user assigns it a status. This state is available when no pre-selected status value has been defined. Every workflow should have at least one configured transition that moves an item from ‘No Status’ to an assigned status (e.g. No Status → In Progress). |
{Status Value} | No Status | In rare cases, it may be necessary to revert an item from a specific status value back to ‘No Status,’ allowing the process to restart (e.g. In Progress → No Status). |
{Status Value} | {Status Value} | The primary function of a workflow is to enable transitions between different status values (e.g. Open → In Progress). However, it is also possible to create a transition where the item remains in the same status but still triggers workflow actions (e.g. In Progress → In Progress). |
Any Value | {Status Value} | Defining a transition from ‘Any Value’ allows all status values to transition to a specific status without needing individual transitions for each one (e.g. Any Value → Cancelled). This simplifies workflow configuration when multiple statuses need to lead to a common endpoint. |
Understanding the 'Require Item Form in Valid State' Property (From V.23.21.1)
Enabling this property restores legacy validation logic, ensuring that the Status Change button remains inactive if the form is invalid. This validation is active across the following interfaces:
Item Info Sheet (Form with tabs)
Item Split View (Form with tabs)
Item Modal (Form with tabs)
Menu Element Wizards (Wizard form)
CAS Print – Item Forms
Validation Behaviour
The system manages the availability of the Status Change button based on the current state of the data.
Standard "Dirty" Form Validation
It is important to note that validation for "dirty" forms is always present, regardless of whether this new property is ON or OFF. If an item has unsaved changes, the system will continue to enforce standard save-state protocols to ensure no data is lost during a status transition.
When is the button disabled?
The button is locked by default in the following scenarios:
Required Fields: Any visible field marked as "Required" is currently empty.
Email Formatting: The data entered into an Email field does not follow a valid structure (e.g., missing the "@" or domain).
When is the button NOT disabled?
The button remains active (validation is not "live") for the following, as these require server-side checks or explicit interaction:
Custom/Unique Field Validation: This is only triggered once a user explicitly modifies the field.
Rule Validation: Logic defined by rules is only evaluated after the item is saved.
URL Formatting: Specific formatting for URLs is validated only upon saving the item.
Migration Logic and Configuration
The state of this new property is determined by your existing workflow settings and migration status.
Workflow State Mapping
The following table describes how the property is set based on your workflow configuration:
Scenario | Workflow Status | Property State |
Pre-Migration | ON | ON |
Pre-Migration | OFF | OFF |
Post-Migration | Disabled (Set to OFF) | OFF |
Post-Migration | Enabled (Set to ON) | OFF |