Overview
Encodify supports integration with a wide range of identity providers that offer support for industry-standard protocols. The configuration process generally consists of two main stages:
Creating and configuring an IdP in Encodify
Registering Encodify as a client application in your IdP's admin portal
This guide provides a high-level overview of the steps needed to configure an external IdP with Encodify.
Configuring an Identity Provider
Step 1: Create a New Identity Provider in Encodify
Navigate to: Site Configuration → Identity Providers and Users → Identity Providers.
Click Add New IdP.
Complete the required fields:
Name ID: A short, URL-safe identifier (letters only).
Display Name for Login Page: Text shown on the login button.
Authentication Method: Select the protocol used by your IdP (e.g. OpenID Connect, OAuth 2.0, SAML 2.0).
Email Domains (optional): Restrict access to users with email addresses from specific domains.
Click Next.

Step 2: Link to a Login URL
Select or create a Login URL and Login Page pair.
Each Identity Provider must be associated with one unique Login URL.
Users accessing this Login URL will be directed to the corresponding Login Page, where the associated IdPs are visible.
If only one IdP is configured for that page, users may be redirected directly to the external login screen without seeing the login page.
You can manage Login URLs using the dedicated menu. Note:
Deleting a Login URL pair only detaches it from the IdP; the Login Page itself remains.
You can choose to the Hide Login Button if you don’t want the IdP to appear on the login page.
Example
Using Encodify Login URL
https://example.domain.com:Encode, users who navigate tohttps://example.domain.comwill see the “Encodify” login page with the corresponding IdP configured and associated with it.
Click Next to proceed.
Important: If only one Identity Provider (IdP) of type SAML 2.0 or OAuth 2.0 is configured, users will be automatically redirected to the external login system, bypassing the Encodify login page entirely. Once logged in via Single Sign-On (SSO), users cannot log out of Encodify unless they also log out of their external account, as SSO will immediately log them back in.
Step 3: Copy Callback URL
A Callback URL will be generated. Copy this, as you will need it when registering Encodify in your identity provider's admin portal.
Step 4: Configure your chosen Identity Provider
The exact steps required to configure your Identity Provider will depend on the platform you use. Generally, this involves:
Creating a New Application
Name the application.
Paste the Callback URL from Encodify.
Configuring Protocol Settings
Define redirect or reply URLs.
Choose the appropriate authentication protocol (e.g. SAML, OAuth2, OIDC).
Retrieving Configuration Details
Client ID / Application ID
Client Secret (if applicable)
Metadata URL or configuration file
Required scopes or claim attributes (such as
email,name,groups)
Note: For provider-specific setup instructions, refer to your IdP’s official documentation or consult the relevant integration guide provided by Encodify.
Step 5: Complete IdP Configuration in Encodify
Resume the setup wizard in Encodify.
Input the relevant configuration details from your IdP:
Metadata URL or manually entered endpoints
OAuth2 Client ID and Secret (if applicable)
Required scopes
Attribute used to identify external users (commonly
email)
Click Next.
Step 6: Attribute and Group Mapping (Optional)
Encodify allows you to synchronise user access rights and group memberships from your Identity Provider using structured XML mapping files. This ensures that user privileges in Encodify are aligned with your external system each time a user logs in.
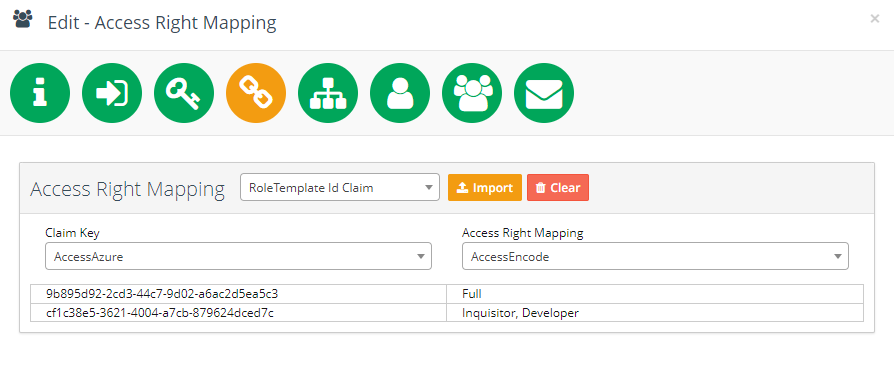
Access Rights Mapping
Upload a mapping XML file that defines the external access roles and their corresponding Encodify access rights.
<MappingDocument>
    <Mapping>
        <ExternalSystemAccess>Global Company</ExternalSystemAccess>
        <EncodeAccessRight>Admin</EncodeAccessRight>
    </Mapping>
    <Mapping>
        <ExternalSystemAccess>Local Company</ExternalSystemAccess>
        <EncodeAccessRight>Sales Manager</EncodeAccessRight>
    </Mapping>
</MappingDocument>
Select the SAML claim attribute that represents the external access right.
In the Claim Key dropdown, choose the XML tag representing external access (e.g.
ExternalSystemAccess).Access Right Mapping - value in this input should match exactly the name of the claim coming in the response form identity provider app.
In the Claim key - Access Right Mapping dropdown, select the corresponding Encodify access right tag (e.g.
EncodeAccessRight).If a user has multiple roles, you can define a comma-separated list in the XML tag.
The access right assignment logic is as follows:
User Exists | Mapping Enabled | Mapping Found | Result |
|---|---|---|---|
Yes | Yes | Yes | External rights assigned |
Yes | Yes | No | Default rights from IdP assigned |
Yes | No | N/A | Existing rights retained |
No | Yes | Yes | External rights assigned |
No | Yes | No | Default rights from IdP assigned |
No | No | N/A | Default rights from IdP assigned |
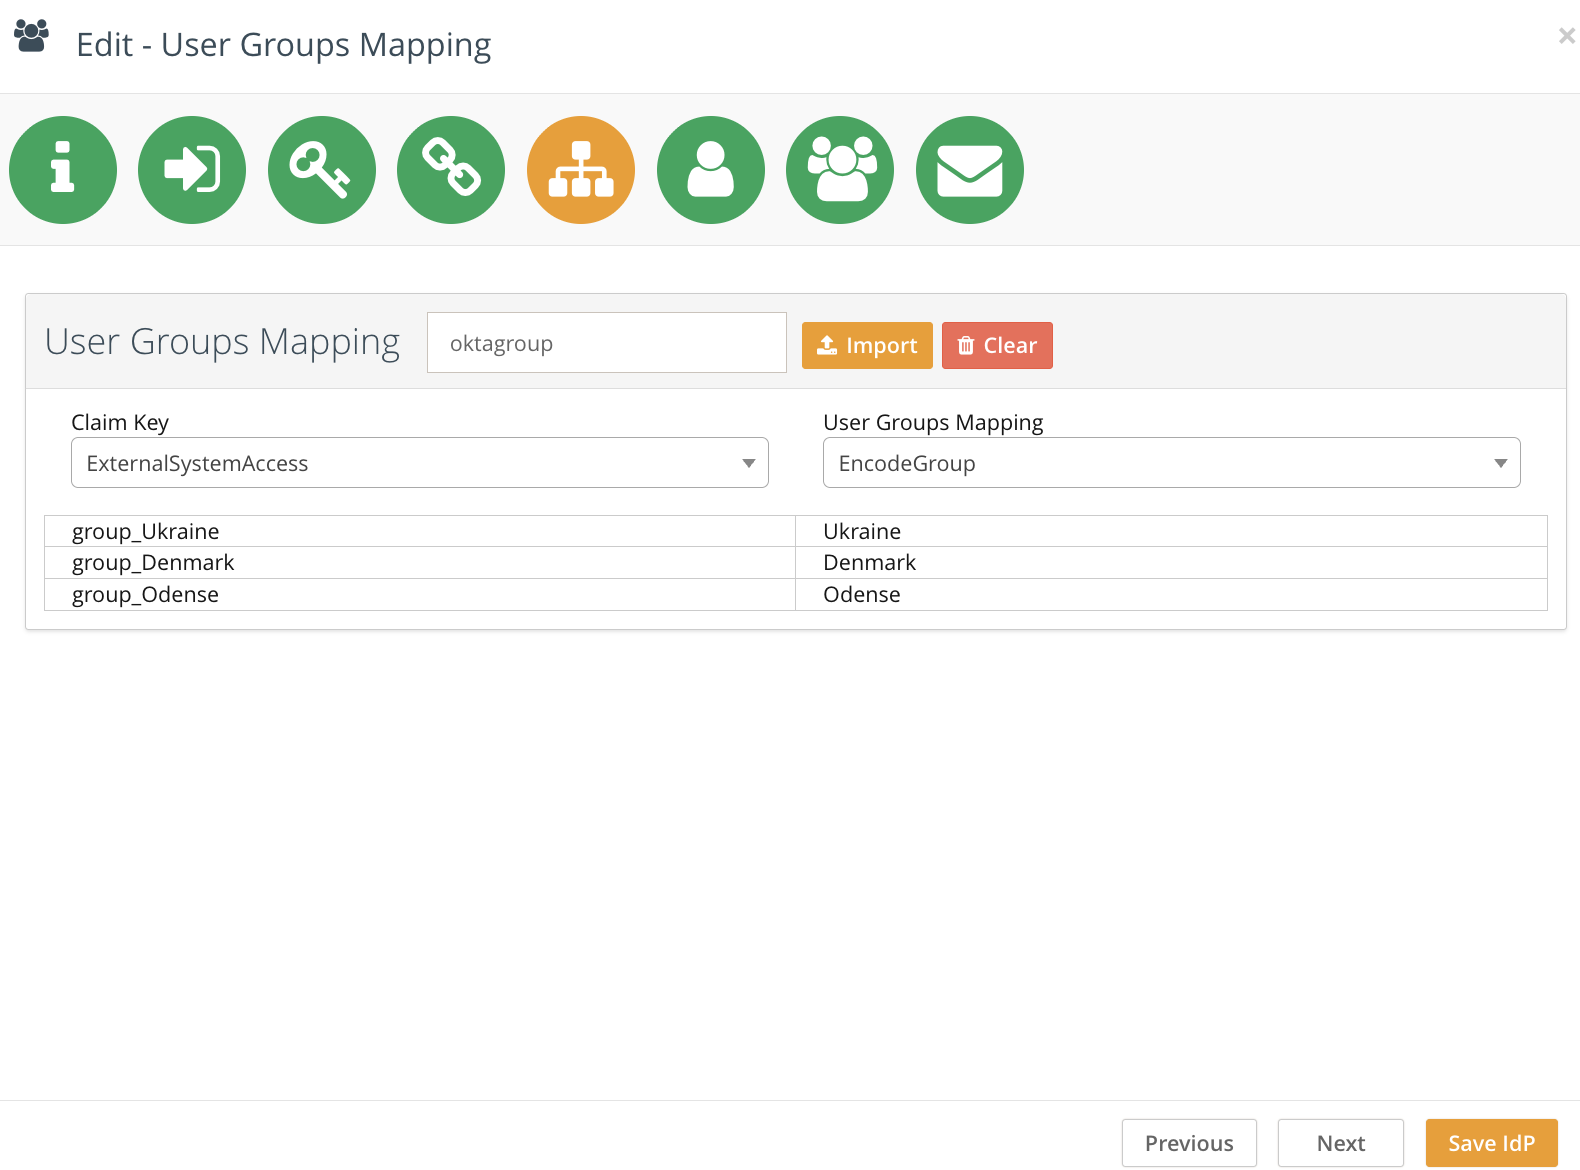
User Group Mapping
Upload a mapping XML file that maps external user groups to Encodify user groups.
<Mapping>
    <ExternalSystemAccess>Local Company</ExternalSystemAccess>
    <EncodeGroup>Argentina, Chile, Bolivia</EncodeGroup>
</Mapping>
Select the SAML claim attribute used to transmit user group membership.
Choose the XML node for external group (
ExternalSystemAccess).Choose the XML node for Encodify groups (
EncodeGroup).
Group assignment logic mirrors that of access rights:
User Exists | Mapping Enabled | Mapping Found | Result |
Yes | Yes | Yes | External groups assigned (overwrite) |
Yes | Yes | No | Default groups assigned (overwrite) |
Yes | No | N/A | Existing groups retained |
No | Yes | Yes | External groups assigned (overwrite) |
No | Yes | No | Default groups assigned (overwrite) |
No | No | N/A | Default groups assigned (overwrite) |
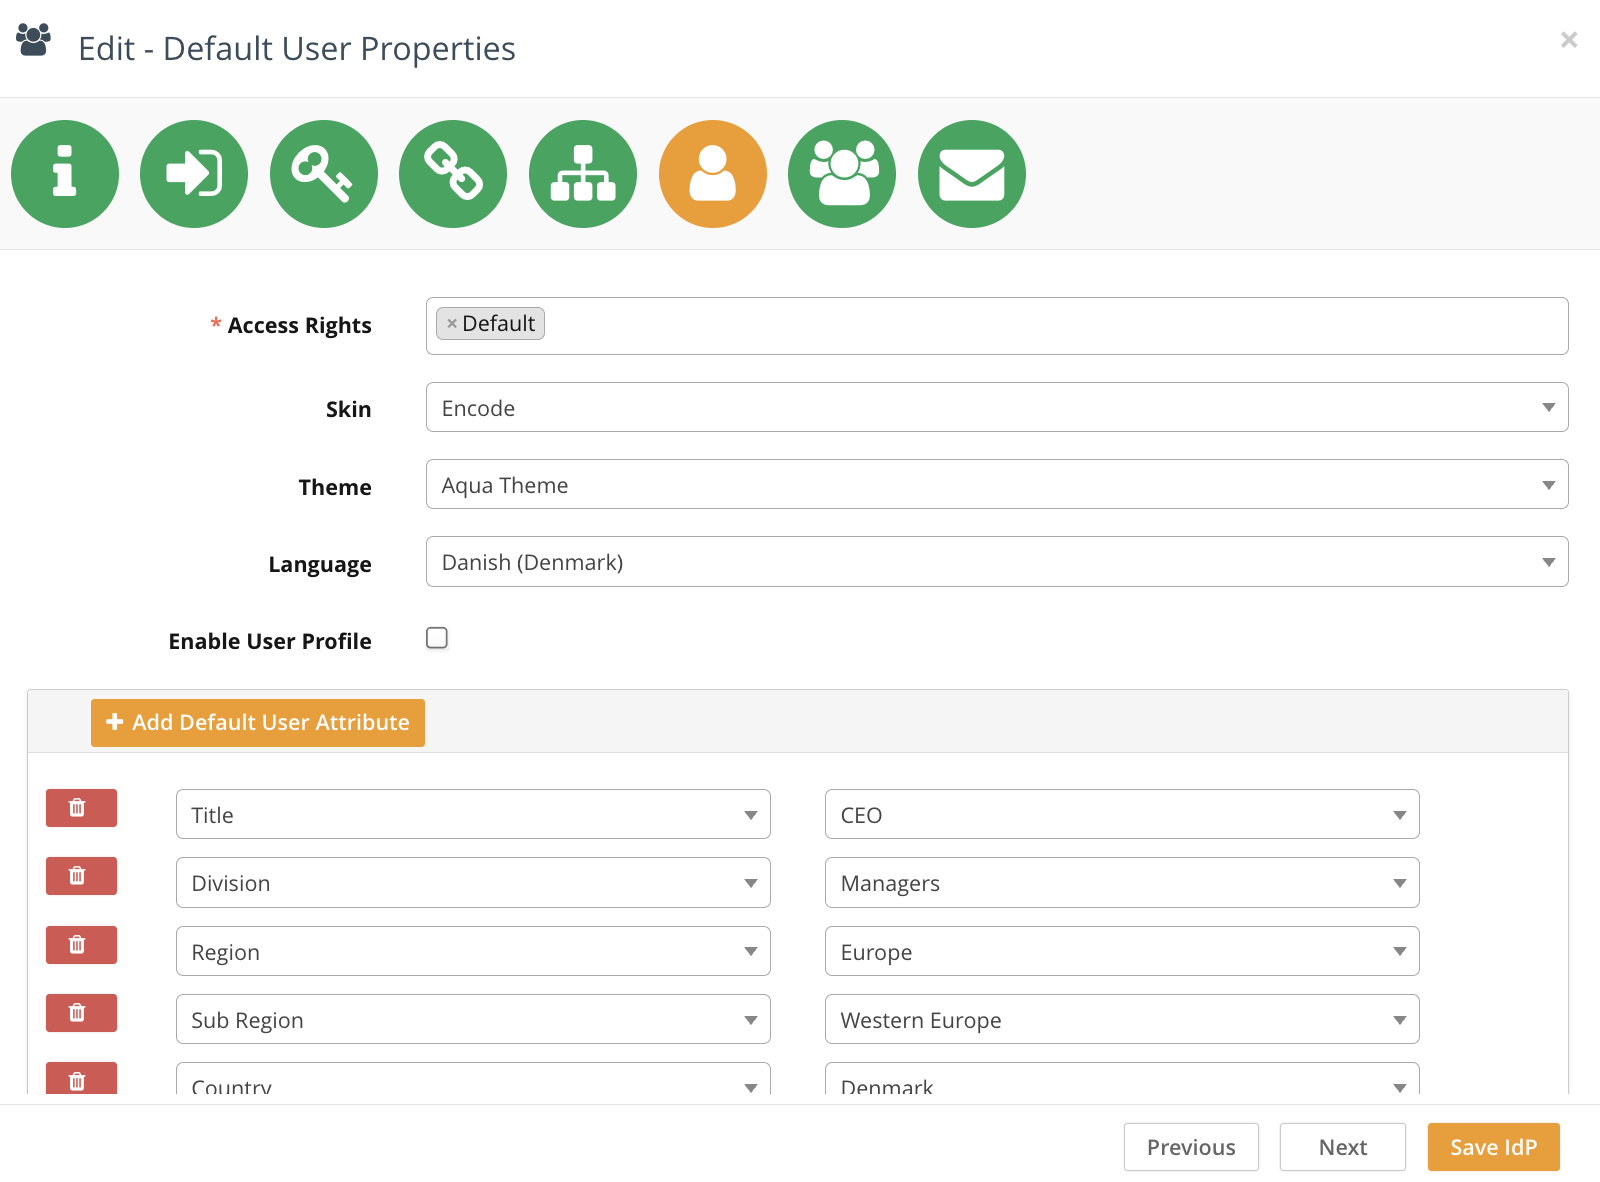
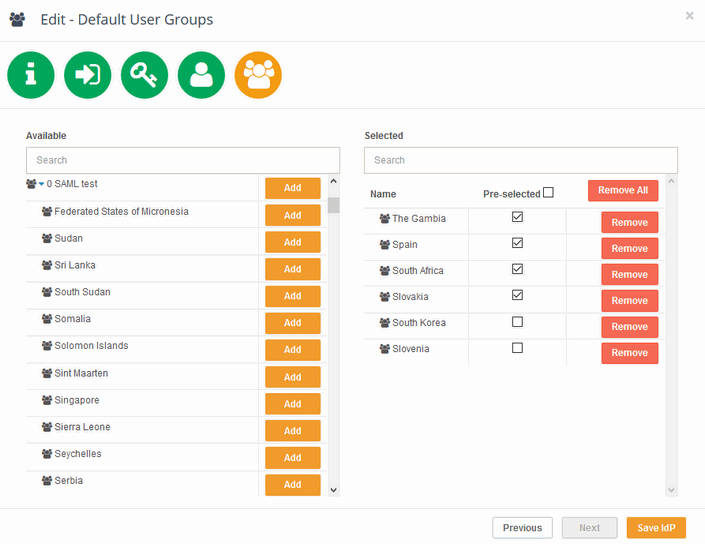
Step 7: Default User Groups
This screen allows you to set default properties for users who will be added to this IdP or auto-provisioned via Single Sign-On. These include:
Access Right
Skin
Dashboard Theme
Language
Enable User Profile (shows the user profile modal window on first login, allowing users to complete their profile)
Additional custom user attributes can also be set, but only if the User Management module is enabled. To configure:
Click Add User Attribute.
Select the custom field from the left dropdown.
Define the default value in the right dropdown.
Note: The New UI and Classic UI toggles were removed in version 13.0.0.
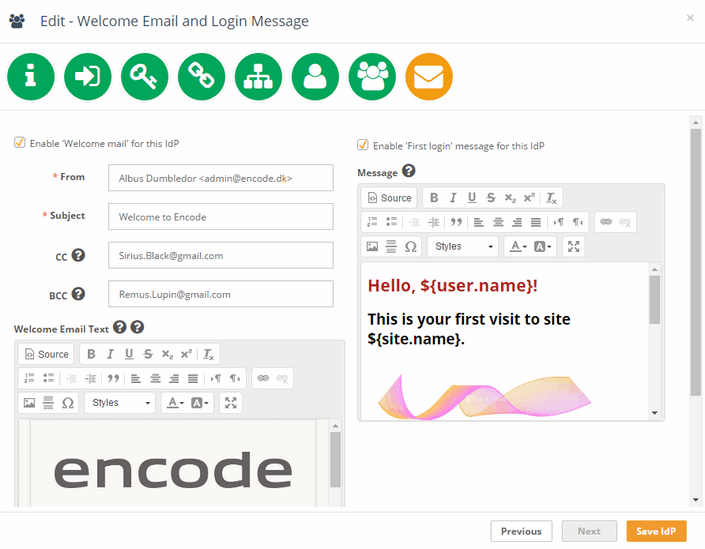
Step 8: Welcome Message & First Login Email
This screen allows configuration of:
A Welcome Email sent to new users on first login
A First Login Message shown as a modal window upon initial access
You can upload a pre-defined HTML email template or create one using the built-in Rich Text Editor. Both the email and message support placeholders, including:
${user.name},${user.login},${user.email}– substituted with corresponding user details${site.name}– replaced with the name of the current site
This ensures each new user is greeted with a personalised message and a professional onboarding experience.
 .
.