Location: Site Configuration > Module > Settings
Settings is a basic configuration section where you can activate and deactivate a number of Module features, select Media Holders, and set Group Restriction on users. This is also where you can configure the Ordering function as well as the Print function for the module.
To configure the settings, follow these steps (actions involved in each step will be discussed in detail further below):
On the toolbar, click Edit Settings.
In the dialog box that opens, configure the general settings discussed in the table below, by selecting or clearing checkboxes next to the names of the options.
Specify what Media File Holders should be used in different places within the module, by selecting them from the lists of available Media Holders.
Configure Group Restriction if necessary.
Configure the Print function if necessary.
To configure the Ordering function for the module, click Ordering Function on the menu on the left and proceed as specified in section Ordering function.
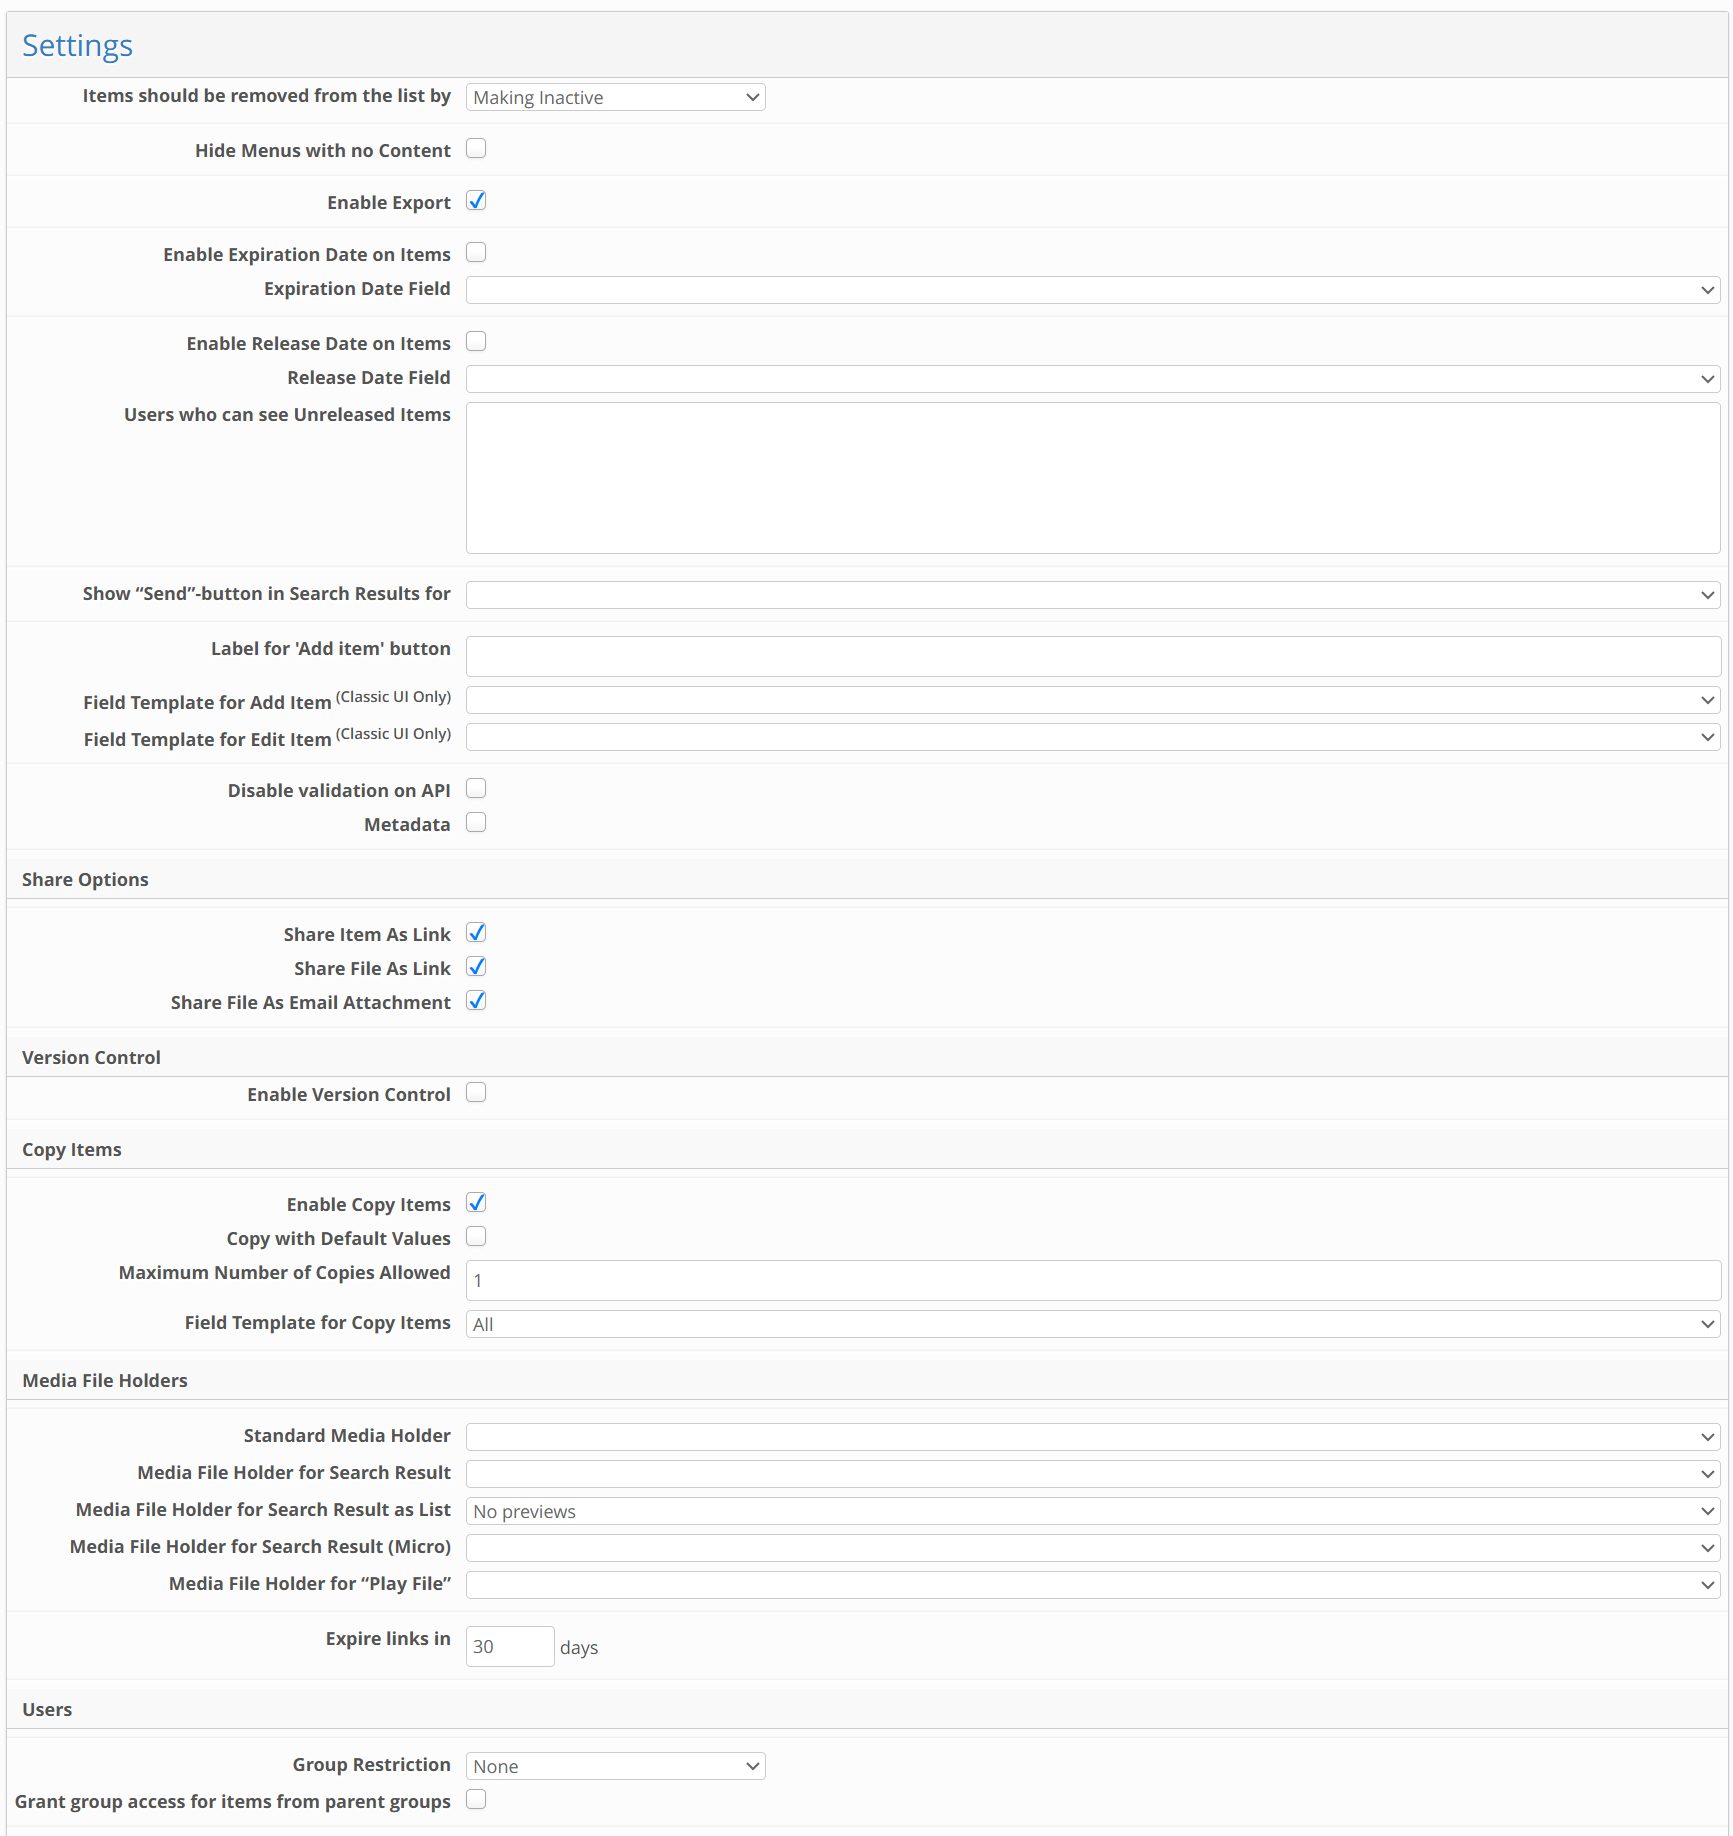
Module Edit Settings window
Module Edit Settings window
Features
This part of the Settings section deals with various features that you can activate for the module. Some of the features require further configuration elsewhere in the module, so refer to the related sections of the manual.
Option | Default value | Meaning | Related manual section |
|---|---|---|---|
Items should be removed from the list by | Delete | Determines whether users will be able to permanently delete items in the module or only deactivate them so that later they may be reactivated. Note that this option cannot be changed to “Making Inactive” if the External File Structure functionality is enabled in the module | |
Log Changes (This flag is removed in v.15.0.0) | No | Use this to keep track of changes made to the module items — the log provides information on which user made the change and when.(This implementation is deprecated. Starting from v.15.0.0 all changes are always logged by default) For the log to be available to users, a Menu Element has to be configured to display log entries. Note: Menu Elements are decommissioned for New UI in version 15 and replaced by Item Views | Logging Changes |
Log Downloads (This flag is removed in v.15.0.0) | No | Use this to track how many times a particular version of a file has been downloaded by users.(This implementation is deprecated. Starting from v.14.2.0 all downloads are always logged by default) For the download log to be available to users, a Menu Element has to be configured to display log entries. | Logging Changes |
Hide Menus with No Content | No | Renders Menu Elements that have no content on them unavailable to the user (the names of such elements will be missing from the navigation menu in the item information window). Note: Menu Elements are decommissioned for New UI in version 15 and replaced by Item Views |
|
Enable Export | No | Adds a button labeled Export to the toolbar on the module main page so users can export selected field data from the items of the module to a different formats. | Export |
Enable Send Link to Item | No | Enables the user to send out emails containing the link to an item in the module, so that the email recipients can directly access the item by following the link. | |
Enable Send Link to File | No | Enables the user to send out emails containing the link to a file uploaded to an item in the module, so that the email recipients can directly download the file from its Media Holder. | |
Send File as Email Attachment | No | Enables the user to send emails containing files from the module items as an email attachment. | |
Enable Item Lists | No | Enables users to group media files from different items into separate sets (called Item Lists), which can then be shared with other users. |
|
Enable Actions for Item Lists deprecated | n/a | Makes it possible to configure an Action to ensure the sending of reminder emails to users who forget to review the Item List that has been shared with them. | Item List Reminders |
Enable Release Date on Items | No | Allows using a date field as a deadline for items. Items before the deadline as marked as unreleased and cannot be viewed by non-admin users unless they have special permissions (set below) |
|
Release Date Field | n/a | Specify the Date field you want to treat as a deadline |
|
Users who can see Unreleased Items | n/a | Select Access Rights that can have access to unreleased items |
|
Enable Copy Items | No | Activating the feature in a module adds the Copy button to the toolbar of the item view window, visible to users with the Read and Upload rights for the module. Clicking this button opens the Copy Item window, where the user can modify the values of the fields and the group settings of the item being created (the item copy). Clicking Copy Item then creates the item copy. ⚠️ User needs to have Read and Upload access to the to-be-created item (via status settings) in order to finalise copying |
|
Copy with Default Values | No | When Copy with Default Values is enabled, field values are resolved in a fixed order:
The copied item reflects the combined result of template rules, defaults, and trigger recalculations. | More details below in “Copy with Default Values” section |
Maximum Number of Copies Allowed | 1 | The maximum number of copies that can be created using Bulk Copy functionality. |
|
Field Template for Copy Items | None | Defines which field values will be copied from the original item on item copy. All the values of fields that are not included in the specified template will not be copied. |
|
Duplicate Referencing Items for Module |
| Specifies whether items from the referencing modules will be copied |
|
Field Template for Duplicate Referencing Items | None | Defines which field values will be copied to duplicated items in the referencing modules. |
|
Enable Expiration Date on Items | No | Enables the user to set expiration dates on items in the module so that once the set date is reached, the item will be marked "expired" and Download/Print function will be disabled. |
|
Expiration Date Field | No | The field in the module, with the content type Date, to be used for specifying the Expiration Date for the module items. | Field Configuration |
Show “Send”-Button in Search Results for | N/A | Media File Holder is used when sending a file via the Send button displayed under the item in the Search Result view. |
|
Enable Version Control | No | Saves previous versions of files uploaded to the module, thus enabling the user to view the document history for a particular item and download old versions of files. | Version Control |
Interval Between Version Numbers | 1.0, 2.0, 3.0... | If the Enable Version Control option is selected, this will determine the version numbering format: either an integer or a decimal format can be used. | Version Control |
Label for ’Add item’ button | None | Specify the label for the Add button in the widget on the dashboard that uses the current module. I nothing is specified, the default “Add Item” label will be used | Dashboard and widgets and module view |
Field Template for Add Item | None | Allows selection base field template for the “Add” and “Edit” item windows. The edit template is also applied in the Multi Edit window. In case no base template is selected, all fields available for field usage will be shown | |
Field Template for Edit Item | None |
| |
Disable validation on API | No | When checked, the system will not validate the field values modified by External API requests | External REST API |
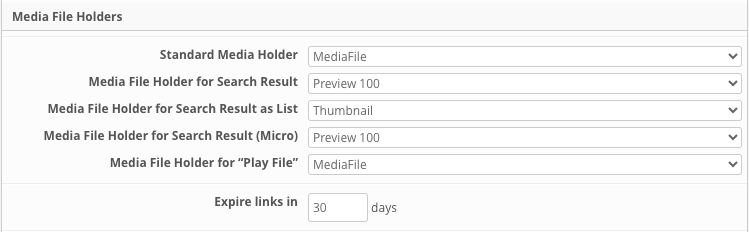
Media Holders Section
The group of settings under Media File Holders indicates places in the system that use the contents of specific Media File Holders (images displayed on screen, videos played back, files sent in an email). Your task is to specify which one of the Media File Holders existing in the module should be used in each case.
Option | Default | Meaning |
|---|---|---|
Default Media File Holder | MediaFile | Media File Holder that the system uses by default when no other Media Holder has been specifically designated. |
Media File Holder for Search Result | Preview 100 | Media File Holder used to display previews of files in the Search Result “With previews” view mode. |
Media File Holder for Search Result as List | Thumbnail | Media File Holder used to display previews of files in the Search Result “As List” view mode. |
Media File Holder for (Micro) Search Result | Preview 100 | Media File Holder is used to display previews of files in the Micro Search Result window. |
Media File Holder for “Play File” | MediaFile | Media File Holder is used by the system to play files. When the module has MPEG4 to play, a handler can be used for those files. If asked to play a non-MPEG file, the Default Media File Holder (see above) will handle the file. |
Media File Holder for Profile Picture |
| Media File Holder is used for the preview of the user profile image in the user profile view. Available ONLY in User Managment Module. |
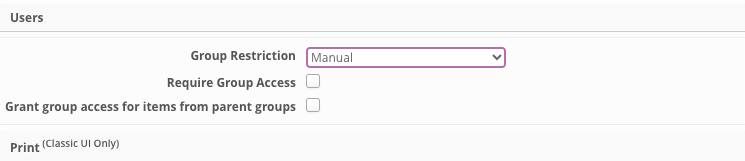
Users
This is where you can control users’ access to items in the module based on the User Groups defined for the site. For details, see User Groups and Group Restriction in chapter Users.
Option | Default value | Meaning | Related manual section |
|---|---|---|---|
Group Restriction | None | Select the type of group restriction. Available options: None, Automatic, Show and Preselect, Manual, Assigned by Action. | |
Require Group Access | Off | Enables validation on saving an item without any user groups assigned. Applicable only to "Manual" and "Show and Preselect" group restriction types. | |
Grant group access for items from parent groups | Off | Allows users with subgroup access to see items assigned to the parent group. |
Activating the Print function in the Module adds a button to the toolbar of the item information window, clicking which generates a PDF document containing data from the item in question. The format and structure of the document depends on the XML template applied to it. A default template is available, which you can edit or replace with your own custom template. It is this template that defines which data from the item will actually appear in the resulting PDF document.
To configure the Print function, follow these steps:
Select the Enable Print checkbox. More options to configure will appear below.
In the Text on Print button box, type a name for the button that will be used for generating PDF documents.
If you want to replace the default XML template with a custom one, enter the path to the file with your template in the Upload Template box, or click Browse next to that box to locate the file on your computer, and click Upload.
If you want to edit the XML template, click Edit Template. This will open a new window where you can add new pages and elements to the template and configure the parameters of the template and its elements.
You can provide a background for data displayed in PDF documents that will be generated. To do that, enter the part to the file with the PDF background in the Upload Background PDF box or click Browse next to the box to locate the file. The file will be uploaded once you’ve clicked OK on the toolbar of the Settings dialog box.

Editing settings: configuring the Print function
Export to PDF
Selecting Enable Export to PDF will enable displaying of the button with the corresponding Label in the Item Information window, so user will be able to download item information in PDF format. If it is necessary to save the generated PDF file to another module, please select Enable Save Exported PDF checkbox and map the corresponding Module, File Field and Field Template to be used.
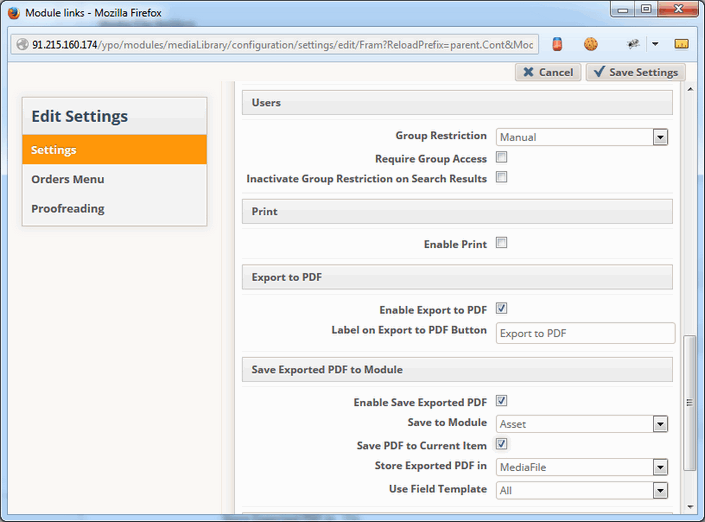
When “Save to Module” select box is set to the current module, check-box “Save PDF to Current Item” is shown. When it is enabled, the exported PDF can be saved directly to the same record.
User can enter some text in one or more text fields for a particular item and upload a number of files to the file fields. When clicking the “Export PDF”-button, a PDF is generated and saved into a file field on the same item. When enabling version control, a new version of PDF will be automatically created on the same item.
Item’s fields are not visible in “Export PDF” window, no matter what Field Template is chosen, in case of enabling “Save PDF to Current Item” check-box.
Copy with Default Values
When the Copy with Default Values option is enabled, the system determines field values using a defined priority order to ensure predictable results during item copying. This allows default rules and field dependencies to be applied during copy, similar to item creation.
.png)
Copy Items: Copy with Default Values
Order of precedence
Copy → Default → Trigger → Recompute derived
Empty copied values stay empty (no default is applied afterward).
Derived / auto-filled fields (such as
*_text) are always recomputed and never copied directly.
The following rules apply:
Copy template takes precedence:
If a field is included in the copy template, its value is copied directly from the source item. This applies even when the source value is empty - the empty values are treated as intentionally set and will not trigger default values afterward.
Default values are applied next:
If a field is not included in the copy template, its configured default value rule is applied.
Triggers cascade automatically:
Whenever a field receives a value (either via copying or default rules), dependent field triggers are executed and helps ensure that related fields are updated accordingly.
Derived fields are recalculated:
Auto-filled or representation fields (such as *_text) are never copied directly, even if included in the template. They are always recomputed based on the final values of their parent fields.
⚠️ The final values shown in the copied item reflect the combined result of copy template rules, default values, trigger execution, and derived field recalculation.
Note: The option is disabled by default. When disabled, copy behavior remains unchanged.
Ordering Function
If you intend to integrate your module into an Order system, in which it would have the role of a catalogue storing items available for ordering, you will need to configure the Ordering function, linking your module with another one, which is to serve as the recipient of orders. For information on how to configure the Ordering function, refer to the Ordering configuration manual.