Overview
User Groups in Encodify are defined at the site-wide level and are used to control access to module items. They allow administrators to manage visibility on a per-item basis, ensuring users only access items relevant to their group membership.
Access to an item is granted only if a user belongs to a User Group that has been assigned to that item. Groups can be assigned to users manually or automatically, depending on how your organisation configures access control.
Creating and Managing User Groups
Understanding Group Hierarchy
User Groups support hierarchical access control, allowing you to define parent-child relationships.
Parent group members can access all items in their subgroups
Subgroup members can only access items specifically assigned to their subgroup
Example hierarchy:
group1

├── group2

├── group3

└── group4
Access matrix:
The derived decision table shows whether the user has access to the item or not:
User | Assigned Group | Item: group1 | group2 | group3 | group4 |
|---|---|---|---|---|---|
user1 | group1 | ✅ | ✅ | ✅ | ✅ |
user2 | group2 | ❌ | ✅ | ❌ | ❌ |
user3 | group3 | ❌ | ❌ | ✅ | ❌ |
user4 | group4 | ❌ | ❌ | ❌ | ✅ |
Note: If “Grant group access from parent groups” is enabled, users inherit access from parent groups.
To create a User Group
To create a new User Group in Encodify, follow these steps:
Navigate to Site Configuration → User Settings → Groups.
Click New User Group.
Enter a name for the group.
(Optional) Select a parent group if you wish to organise groups in a hierarchical structure.
Click OK to save the new group.
Renaming and Deleting Groups
To rename an existing group:
Click the Edit icon next to the group
Update the group name as needed
Click OK to save your changes
To delete a group:
Click the Edit icon next to the group
Click Delete
Confirm the deletion when prompted
⚠️ Important: Deleting a parent group will also delete all its subgroups. Any items previously restricted to those groups will become accessible to all users.
Importing User Groups
To streamline setup, you can import multiple groups while preserving their hierarchy.
Import format (via copy-paste):
Parent groups should be listed on separate lines
Subgroups must be indented with a tab character
Having the list of groups in Excel as follows:
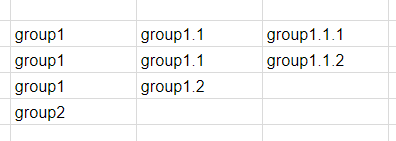
Note!
Avoid commas in groups names if used together with Assign by User Group actions.
First row with new entries takes precedence on insert; duplicate entries or conflicting entries are ignored.
Configuring Group Assignment Logic
Group Restriction Types
To enable and configure group restriction for a module:
Go to Manage Modules → {Module} → General → Settings
Click Edit Settings
Select a value from the Group Restriction dropdown
Restriction types:
Type | Description |
|---|---|
None | No restriction; all users can access all items |
Automatically | Only users in the same group as the item's creator can access it |
Manual | Groups are manually selected per item |
Show and Pre-select | Items are auto-restricted to pre-selected groups, editable on creation |
Assigned by Action | Groups are assigned using automation; items without a group are visible only to the creator |
Additional configuration options:
Inactivate group restriction on search results – Items will appear in search even if restricted
Require Group Access – Users must assign a group on item creation (Manual / Pre-select)
Allow Parent Groups – Users inherit access from parent groups
Important: Items are only visible to admins when the system property flag 'itemVisibleToAdminOnlyIfNoGroupsAssigned' is enabled.
Note: Admins can make items globally visible by enabling "Everybody can access this item"
Group Selection Modes
The Group Selection Mode can be configured to determine how users are assigned to groups:
Manual – User groups are assigned directly to users via the interface.
Assigned by Action – Groups are assigned to users automatically using "Assign/Create User Groups" actions configured in the User Management module.
If "Assigned by Action" is selected, user groups cannot be manually assigned, and the User Groups list will be read-only in the user settings window.
Assign by Action
The Assign/Create User Groups action automates group assignment on item creation/update.
Parameters:
Parameter | Description |
| Ignores hierarchy. Comma-separated list of field IDs. |
| Respects hierarchy. Each level must be specified. |
| Set to |
| For user assignment. Requires “Assigned by Action” mode. |
| Creates missing groups based on mapped values. |
Important notes:
Assignment of group restriction by the configured actions in regular modules works only when the group restriction type in module Settings is set to "Assigned by action". Please note that assignment of user groups to users by actions is not controlled by the group restriction type of the user management module, only by the “Group Selection Mode” setting in User group - Settings.
Actions assigning user groups to users must have assignGroupsToItem set to "false".
Group hierarchy must be complete (no missing parents).
Duplicates or incorrectly placed subgroups will cause failure.
User groups must specify the correct level, or assignment/creation will fail.
Assignment using group hierarchy requires all levels from root (level 1) to be specified. Invalid configurations will fail:
level2=idlevel3=idModified field values mapped for user groups will not modify previously created user groups; new groups will be created instead.
Field values for automatic group assignment during bulk user import must be passed in the request. User groups should not be present in API requests for bulk user creation.
Cannot mix action-based and IDP-based group assignments.
Assigning Users to Groups
Navigate to User Management
Search or browse to find the user.
Click the Edit icon and go to the Site Details tab.
In the User Groups section, tick the checkboxes under:
Access – Grants access to group-restricted items.
Pre-Select – Used with the “Show and Pre-select” restriction type.