Overview
The User List provides a comprehensive overview of all active and inactive users across the platform. It supports administrative and operational tasks related to user management and can be accessed from the following locations:
System Configuration → Users → Active Users provides a global list of active users across all sites.
System Configuration → Users → Inactive Users provides a global list of inactive users across all sites.
Side Navigation → Configuration → User Management provides an overview of active and inactive users for the given site.
User Management
Working with User List
To view the user list in the Side Navigation, a user must have at least the "Find Users" access right and "Read" access to the User Management module.
The ability to create, edit, or deactivate users is controlled by the following permissions:
"Find Users" + "Edit User" access rights
"Read", "Edit", and "Upload" access to the User Management module (UMM)
The Add/Edit User page also respects the field usage settings and item view definitions configured in the UMM.
Access to a user's profile picture is controlled by "Download" rights to the UMM and the associated media holder.
The profile picture preview uses the media holder defined under User Management module > Settings > Media File Holders. You can map either the default (original) or a custom media file holder to control where profile pictures are stored and accessed.
The tables below outline the parameters required when creating a user account on a site. These include general settings—such as user credentials, contact details, and authentication preferences—as well as site-specific configurations that define the user’s role and personalise the site's appearance and behaviour for them.
Table 3.1: User Settings – Basic Information
Parameter | Description |
|---|---|
Authentication Method | Defines how the user can log in to the system. By default, this is internal log-in using Encodify credentials. When Identity Providers are configured on the site, they will also appear in this dropdown list. A user can log in using only one authentication method per site. Selecting a specific Identity Provider also links the user to it. See the Authentication via Identity Providers manual for more details. |
External User ID | The ID of the user’s external account, provided by the authorisation server. This allows connection between the user’s external account and Encodify, enabling access via external login. This field is available only when a non-internal authentication method is selected. For internal methods, the Login and Password fields are shown instead. |
Name | The user’s full name. |
The user’s primary email address. | |
Mobile Email | The user’s mobile-specific email address. |
Login | The log-in name used for authentication (internal method only). |
Password | The password used for authentication (internal method only). The entered password must comply with the password complexity level. |
Password (repeated) | Confirms the password by re-entering it in this field. |
Phone | The user’s landline phone number. |
Mobile | The user’s mobile phone number. |
Fax | The user’s fax number. |
Address | The user’s address. |
City | The city where the user is located or works. |
Profile Picture | The user’s image, visible in the User List, User Profile window, and Edit User window. If no image is uploaded, a generic user icon ( |
Expired Date | The date after which the user becomes inactive. |
Table 3.2: User Settings – Site Information
Parameter | Description |
|---|---|
User Access Right | Access rights assigned to the user. From version 15.0.0 onwards, multiple access rights can be assigned. |
Site Administration | Grants the user site administrator rights when enabled. |
Allow User Switching | Allows site administrators to switch to standard user accounts. Can be enabled by system or site administrators. |
Site Creator | Allows the user to create new sites. |
Title | The user’s job title or professional designation. |
Division | The division or department to which the user belongs. |
Region | The user’s assigned region. |
Sub Region | The user’s assigned sub-region. |
Country | The user’s country of operation. |
Language | The default site language for the user. |
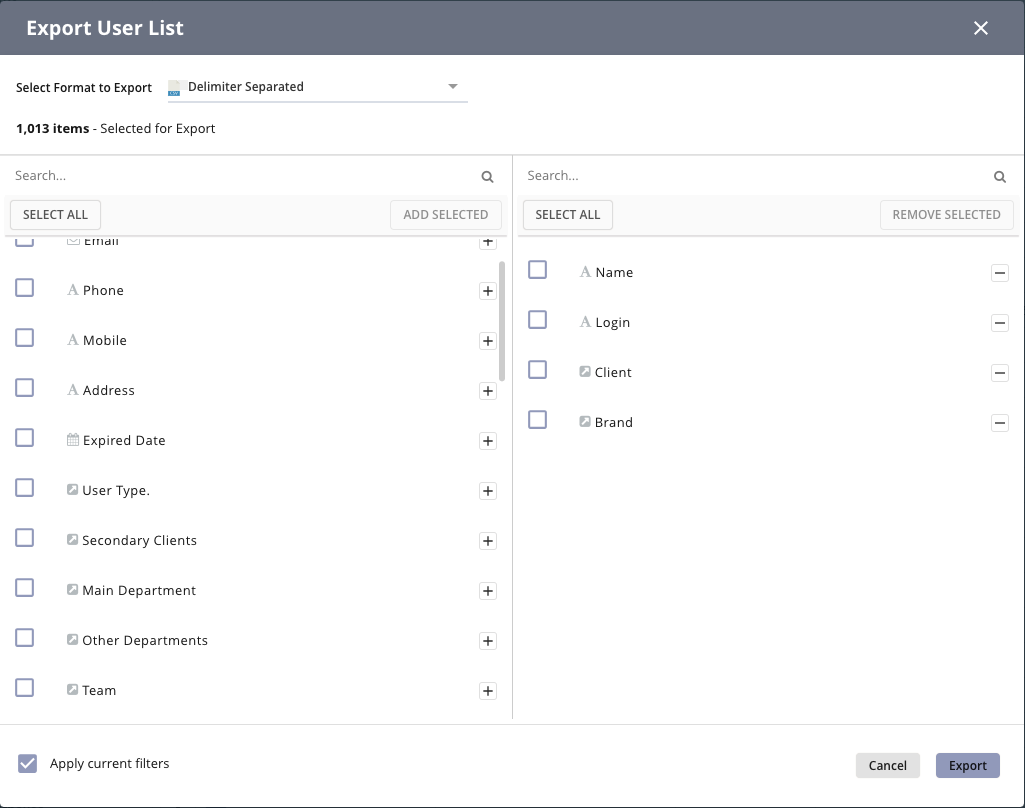
Export User List
Similar to the module export functionality, the User Export feature allows you to customise the data to be exported according to your needs. Specifically, you can:
Select the export file format – Choose from available formats such as CSV, Excel, or JSON, depending on your intended use.
Define the list of fields – Specify which user data fields should be included in the export (e.g. name, email, login, role, region).
Apply filters – Narrow down the user list by applying filters such as access rights, division, activity status, or other user attributes to export only the relevant users.
This functionality is useful for auditing, reporting, or migrating user data between environments. Export settings may also respect any visibility or field restrictions applied through User Management configurations.