Introduction
Along with translations entered by administrators for Modules, Fields, and Field Options, translations for other User Interface labels are available using Translator application in EBMS.
Unlike module and field name translations that are entered and saved in module and field definition settings, translations for all the other user interface elements is stored in translation file. Translations entered via the Translator application in EBMS is saved to the translation file that is configured to be used for the particular installation.
If there are no specific settings related to translation file, default translation file is used. Therefore, all the translations entered via Translator will be saved and stored in this default translation file.
Translator Configuration
To configure Translator application, follow the below described steps:
To make the Translator menu available to system administrators in Sites > System Status, go to the System.properties file and set the following property to “true”.
allowedAccessToTranslator=trueDefine the list of languages that will be available in Translator and the list of languages for which translation can be entered. These are defined by the following properties in
webapp.yamlfile:
active-languages: US, DE_DE
translatable-languages: DE_DE
According to the above settings, system administrator will be able to search for translations for US (English) and DE_DE (German) languages, but will only be able to add/edit translations for German language.
Note!
If no languages are defined in System.properties file , the following defaults are applied:
Active languages used in EBMS: DK and US;
Default language is US
Languages available in Translator application: US, DK
The maximum length of language key (i.e. ZH_MO, PL_PL, ...) is 32 symbols.
Language code should be specified with underscore. Otherwise, language will not be available as active or translatable.
Correct: DE_DE, UK_UA
Incorrect: DE-DE, UK-UA
Please, refer to the Language settings section for the list of languages and their codes currently supported in the system.
Define which translation file will be used by the system. If “useDefaultTranslation” is set to “true” system will use default translation file
translator_export.xmlRestart the application server in order to apply the properties added to the
webapp.yamlfile.
Working with Translator
Working with translations involves the following activities:
Searching for specific user interface label translations
Adding or editing translations for languages defined as translatable
Importing non-translated labels (the so-called “nerds”) for entering translations
Getting Started
To start working with translations, enter the Translator menu by navigating to System Configuration > Sites > System Status > Translator.
On the Login for maintenance page, enter login and password: the same as for database upgrade procedure.
After logging in, the page for managing translations will be displayed.
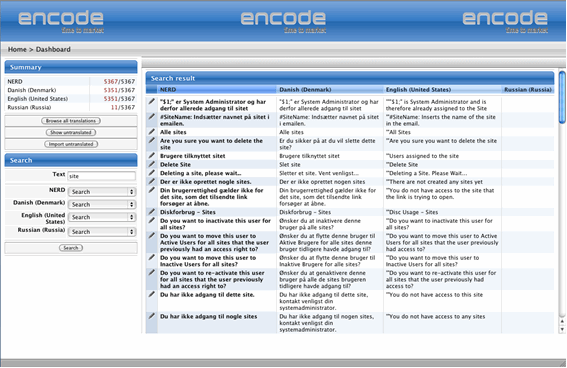
The upper part of the left frame of the translation window shows summary information regarding the translated and not translated labels and the languages to which these labels can be translated. The Nerd field represents the original text labels that have been marked for translation in the code. Each language field in the summary section contains two values: the value in red color — is the number of translated labels in the system, the value in black color shows the total number of the translatable labels imported to translator.
The lower part of the left frame contains search frame where you can perform search across the translated and not translated labels in different languages. Entering searching criteria in the Text field allows search by the translatable text. Search result matching the searching criteria is displayed in the right frame.
Import labels for translation
In order to import not translated labels to Translator, perform the following steps:
Click the Import untranslated button under the Summary section. The window appears with the list of not translated labels that are marked for translation in the system.
Note! Not translated texts will be added to the list of untranslated texts only after you have visited the page that contains these untranslated labels in the system.
Select the check boxes next to the labels you want to import for further translation, and click Do Import. After import the total number of the translatable texts in the Summary section will be updated.
Browse Translations
There are several ways to browse translations using Translator:
Click the Browse all translations button under the Summary section of the Translator page to view all “nerd” labels and their available translations in the system.
Click Show untranslated to search for all labels for which translations have not been entered. The list of not translated labels includes all labels in the system that does not have translations for at least one of the active languages in the system.
Use the Search section in the lower left pane of the Translation page to search for translations for a specific label.
In the Text field, type the name of the label to look translations for.
From the select boxes below, for each of the active languages, specify one of the search options:
Do not search
Search
Translated
Untranslated
Click search to perform search according to the specified criteria.
Working with Translations
To add translation to the not translated label, or edit the existing translation text for a specific language, follow the below steps:
Click the “Edit” icon next to the label.
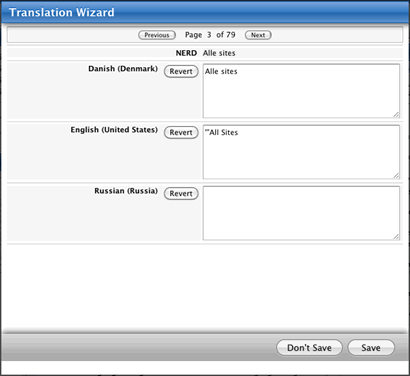
The Translation wizard window will open. The Nerd field is not editable and shows the original text that is a subject to translation into different languages represented by the corresponding fields below.
Fields for languages that are not defined as “translatable” in System.properties will be read-only.
The Revert button next to the language field will discard the changes made to the translation text and will return the translation value before modification.
Clicking the Mark for Removal button will delete all the entered translations for the selected label after clicking Save.
Note! the Mark for removal button is available in Translation wizard only when the system is configured to use default translation file.
After entering new or editing existing translations for different language fields, it is possible to navigate back and forward among the texts clicking the “Next” and “Previous” buttons, but all the modifications made to translations will be saved only after clicking Save.
All the entered translations are applied in the system at once, not requiring application server restart.