Overview
A Selection Rule automatically populates fields with either predefined or dynamically mapped values when specific conditions are met. There are two distinct types of selection rules:
Static assigns a predefined field value that you select in the rule's configuration. This occurs when the rule's conditions are met. For example, if the Format field equals A4, you can set the Template field value to "Template A4."
Dynamic populates fields by matching the field values of a source item to items in a linked module. This means the field values from the source item are used as search criteria to find corresponding items in the linked module. For example, this type of rule can be used to link images to a product based on its Format and Brand values.
Static and Dynamic rules can be applied in Creative Automation Print Studio during the Output Generation step. No additional configuration is required. The rules are automatically applied when assigning templates to the input items during output generation.
IMPORTANT: Selection automation rules are executed under the System user context. This means:
Group and Status restrictions are ignored when populating options through a selection rule.
Filter by Current User cannot be applied.
Note: Selection rules respect filters on Module Link fields. This means that only the options allowed by the filter restrictions will be populated by a Selection rule.
How to Create a Static Selection Rule
Rules Configuration
To configure a Static Selection rule, follow these steps:
Navigate to Automation Rules (see Automation Rules Overview for more details)
Click the Add Rule button
Complete the Basic Info section:
Enter a Name and, optionally, a Description.
From the Type dropdown, select Selection.
In the Conditions section, select a Module. If needed, specify Filter Criteria to configure the conditions that will trigger the rule.
Configure Actions:
Select Static as the Selection Type.
Specify the field and field value that should be set when all configured conditions are met.
Enter a custom value using regular text, velocity templates, or concatenated text. Leave the field empty to remove values from the field.
Repeat for each additional action you want to configure.
Click Save to confirm your settings and create a rule.
.png)
Note: Static Selection rules with custom values have the following characteristics:
It is not possible to assign multiple custom values. You can only remove all values or assign a single custom value.
When duplicate values exist, the most recently created value is assigned by default.
When a text field is selected, only 'Custom Value' is available; 'Field Value' is disabled.
Custom value matching is case-insensitive.
Supported Mapping Field Types
The following field types are supported within field mapping:
Module link
Text option fields
Status fields
User fields
How to Create a Dynamic Selection Rule
Rules Configuration
To configure a Dynamic Selection rule, follow these steps:
Navigate to Automation Rules (see Automation Rules Overview for more details)
Click the Add Rule button
Complete the Basic Info section:
Enter a Name and, optionally, a Description.
From the Type dropdown, select Selection.
In the Conditions section, select a Module. If needed, specify Filter Criteria to configure the conditions that will trigger the rule.
Configure Actions:
Select Dynamic as the Selection Type.
In the Field Mapping section:
Select the Module Link field that should be populated as a result of rule execution.
The Module value is automatically prefilled with the current module.
The Lookup Module value is automatically prefilled with the module that the selected Module Link points to.
In the When section, select the fields in the source and target modules that will be used to match items or options in the Lookup Module.
Click Save to confirm your settings and create a rule.
.png)
Supported Mapping Field Types
The following field types are supported within field mapping:
Module link
Text
Decimal numeral
Integer
Fields taking options from site configuration (Country, Region etc)
User fields
Searchable text concatenation
Automatic Numbering
How to Configure Linked Action
For Automation Rules to be available in the user interface, the relevant module must have Actions configured in Site Configuration.
Configuring an Action for Rules on the Current Module
To allow execution of rules on items within the same module:
Go to Site Configuration → {Module Name} → Actions.
Click Create Action.
From the Event dropdown, select Create and Update.
From the Action dropdown, select Execute Task.
From the Task Name dropdown, select Execute selection rules.
Click OK to save.
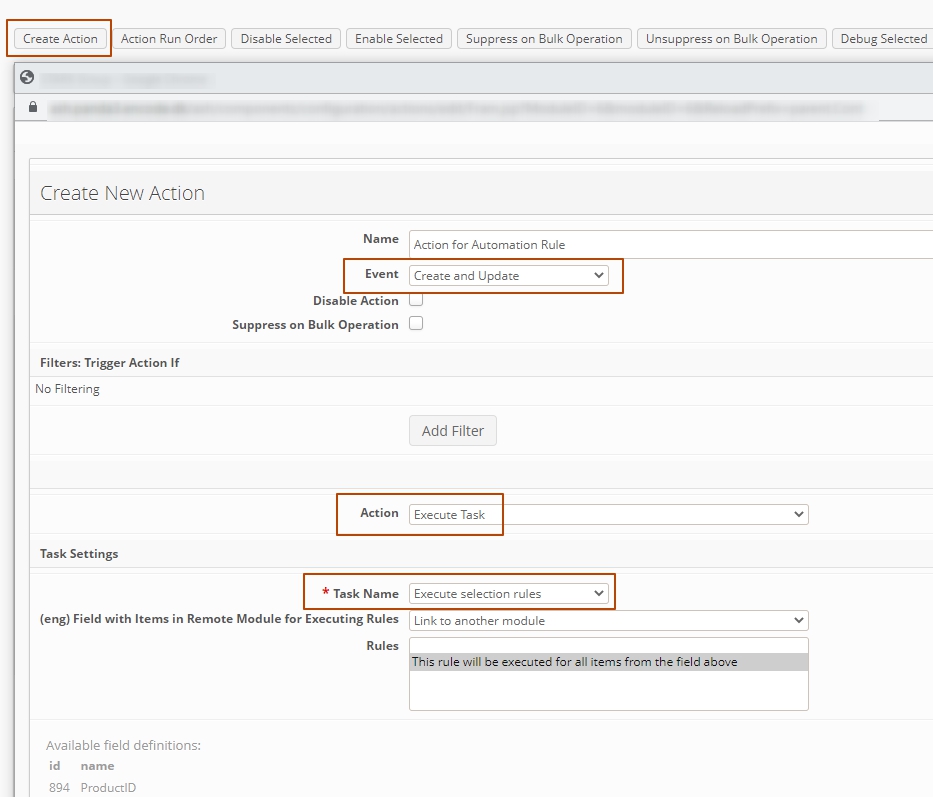
Configuring an Action for Rules on Another Module
To allow execution of rules on items in a different (linked) module:
Go to Site Configuration → {Module Name} → Actions.
Click Create Action.
From the Event dropdown, select Create and Update.
From the Action dropdown, select Execute Task.
From the Task Name dropdown, select Execute selection rules.
From the Field with Items in Remote Module for Executing Rules dropdown, select the relevant Module Link field. Rules will be executed for each related item in this field.
In the Rules multi-select field, choose one or more active selection rules that will be applied to all items identified by the selected field.
Click OK to save.
An image highlighting action configuration