This chapter looks at the import functionality as a tool to mass-create items in modules.
General Import Configuration
Location: Site Configuration > Module > Import
Along with the manual creation of items in the module, importing functionality can be used to mass-create items in the module.
In order to import items to the module, the following pre-conditions should be performed:
prepared xml or csv file should be uploaded as a template, to perform mapping of the xml tags (or csv headers) to the module fields
xml/csv file itself should be uploaded for items creation
All the settings related to the import functionality in the system, are performed in the Import menu of the module.
To configure import for a specific module, perform the following steps:
Go to Site Configuration > Module > Import and click the Import Settings button on the toolbar.
In the Import Settings window, click the Upload template button.
In the Upload Template window, click Browse to search for the xml to be imported. Uploaded to selected xml and click Save Settings.
As soon as the xml template is uploaded, select the root element, and then perform the mapping of fields in the module to the xml tags of the uploaded template. The tag selected as a root element defines the item itself. Meaning that within these tags, the tags representing field values of the imported item are enclosed.
The Field Settings section of the Import Settings window is “divided” into two so-called columns: the left one lists the names of the xml tags from the uploaded xml, the right one — the select boxes from which corresponding module fields can be selected.
After xml tags have been mapped to the module fields, select the field that will be used as “Key”. By the key field, the system will understand whether the item already exists and should be updated, or the item is new and will be added to the module.
Configure other import settings to adjust the import functionality to your exact needs:
Option name | Description |
|---|---|
Save Imported Files and Logs | This option enables the automatic cleanup for imported files and log record after certain time period. Note, that failed imports records are not cleaned up automatically. |
Keep logged files for | The number of days to keep the log information. Empty or “0” value means keeping data forever. |
Only update existing records | Select the check box to only update the records that already exist in the module. New elements will not be imported from the xml template. The already existing elements are identified by the field value of the field marked as key. If the option is not enabled, all the items with key field’s values not yet existing in the module will be imported to the module |
Ignore Field Validation | Select the checkbox to disable validation on required fields or invalid data imported. |
Run Import Scheduled | If you choose to run import on a regular basis using scheduler job, select the Run Import Scheduled check box. |
Remove items missed in imported file | If enabled, the items that are not present in imported file will be removed. |
Skip update unchanged items | If enabled, existing items identical to those in the imported file will be skipped. |
Skip Indexing Items | If enabled, imported items will not be indexed and cannot therefore be found using quick search. Available from version 11.0.0 onwards |
Skip Executing Actions for Items | If enabled, actions for the imported items will not be executed. Available from version 11.0.0 onwards |
Reactivate previously inactivated items if present in import file | If enabled, existing inactive items will be activated if they are present in the imported file. |
Action Class | Specify action class that can perform certain actions, for example create new xml file with the adjusted values after import. |
XML Adjuster Class | Specify the name of the XML Adjuster class that will perform pre-processing of the xml being imported. For example adjusting format of the date to match the format in the system. |
CSV settings | |
Header in first line | Enabled by default, disable if CSV file for import does not contain a header row. |
CSV separator | Possible values: comma, semicolon, tab character. |
File Structure settings | |
Folder for lookup files by references | Specify the path to the folder that will be used as a root for picking up files for importing them into the module. |
Ignore Files/Folders starting with | A comma-separated list of values to exclude. Therefore, if comma
The list of excludes is case-sensitive. |
Ignore Mime Types | Allows filtering files for importing by their mime types. |
Import files directly from FS (Files will be removed after import) | Activated the Folder Import mode. The items to be imported not from the XML/CSV structure but from the folder structure. |
Please note: starting from v.14.0.0 some breaking changes will be implemented - if "Save Imported Files and Logs" is set to TRUE then we should ensure that "Keep logged files for" value is greater than 0 and it defaults to 30 days.
Please note: starting from release v.15.0.0 fields with auto content will be prefilled and field dependencies are respected in result of item update via API.
It’s important for fields to be in json in logically correct way to prevent cleanup of already filled fields by dependency in case order mixed up.
For temporary return to old behavior (ignoring dependencies and prefilling) - new yaml parameter added:
encode.webapp.external-api.legacy-set-fields
The actual import can be performed in 3 ways:
By manually uploading the xml file in the Import Section of the Module configuration
By running the scheduler job, that will check the Import folder and will perform the import of items to the module
By running import scheduled action, that will check folder on remote FTP/SFTP server and will perform the import of the items to the module
To import the xml file manually:
Go to Module > Import and click the Import File button on the toolbar of the Import Settings page.
Browse for the xml file to be imported.
Click OK.
Check the result of the import switching to the Log tab of the Import page.
To perform import of xml file using scheduler job, the following steps should be performed.
Select the Run Import Scheduled check box in Import Settings.
Go to the ../Files/ModuleRoot/{ModuleID}/Import, and copy the xml that will be imported to the Import folder.
Configure Scheduler properties to run FieldImportJob:
Go to System Configuration > System Status > Scheduler.
Click the Scheduler Properties button on the toolbar
Add the following to the
Scheduler.propertiesfile:joblist=fieldImport job.fieldImport.type=dk.encode.ebms.scheduler.FieldImportJob job.fieldImport.interval=100Save the changes.
Click the Start Scheduler button to launch the job.
As soon as the job is run, check the module for the imported items.
To perform import of xml file from ftp server using scheduled import action, the following steps should be performed.
Create FTP connected service(How to configure FTP connected service - https://documentation.encodify.com/docs/ftp-connected-service)
Create Import Settings
Create Scheduled Import action with mapped previously created Import Settings(How to configure Scheduled Import action - https://documentation.encodify.com/docs/scheduled-import)
Go to the folder specified as Remote Folder in Scheduled Import action settings (i.e. /ftp/test) and copy the xml that will be imported to those folder.
As soon as the action is triggered, check the module for the imported items.
Please note: in case if the XML file for import contains any invalid value - the corresponding item won't be imported/updated and Result will be marked as 'Partial' in log.
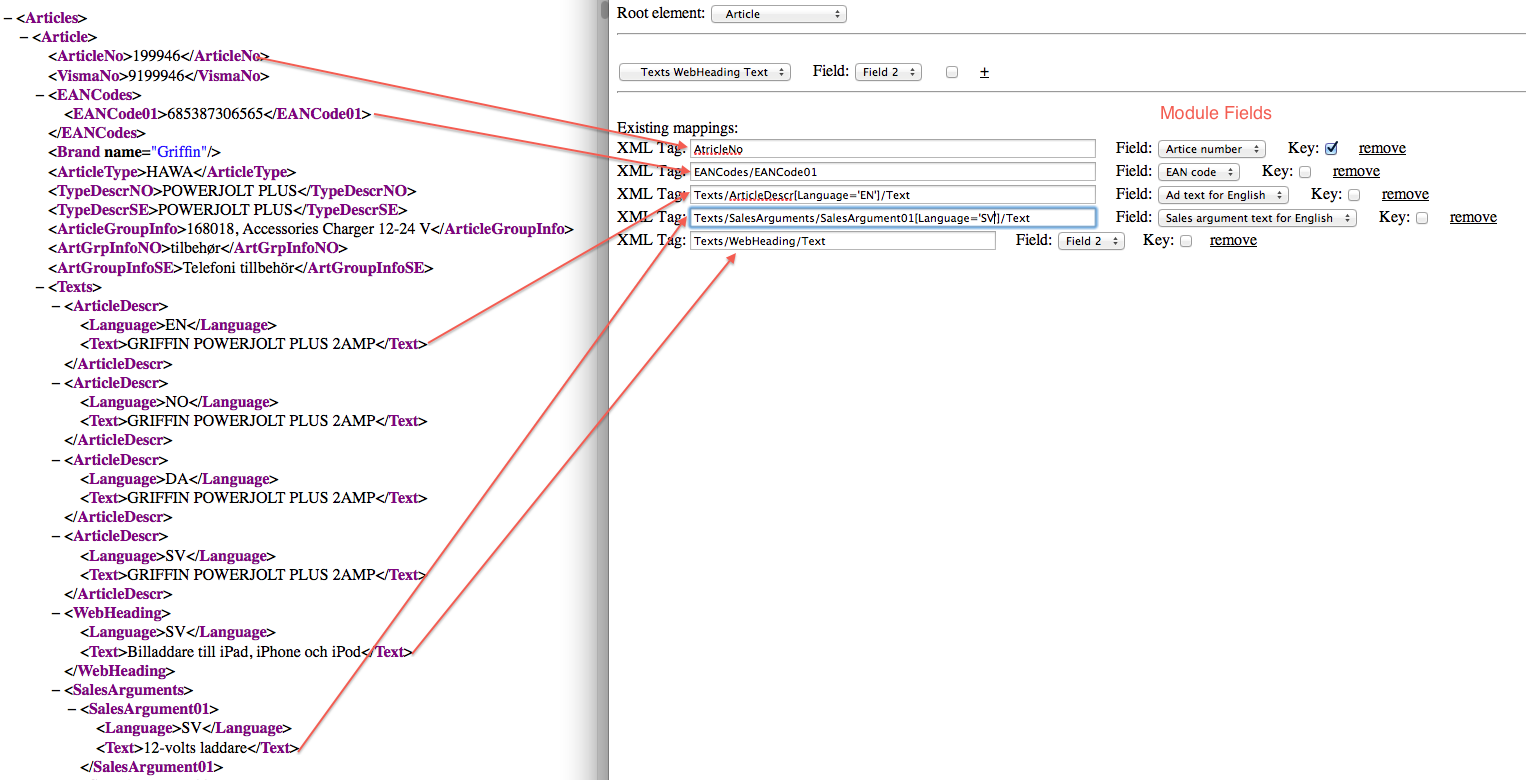
Importing data from XML with nested elements
Example of the XPATH for mapping the nested elements in the XML.
Setting Group Restriction for items via Import
For modules with enabled group restriction it is possible to perform import of items with group restriction settings. For more Info regarding User Groups and Group Restriction please refer this manual 3.3 User Groups and Group Restrictions.
Depending on production needs and what will be present in the imported xml file, groups can either be identified by name or id during import. According to this, mapping of group nodes should be performed correspondingly. See the example below:
Using node attributes
...
<product>
<groups>
<group id="1" name="Marketing"/>
<group id="3" name="Advertiser"/>
</groups>
<productname>Giraffe Huge</productname>
<productId>1123581321</productId>
</product>
...
Using node values
...
<product>
<groups>
<groupId>1</groupId>
<groupName>Advertiser</groupName>
</groups>
<productname>Giraffe Huge</productname>
<productId>1123581321</productId>
</product>
...
In the examples below we have two groups:
Marketing with id=1
Advertiser with id=3
As groups are assigned by Group Id OR Group Name in both of the described cases Marketing and Advertiser groups will be assigned to a product. There are a lot of cases when All Users Can Access This Item should be assigned to a user via import. If group restrictions are set to the module where import is to be performed All Users Can Access This Item can be assigned to items by importing empty node or attribute. For example:
If mapping is set using node values
...
<product>
<groups>
<groupId></groupId>
<groupName></groupName>
</groups>
<productname>Giraffe Huge</productname>
<productId>1123581321</productId>
</product>
...
In case mapping is set using node attributes
...
<product>
<groups>
<group id="" name=""/>
</group
<productname>Giraffe Huge</productname>
<productId>1123581321</productId>
</product>
...
The easiest way is just to specify single parameter empty (doesn’t matter node attribute or node value you use)
...

<product>
<groups>
<group/>
</groups>
<productname>Giraffe Huge</productname>
<productId>1123581321</productId>
</product>
...
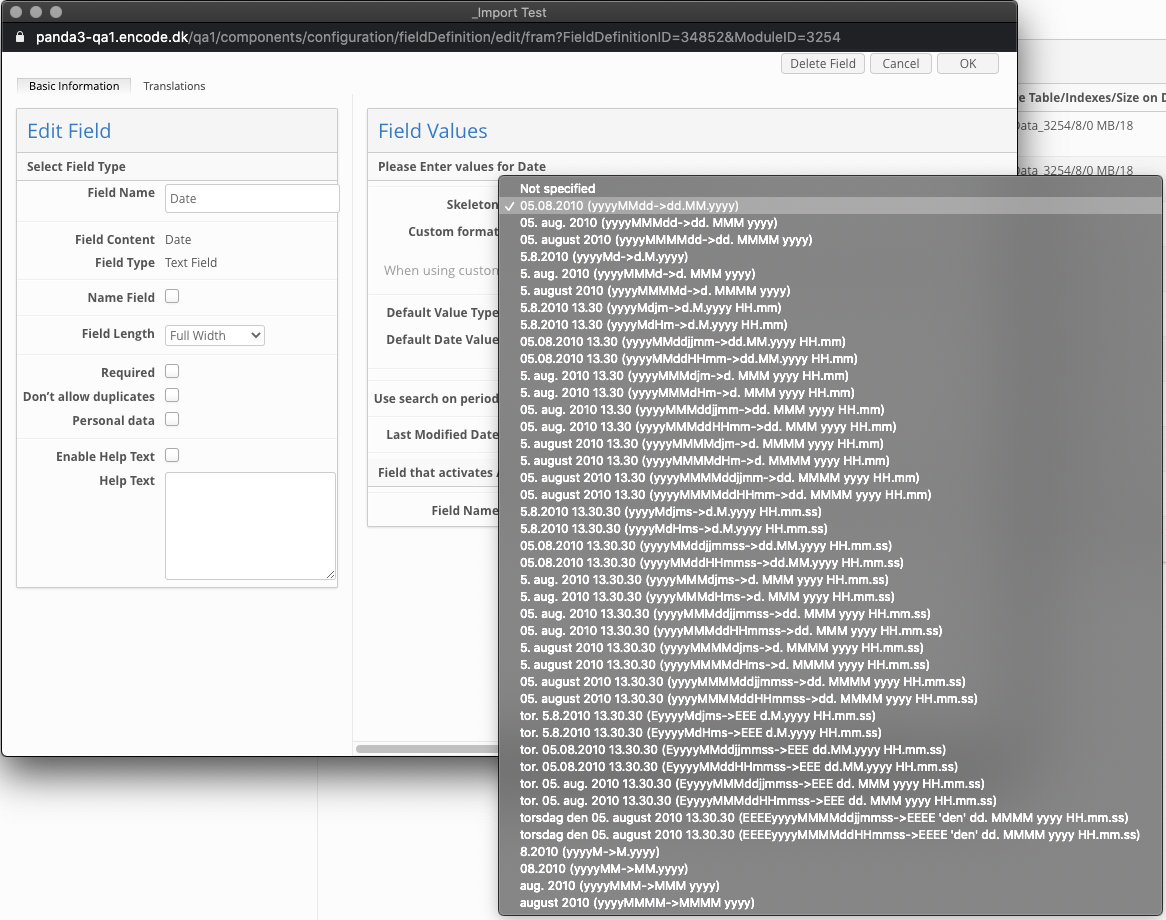
Date Formats Supported by XML import
Version 9.101.0 and after
Starting from version 9.101.0 date field format is defined via skeletion. What previously used to be 4 different field definition, is now 1 field type "Date" with a variety of skeletons that will define if date representation is date, date time, week-year, month-year. Skeleton list follows locale settings, which means that corresponding separators and localization is appplied.
The above mentioned changes has impact on the way dates can be imported into our system.
Import configuration was extended with 2 new settings: "Locale" and "Date format" that allows to specify which locale and format to apply to the values during import if the latter do not match locale and format of the user/site.

If no Locale or Date format settings are specified, which is the default state, it is important to ensure that the imported values match the skeleton that corresponds to the format and locale of the user if import is being done via "UI" or site if import is done by scheduler job.
In case imported date values does not match the skeleton and locale, values will not be imported and import log will inform about the invalid data in the import file.
E.g. 03/02/2021, 08:00:00 will not be imported into the field with format 03-02-2021 08:00.

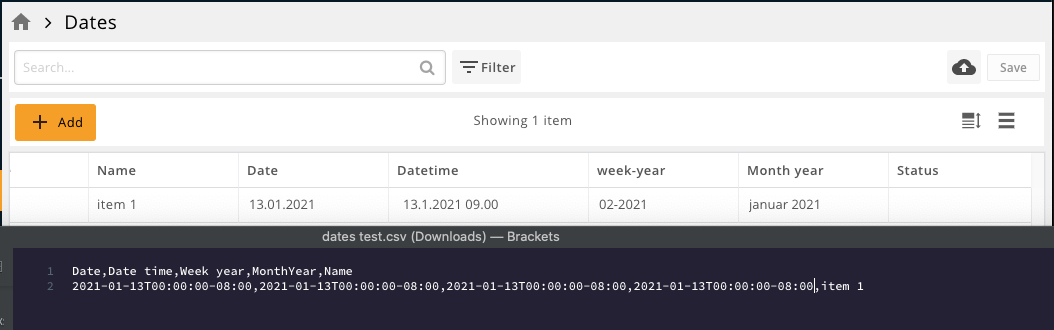
Alternatively, dates can be imported in ISO format to avoid being dependent on skeleton and locale. Example of date time value (in UTC) : 2021-01-27T07:42:50Z. Value with timezone 2021-01-13T00:00:00-08:00.
 Once locale/date format has been specified in import settings, exactly this format/locale will be used during import, without any fallbacks or respect of the locale/format settings of user or site.
Example:
To import value | Use format |
|---|---|
18-02-2021 | dd-MM-yyyy |
15-2021 | ww-YYYY |
20210313 | yyyyMMdd |
11-2021 | MM-yyyy |
The following 2 links can be used a guide for date format settings:
https://unicode.org/reports/tr35/tr35-dates.html#Date_Field_Symbol_Table
https://unicode.org/reports/tr35/tr35-dates.html#Date_Format_Pattern_Examples
It is still possible to import date field values as milliseconds. System will parse milliseconds value as date if value contains 12 digits or more. Corresponding user/site locale/date format settings will be applied.
Handling of Special Cases (import of "00-00-0000")
Starting from version 9.101.0 "Search Pattern" and "Replace String" import settings should be used in order to be able to import date value "00-00-0000"
Search pattern: ^(.*?)(00\/00\/0000)?$
Replace string: $1
This setup will import an empty value into the date field, instead of failing import.
Versions before 9.101
International format / US format is date format setting for the site (System Configuration > Site list > Site Edit > Date Format), that defines how date value in the imported xml tag will be processed by the system.
For example: International date format presupposes day-month-year value, while in US format month value goes prior to the day. This defines the corresponding processing of the incoming value: 01/02/2013 will be interpreted as 1st of February 2013 with International date format for the site, and 2d of February 2013 for the US format.
Date | Date/time | Week/year | Month/year | |
|---|---|---|---|---|
International format | ||||
28 November 2003 | yes | yes | no | no |
28. November 2003 | yes | yes | no | no |
28/11/2003 | yes | yes | no | no |
28.11.2003 | yes | yes | no | no |
28-11-2003 | yes | yes | no | no |
28-Nov-2003 | yes | yes | no | no |
28/Nov/2003 | yes | yes | no | no |
28112003 | yes | yes | no | no |
29-2013 | no | no | yes | no |
07/2013 | no | no | yes | yes |
Jul. 2013 | no | no | no | yes |
28 November 2003 | yes | yes | no | no |
US Format | ||||
11292003 | yes | yes | no | no |
November 29, 2003 | yes | yes | no | no |
Nov. 29, 2003 | yes | yes | no | no |
11/29/2003 | yes | yes | no | no |
11-29-2003 | yes | yes | no | no |
11.29.2003 | yes | yes | no | no |
11.29.03 | yes | yes | no | no |
29-2013 | no | no | yes | no |
07/2013 | no | no | yes | yes |
Jul. 2013 | no | no | no | yes |
Note!
Time for Date-Time fields will be filled only if date in the imported XML is specified:
in the milliseconds
as hh:mm
Import of Numeric field values (Version 9.101 and later)
Starting from version 9.101 with introduction of the internationalization functionality, numeric field format is defined solely by locale settings of the user/site. It is no longer possible to specify number format on the field definition level.
As mentioned before, system applies user locale if import is being done via UI, or site locale if file is imported by the scheduler job.
In order to still be able to support scenarios where imported data is coming in different number formats, "Locale" setting was introduced in configuration of import.
This setting allows to tell the system which format should be applied to the numeric value during import, regardless of the user or site locale settings.
Example:
XML file is being imported via UI (Site Configuration > Module in question > Import).
User performing import operation has "da-dk" locale setting, which uses comma "," as a decimal separator.
Imported file contains value "40.2" which uses dot "." as a decimal separator.
In order to import "40.2" value correctly, we need to specify locale that uses dot "." as a decimal separator e.g. "en-US".

File Structure Import
As an alternative to the External File Structure functionality (aka. EFS) import of folder structures with files is available as a part of the module import functionality.
The advantage of using the file structure import as compared to EFS scheduler job are the following:
Files are deleted after import
Version control is supported
It is possible to use regex for search and retrieve of the folder names and use replace strings
Possible to use multiselect fields for mapping several folders from the same level
Configuration and Setup
To enable and configure functionality, follow the below steps:
Go to Module > Import > New Import
Enter the name for the import configuration > select the "Import files directly from FS (Files will be removed after import)" check box.
Enter path to the root folder in "Folder for lookup files by references" field. It is possible to specify path in 2 ways:
../Files/FolderName
/data/Files/FolderName
Specified path would be the root folder level.
In the Field Mapping section, specify the following:
fullPath (required) | File Field | File field into which the file from the folder will be imported to. |
fullPath | Text field | Use this mapping as key to ensure correct handling of versions and files across different subdirectories |
fileName (optional) | Text field | Field will be populated with the file name of the imported file. |
filePath(optional) | Text field | Field will be populated with the path to file relative to the specified root |
path/entry/@level (optional) should be replaced with path/entry[n], where n represents a folder level from root | Module link, Text, Regular option fields | Set up is used when nested folder structure with multiple levels are needed. Field will be populated with the value that corresponds to the folder name of the mapped level. Please note! When using module links or option fields in configuration, it is important to make sure that the options corresponding to the imported file structure exist in the system, as import will not create new values in Encodify. |
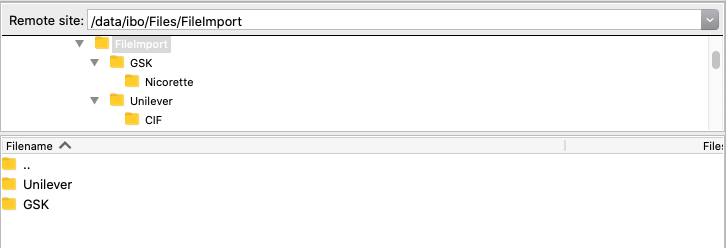
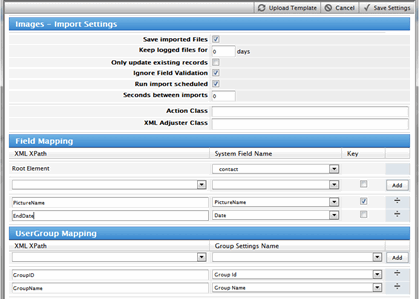
Pic.1 Example of the folder structure
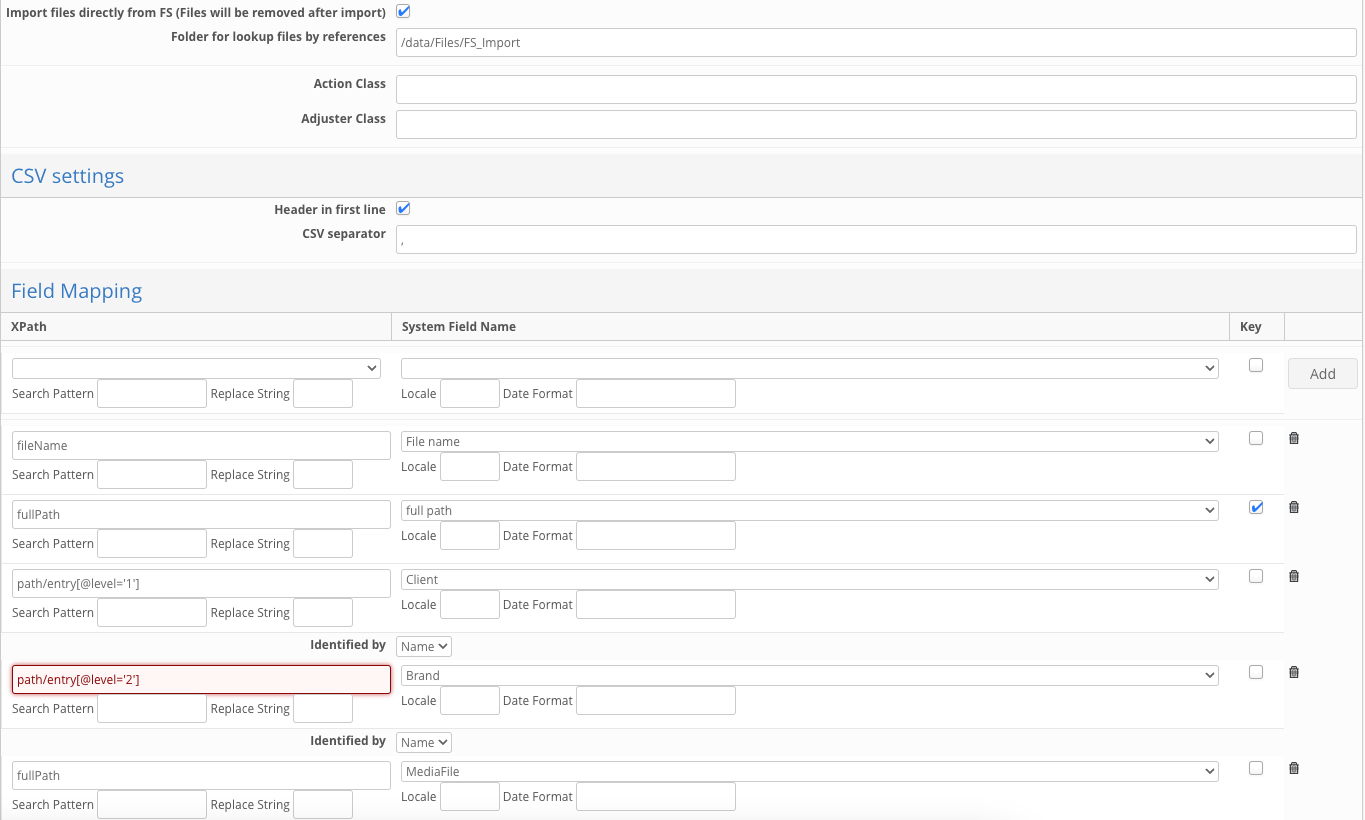
Pic. 2 Example of the folder structure import config
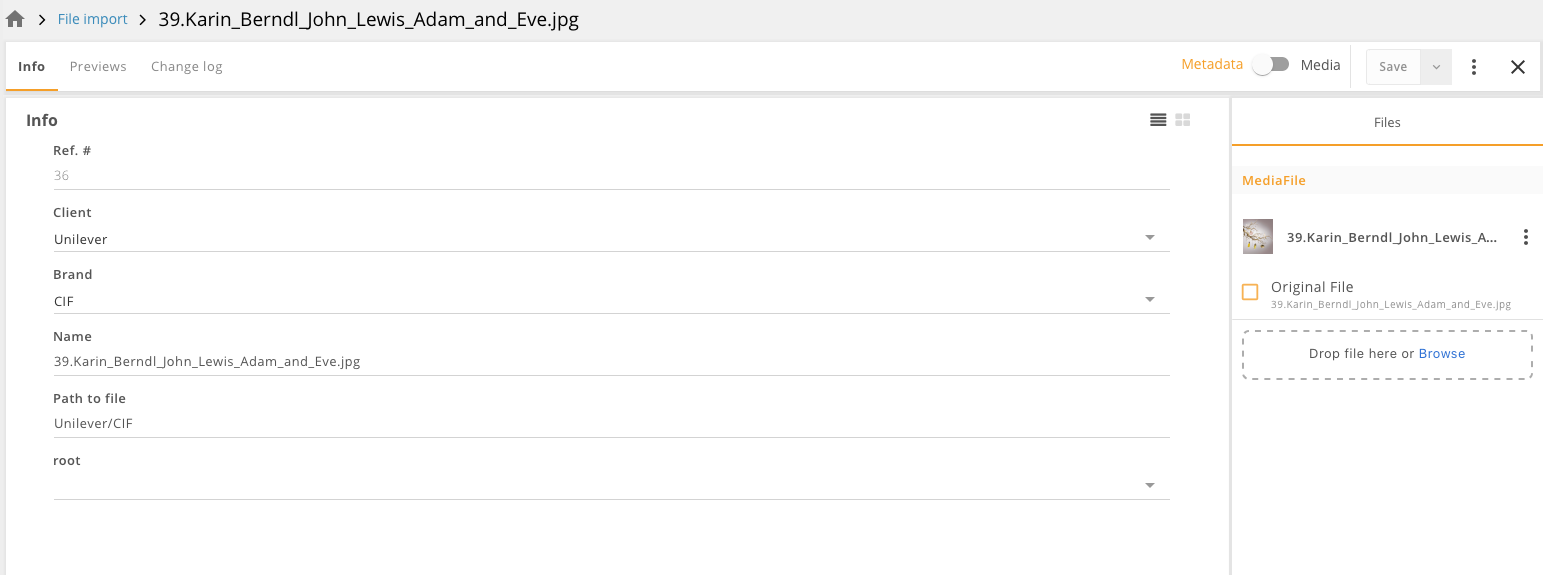
Pic. 3 Example of the imported file
File Structure Import from FTP
In general, File Structure Import from FTP has the same advantages and logic for importing files as regular File Structure Import from File System, but with some differences present in it’s configuration and way of importing files.
The main difference is that instead of triggering via Scheduler Job File Import from FTP is triggered via configured Scheduled Import action.
Also “Folder for lookup files by references”, “Ignore Files/Folders starting with“, “Ignore Mime types“ options from import settings are ignored during file import from FTP since corresponding options from action settings will be applied
Configuration and Setup
To enable and configure functionality, follow the below steps:
Configure Import Settings
Go to Module > Import > New Import
Enter the name for the import configuration > select the "Import files directly from FS (Files will be removed after import)" check box.
In the Field Mapping section, corresponding field mappings should be specified(more info you can find in https://documentation.encodify.com/docs/import#configuration-and-setup)
NOTE: it is recommended to keep "Run Import Scheduled” option disabled in import settings
2.Create FTP connected service(How to create FTP connected service - https://documentation.encodify.com/docs/ftp-connected-service)
3.Create Scheduled Import action with mapped previously created Import Settings(How to create and configure Scheduled Import action - https://documentation.encodify.com/docs/scheduled-import)
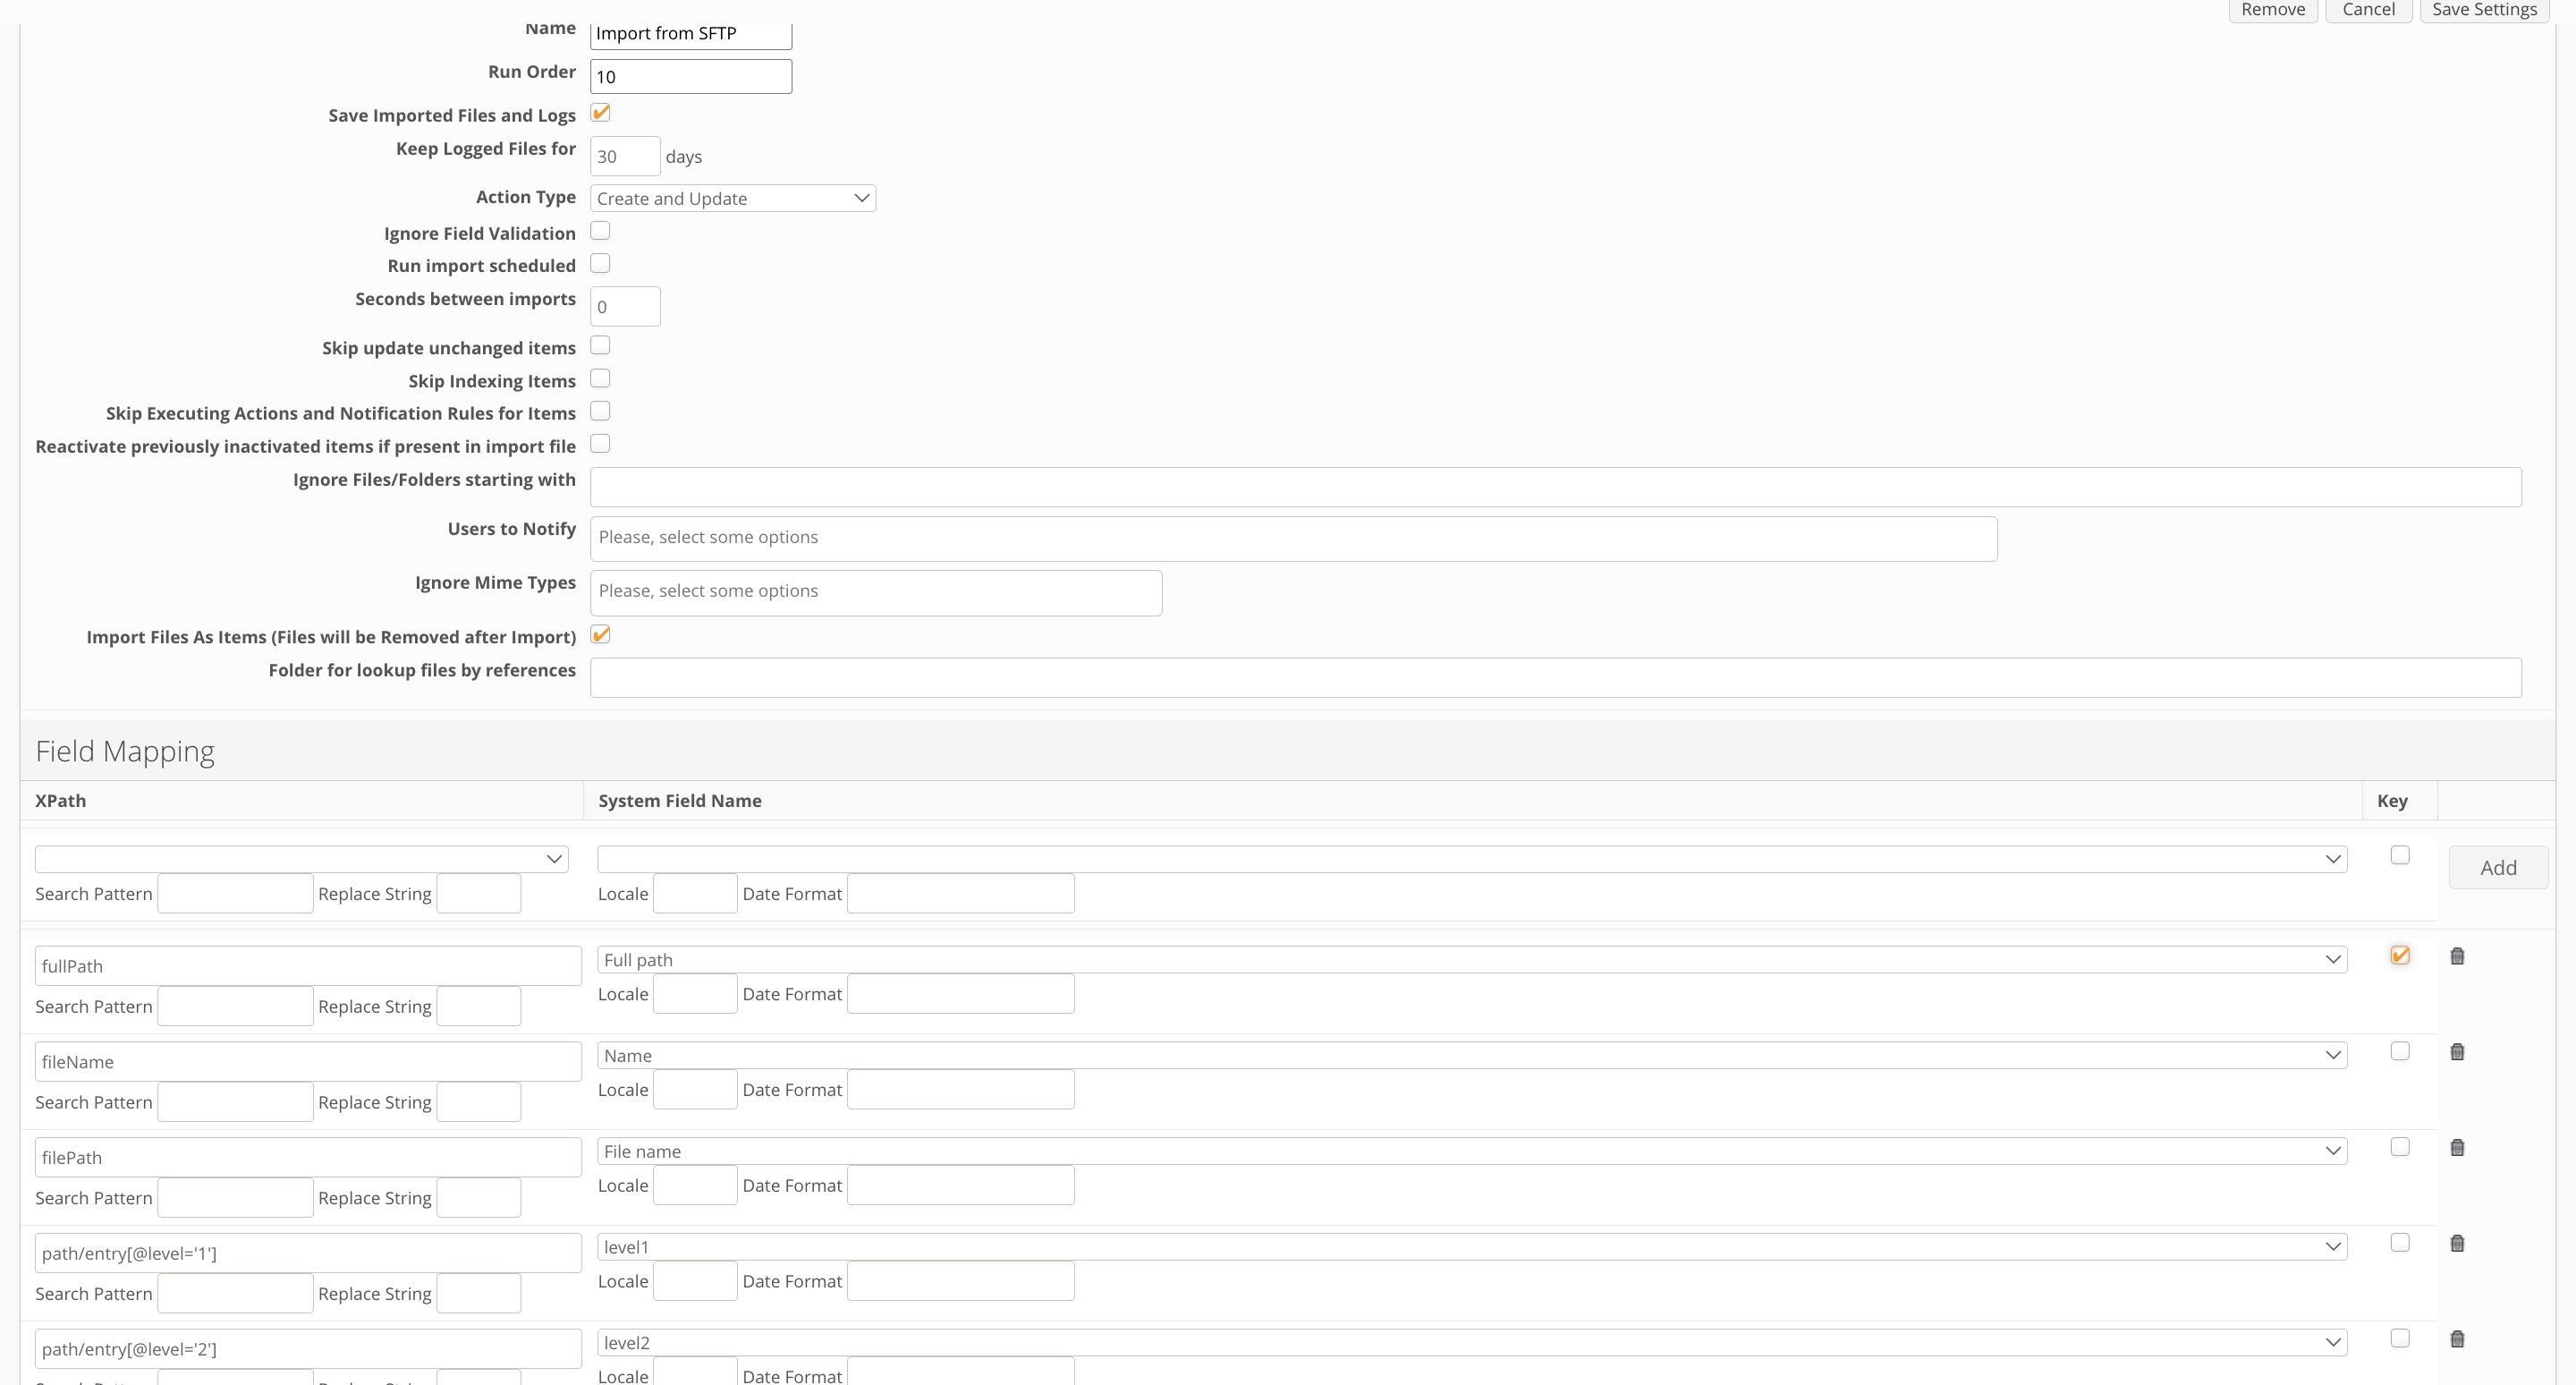
Pic.1 Configuration of File Import config
Known behaviour: it is possible to map up to 10 levels in Fields Mapping section
Important note!
It is recommended to use FullPath mapped to text field as a key for import to ensure that all files from all subdirectories are scanned and imported and versions are supported. Even though FileName can be used as a key when your files are located in root folder (without subfolders present), such key configuration will not work if you need the subdirectories to be scanned for import also.
Re-import of file
In some cases file import can be failed or partly failed(i.e. validation applied, connection issues etc) in order to trigger import again after eliminating causes of failure file can be re-imported via REST API call.
Note: file can be re-imported only if Import Log was enabled and amount of days to keep logs was specified in Import Settings (“Save Imported Files and Logs” and “Keep Logged Files for“ options) and log entry was recorded.
To re-import file:
Go to Module > Import > Import Log of corresponding Import Settings
Click on “Re-import” link in the row of the file to be reimported
Submit re-import action
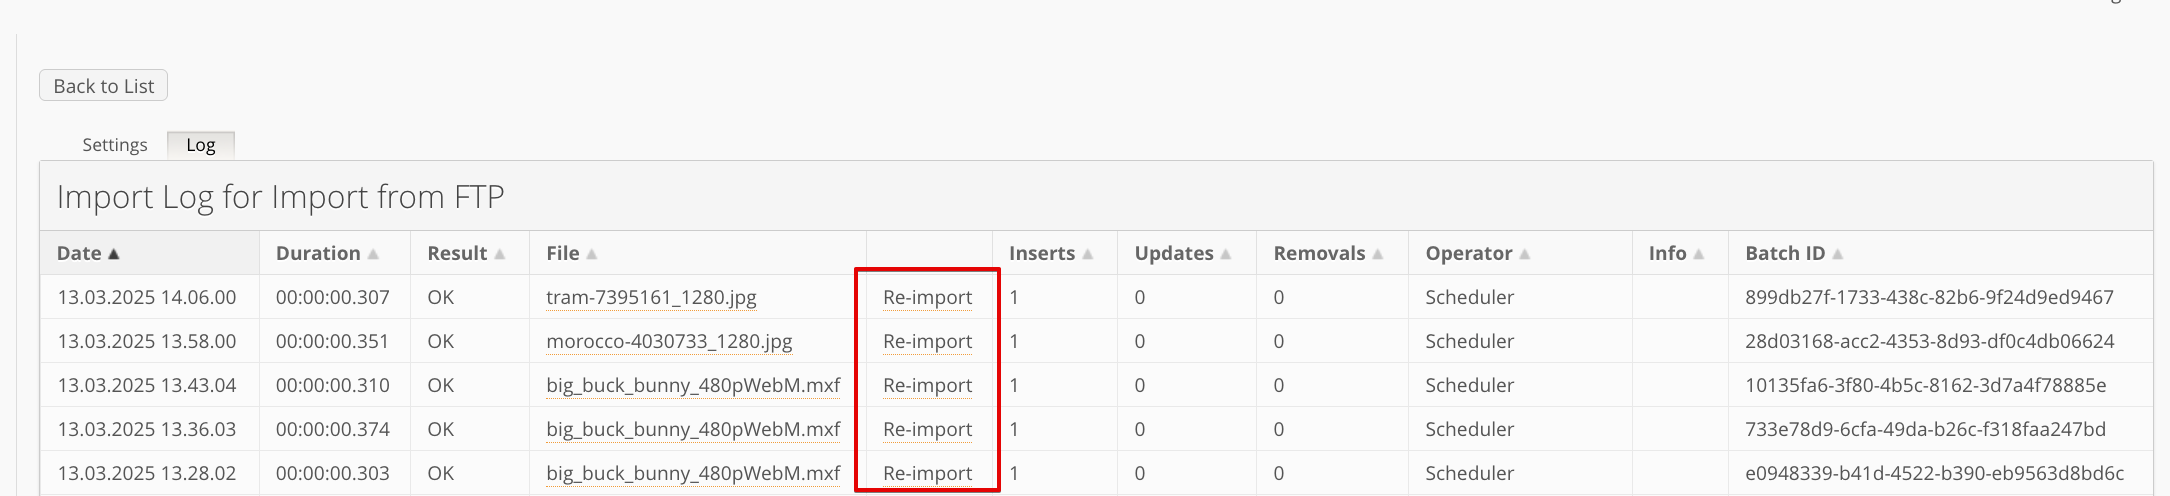
Pic 1. Example of Re-import link
As result of re-import log entry with new batch id will be recorded.
After successful re-import of file new item with imported file will be created in corresponding module
Each file in import log can be downloaded
Known limitation: old log records created before implementing reimport functionality won’t contain “Re-import link