The Template editor window is the place where you edit your XML template by adding new pages and elements to the PDF. The Template Editor is accessible by clicking Create PDF (or Make Ad – it depends on the setting in AdBuilder module) and then the Edit template button in the Make Ad window.
Basic Settings
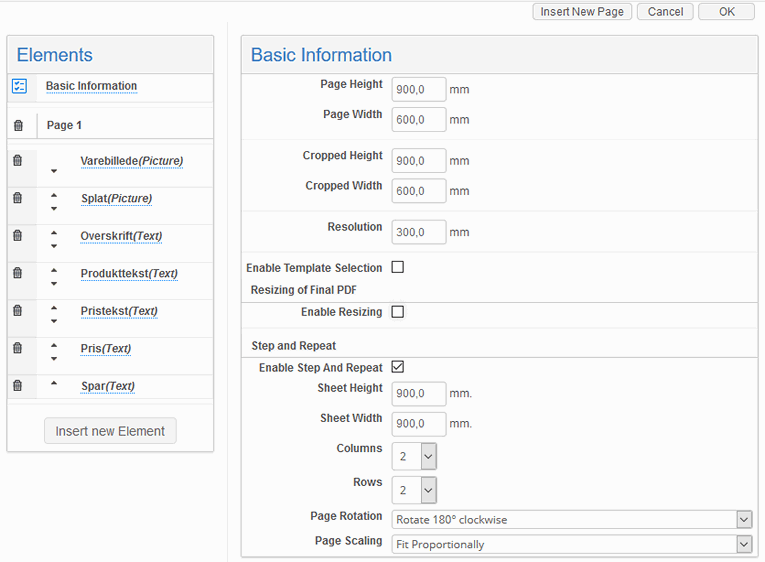
This is where you define the general properties of PDF documents that users will create based on the template.
To edit the basic settings of the template, follow these steps:
On the Elements menu, click Basic Info.
Configure the settings described in the following table.
Setting | Default | Meaning |
|---|---|---|
Page Height | 297.0 | Complete ad height inclusive trim marks etc. |
Page Width | 210.0 | Complete ad width inclusive trim marks etc. |
Cropped Height | Equals Page Height | Final height of the AD that will be used in the newspaper or magazine |
Cropped Width | Equals Page Width | Final width of the AD that will be used in the newspaper or magazine |
Resolution | 300 | Ad resolution expressed in dots per inch. |
Enable Template Selection | Yes/No | Add the "Select Layout" button on each page of the Ad Editor-window. So the user can choose layouts from the variety of pages existing in XML template |
# of Pages | 3 | Specify the number of pages, which will be visible in Ad Editor. |
Resizing of Final PDF
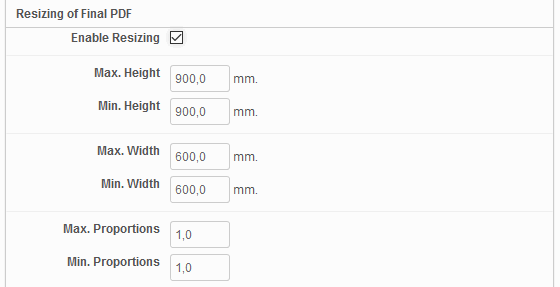
If you want to enable users to adjust the dimensions of resulting PDF documents, under Resizing of Final PDF, select the Enable Resizing checkbox. Then specify the parameters that will define the range of valid values for the user. The following table looks at the parameters and their default values.
Setting | Default | Meaning |
|---|---|---|
Max. Height | 200.0 | Maximum height of the Ad. |
Min. Height | 200.0 | Minimum height of the Ad. |
Max. Width | 131.0 | Maximum width of the Ad. |
Min. Width | 131.0 | Minimum width of the Ad. |
Max. Proportions | 1.0 | Determines how far the user can increase the original height/width ratio |
Min. Proportions | 1.0 | Determines how far the user can decrease the original height/width ratio |
If, when re-adjusting the size of the Ad, the user enters any values that are out of the specified range, the system will display a message prompting the user to re-enter the data to match the required parameters.
Step and Repeat
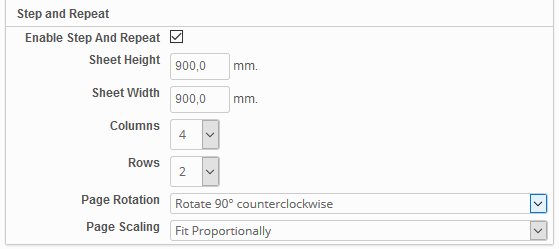
It is possible to arrange multiple copies of a template's output onto a single page. This might be needed, for example, for saving paper costs when printing. The repeated copies of the original template can be distributed in specified grid of rows/columns, rotated and scaled depending on the parameters.
Setting | Default | Meaning |
|---|---|---|
Sheet Height, mm | 900.0 | The height of the result page sheet for placing repeated copies |
Sheet Width, mm | 900.0 | The width of the result page sheet for placing repeated copies |
Columns | 1 | Defines number of page copies repeated horizontally Available options: 1, 2, 4 |
Rows | 1 | Defines number of page copies repeated vertically Available options: 1, 2, 4 |
Page Rotation | None | Defines the rotation angle for the copies in lower half of the result page sheet. Available options:
|
Page Scaling | No Scaling | Scale the copies to fit the result page sheet size. Available options:
|
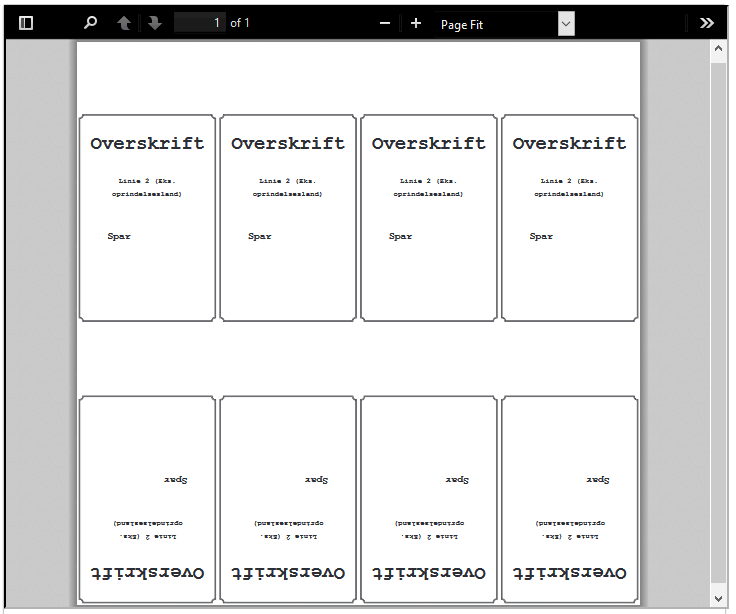
Below you can see the result of Step and Repeat function, which places the page copies into a single sheet according to the specified parameters.
Buttons and Actions
Button name | Action |
|---|---|
Insert new page | Adds new page to the end of the document |
Insert new element | Adds new element to the end of the elements list |
Copy page | Will make an exact copy of the original page with all its elements. New page will appear in the end of the page list |
Copy element | Copy element with all its settings. The new element name will be automatically appended with a next number, e.g. 'Company name' -> 'Company name 2' |
Delete page/element | Removes a single elenement or the whole page with all its settings |
Apply | Applies the recent changes made in the document without closing the Edit Template window. After clicking the button, the Make ad window and PDF preview are correspondingly updated with the latest changes. Can be used as preview of the changes to avoid extra navigation between the Edit Template and Make Ad.
|
Save and Close | Applied and saves the recent changes made and closes the Edit template window. |
Cancel | Reverts the changes made and closes the Edit template window. Changes made before clicking Apply button will not be reverted. |
Managing Pages and Elements
For users to be able to add text or graphics to their Ads, the template should contain placeholders in which those could be inserted. In the Template Editor, these placeholders are called Elements, or Fields.
In the Template Editor window, all pages and elements that your template contains are listed on the left side, in the Elements menu.
Managing pages
To add a new page to your template, click Insert New Page on the toolbar of the Template Editor window. This creates Page item in the Elements menu, with an Insert New Element button under it, which you will use to add elements to the page.
To delete a page, click the Delete icon next to it on the Elements menu.
Managing elements
To add a new element to your template, follow these steps:
On the Elements menu, click Insert New Element under the page on which you want the new element to appear.
In the dialog box that opens, select the type of element in the Field Type list. Currently, three Field types are available for selection: Text Field, Picture Field, Color field.
Select the needed field type and click Insert.
.png) When you add a new element to a page, its name appears under that page in the Elements menu. To edit a particular element, click on its name in the menu. The settings for the element will appear on the right side of the window, where you can edit them.
When you add a new element to a page, its name appears under that page in the Elements menu. To edit a particular element, click on its name in the menu. The settings for the element will appear on the right side of the window, where you can edit them.
To delete an element, click the Delete icon next to it on the Elements menu.