Once you have configured the necessary modules, you have to link them together in one system so that they can interact and share resources with each other. You link the modules by creating and configuring a module of the type AdBuilder.
Creating an AdBuilder module
To create an AdBuilder module, follow these steps:
Go to Modules > Manage Modules and click + Add Module button on the toolbar.
In the dialogue box that opens, select AdBuilder in the Type list.
In the Name box, type a name for the module.
In the Sort Order box, type a number that will determine the position of the module among other modules on the Portal page.
Configuring the AdBuilder settings
To configure the AdBuilder settings, follow these steps:
In the AdBuilder module configuration menu, click Settings.
In the dialogue box that opens, configure the options discussed in the table below.
Option | Meaning |
|---|---|
Template Module | Module used to store the layout templates. |
Field with XML-Templates | Field in the above-specified Template module to which XML templates are uploaded. |
Field with PDF templates | Field in the Template module to which PDF templates are uploaded. |
Label on AdBuilder Button | Name of the button used for generating the PDF document. For example: “Create Ad”. |
Show Info-Button in Search Result | Define whether the Info button will be displayed for the item in the search results. |
Enable Text Export (decommissioned in 14.0.0) | Select the check box to make Export Text button available in the Make Ad window. Clicking the button, the text from all text fields will be exported to the HTML file. |
Module with saved PDF-files | Module used for saving PDFs created in Template module. |
Field with Saved PDF | Field in the "Saved PDFs" module to which the resulting PDF file is saved. |
Field with XML Template | Field in the "Saved PDFs" module to which the modified XML template is saved when the user saves an Ad to the module. |
Field with PDF templates | Field in the "Saved PDFs" module to which the Ad's PDF background is saved. |
Field with Name | Field in which the user enters the name for the Ad being saved. |
Field with Date | Date field that stores the date on which the Ad is saved. |
Field with AdBuilder ID | Field of the type Integer that stores the ID of the AdBuilder module. |
Field Template | Field template from the "Saved PDFs" module presented to the user when saving an Ad to the module. |
Label on Button | Name of the button used for saving PDF files in the "Saved PDFs" module(s) |
Generate Layout XML | Determines if the Layout XML version of the template should be generated when the user saves an Ad in the "Saved PDFs" module |
Save Layout XML in | File field from the "Saved PDFs" module, to which the Layout XML template is saved. |
Insertion Module | Module used to store the text from the ad and usually has configured action to send the link to generated PDF via email. |
Text on Button | Name of the button used for saving a final PDF file to the Insertion module selected above. |
Allow naming of PDF file | When selected, this prompts users to specify names for PDF files when saving them to the Insertion module |
To have the possibility to track which fields in the Templates module are used for a certain Saved Ad, it’s possible to configure the copying of field values from the Module with Templates to the Module with saved PDF files.
To configure copy field values, follow these steps:
In the AdBuilder Settings window click Edit button next to module name where field values should be copied to
Configure Mapping in Set Field Mapping window
Default Picture Module Configuration
The lower part of AdBuilder Settings window represents the configuration of the module with pictures that will be used for creating a PDF. Pictures from the module specified here will be available in the Advanced Search dialogue box that the user accesses when assigning pictures, both in the Make Ad and Edit template window.
To configure the default picture module, perform the following steps:
Go to AdBuilder>Settings>Edit Settings>Picture Properties section.
In the Get Pictures From field, select the module that stores images to be used in making Ad.
Select the media field to which the files in the Pictures module are uploaded.
In the Media Holder field, specify the media holder that contains the files.
In the Media Holder for Preview field, specify the media holder that contains preview images.
Recognize Text within a text field (decommissioned in version 14.0.0)
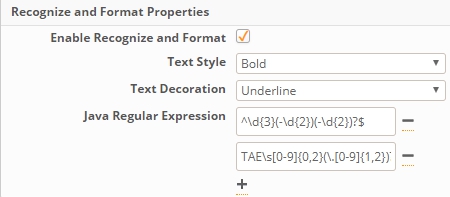
To Recognize Text within a text field & format it automatically (Apply Bold and Underline) to use on Adbuilder such functionality needs to be configured.
To configure Recognise and Format Properties, perform the following steps:
Go to AdBuilder>Settings>Edit Settings>Recognize and Format Properties section.
Select the checkbox near the "Enable Recognize and Format" option.
Select Text Style and Text Decoration that should be applied.
Insert a specific term into the "Java Regular Expression" field to define text to be formatted.
Examples:
RegExp: ((?<!([A-Za-z]{1,10})-?)[A-Z]+\+\d+%\+)
Expression matches: TAE+number%+"
RegExp: (TAE|T.A.E.)\s([0-9]{0,2}(\.[0-9]{1,2})?%?|(100)(\.[0]{1,2})?%?)
Expression matches: T.A.E. number% and TAE number% and TAE number and T.A.E. number
Note! It is recommended to avoid strict regular expressions like ^\d{3}(-\d{2})(-\d{2})?$.
Limitations:
Target font style works only if it's possible to find a font that matches the style, eg "Recognise and format" will try to apply Times New Roman Bold if a text field uses Times New Roman font.
Formatting is impossible for fields with "# of Columns" setting > 1.
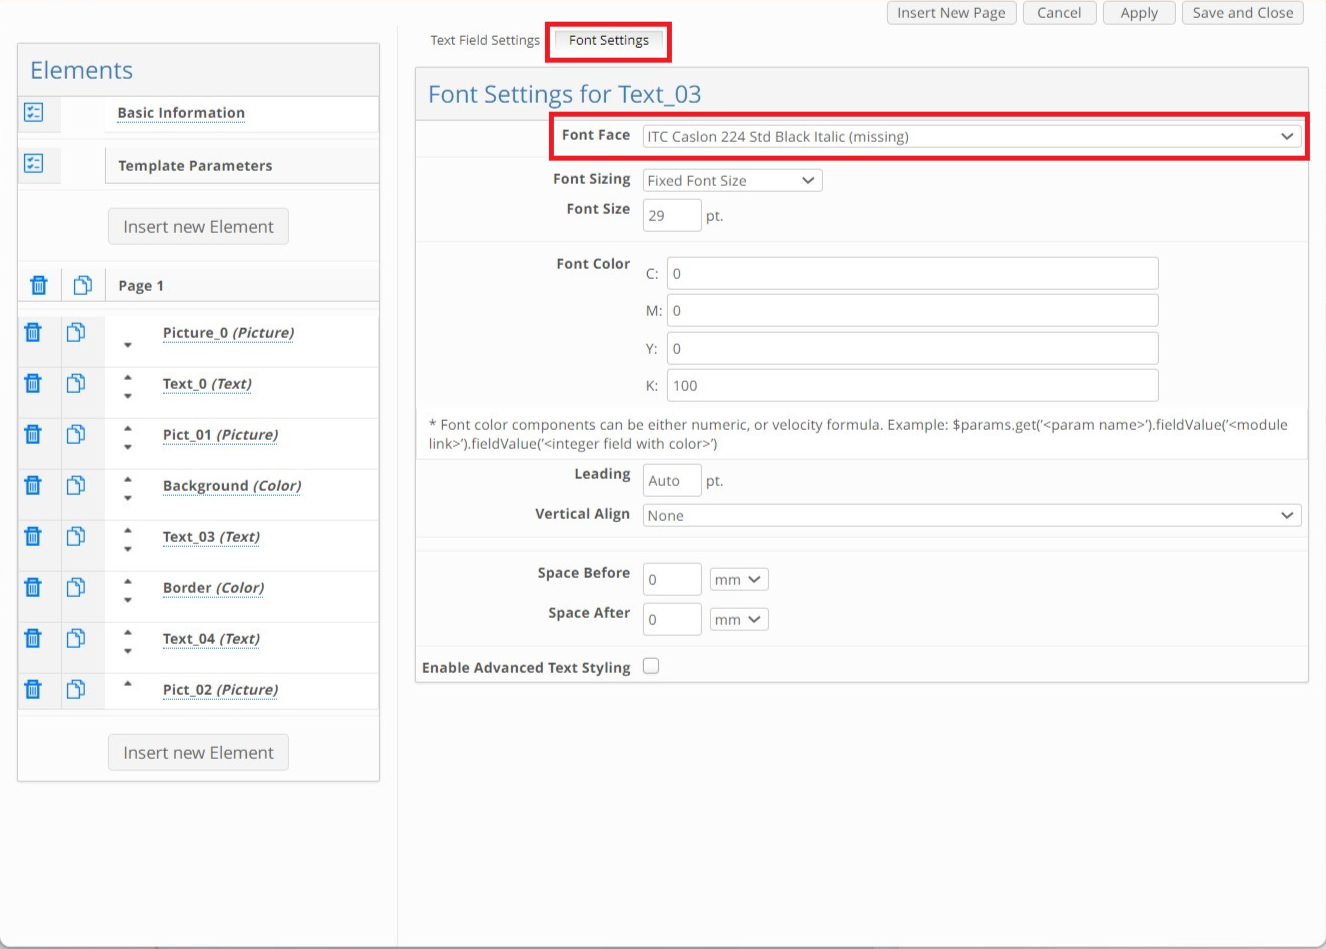
Adding Fonts to the AdBuilder
In its default configuration, the AdBuilder offers a number of fonts that users can use in their Ads. You can view the list of available fonts by going to AdBuilder module > Fonts.
Users can also add their own fonts that they will assign to Text elements on an XML template in the AdBuilder. Later, when the user creates an Ad based on the template in question, the font assigned to a particular text field is applied to the text that the user enters in that field.
To add fonts to the system, go to web/WEB-INF/fonts and copy the fonts you want to add to this folder. All the fonts that are added will be displayed in the list of available fonts in Site Configuration>AdBuilder module>Fonts and in the Edit template window.
Adding Custom Fonts
'Edit Fonts' button has been added to allow system admin users to manage custom fonts without the need to restart the webapp.
Only system admin users can add new custom fonts or delete existing ones.
Requirements:
System.properties is configured with the existing folder path for fonts.
If the path is not specified in system properties, then the following path will be used: /data/Files/Fonts.
If the folder doesn't exist, the system will generate a new folder when custom fonts are uploaded.

.png)
Custom fonts are available in AdBuilder Edit Template text field elements:
Known Behaviour:
In order to see the newly added custom font on the list of AdBuilder - Fonts, the page needs to be manually reloaded.
Only custom fonts can be managed using this window.