Configuring Dependencies via Field Dependencies in module configuration
NOTE: This functionality was decommissioned within version 21
Location: Site Configuration > {Module} > Field Dependencies(Note: this section is deprecated in v.20.0.0 - only "read" access is available to previously created relationship(s))
At times it can be convenient to create relationships between fields. If a select field contains numerous values, it is advantageous to group them into subcategories. Thus another select field can be created to contain the subcategories which, once the relationship has been defined, can restrict the items on the full list to those that belong to a subcategory. Each field value can belong to any number of subcategories. There can be as many as 10 levels of subcategories.
The process of defining a relationship between two fields is twofold. First, you must create the relationship. To do this, follow these steps:
Go to Field Dependencies and click Create Field Dependency on the toolbar. This opens a dialog box with the list box listing all single select type fields that exist in the module.
Select the field to represent the most general category. A new list box will appear below, listing all the single select fields in the module except the one you have just chosen.
Proceed to select the more specific subcategories until you have established the desired hierarchy, and click OK when done
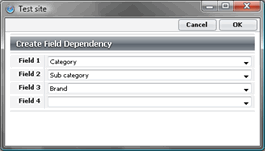
Fig.15.: Field dependency configuration window
The resulting dependency is shown on the configuration page as fields with arrows between them. The first field on the left represents the most general category and the subsequent fields are progressively more specific.
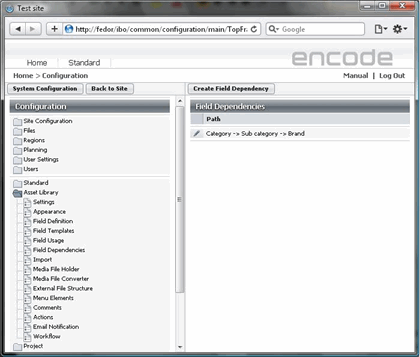
Fig.16.: Field dependencies configuration page
Once you have created the relationship, go on to configure it by specifying which values belong to which categories. To configure the dependency, follow these steps:
Go to Field Definition and click the Edit icon next to the field representing the category just below the top category.
In the Edit Field dialog box that opens, click the Field Dependencies tab.
Relate the values of the ’owner’ field(s) to specific values of the field being edited (see the “How to” instructions below).
Click OK to save your configurations.
Proceed to edit the next field in the hierarchy in the same way as described above; repeat the process until all the fields that are part of the dependency have been configured.
How to relate the values of the field you are editing to the field values of categories above it:
Start by selecting the first value in the list box and all the subsequent list boxes until check boxes appear in the window.
Select the checkboxes next to the values that are to be attached to the field value in the bottom list box.
Select the next value in the bottom list box and repeat the previous step.
When all values for the bottom list box have been attached to the values of the current field, move on to the next value in the list box above the bottom one.
Repeat the process until all the values belonging to the field in the bottom list box have been related to values of the current field (i.e. when all list boxes have gone through all permutations and reached their last values).
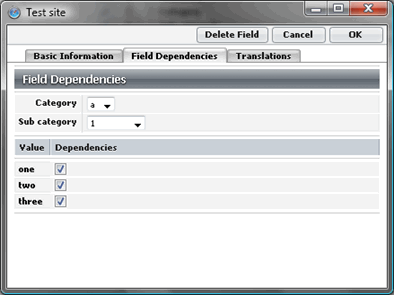
Fig.17.: Configure a Field dependency
Configuring dependencies via Module Links
A bit another configuration is involved for module link dependencies. The dependencies are configured for the module link fields that can be from different modules.
When configuring field dependencies with the help of module links, the following configuration options are available:
Local Field – module link field that references the module and is the value by which the following field value will be filtered.
Reference Field – Simple text field which the module link field specified in the Local field references.
Link to “Create New” - the check box enables users add new items in the referenced module.
Prefill Automatically – selected check box ensures that the module link field will be automatically pre-filled when adding new items via Link to Create New functionality.
Note!
For the cases where parent module has more than 1 field that matches the source for prefill automatically (ModuleID and FieldID of the module links are the same), value from the first field from the list will be used for prefilling.
The configuration of dependencies will be described using the example chain in the previous chapter: Region > Country > City. There will be an Order module, where the user will use these three dependencies.
In Site Configuration create four modules:
Order
Regions
Countries
Cities
Begin configuration of the dependency chain from the highest dependency level that is Region. Go to the Regions module and create a simple text field – Region.
Go to the Countries module and create the following two fields:
Country – simple text field
Region – module link to the Region field in the module Regions
 Fig.18. Countries Module Configuration
In the Cities module create the following fields:
City – simple text field
Region – module link to the Region field in the module Regions
Country – module link to Country field in the module Countries. For the Local field, select previously created Region field (module link to Regions module), for the Reference field select Region field, that is module link field to the Regions field in the module Countries.

Fig.19. Configuration of Region > Country dependency in the City Module
Go to the Orders module. Create the following fields:
Order number – simple text field
Region – module link to the Region field in the module Regions
Country – module link to Country field in the Countries module. For the Local field, select previously created Region field (module link to Regions module), for the Reference field select Region field, that is module link field to the Regions field in the module Countries.
City – module link to City field in the Cities module. For the Local field, select previously created Country field (module link to Countries module), for the Reference field select Country field, that is module link field to the Country field in the module Cities.

Fig.20. Configuration of Country > City dependency in the Order Module
That is all that is required for configuration of the dependency chain. How the configured dependencies work is described in the example below.
In the Regions module, create two region entries:
East Asia
West Asia
In the Countries module, create two country entries:
Country
Region
Japan
East Asia
Georgia
West Asia
In the City module, create two city entries, and select the corresponding Region and Country in the appearing dependent fields:
City
Country
Region
Tokyo
Japan
East Asia
Tbilisi
Georgia
West Asia
Finally, when creating the order in the Orders module, full dependency chain will be available: selecting the Region will show Country field, and City field will appear after selection of the Country. All the values in the select boxes are filtered accordingly: selecting East Asia will show only Japan value in the Country field, and Tokyo will be the only available option in the dependent City field.

Fig.21. Region > Country > City dependency chain