Location: Modules > Manage Modules > {Module} > Module Configuration > Files > External File Structure
Encodify provides the capability of linking an Module with an external file system, with the files being represented by individual Module items. This may be useful when you have a complex file structure that has to be managed or is more convenient to manage outside Encodify. The files can be stored on Encodify server or on another mounted server. A scheduler job should be set up, which regularly scans the file structure for changes and synchronizes them with the Module.
.png)
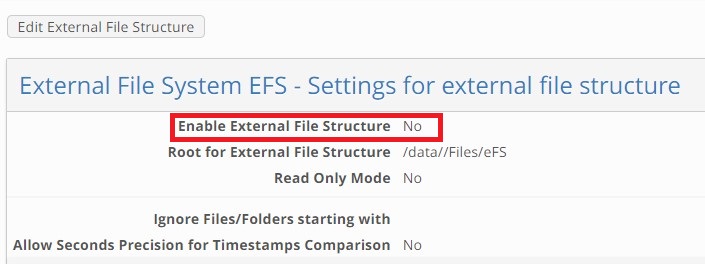
External File Structure Configuration page
Note! External File Structure cannot be used if “Items should be removed from the list by” option is set to “Making Inactive” in Module > Settings.
Configuring the use of External File Structure
To link a Module with an external file structure, follow these steps:
On the toolbar, click Edit External File Structure.
In the dialog box that opens, select the Enable External File Structure check box.
In the Root for External File Structure box, type the path to the root folder of the file structure.
If you want the system to ignore (i.e. not to reference) files and folders whose names begin with specific characters, type those characters in the Ignore files/folders starting with boxes.
In the Permissions section define whether users will be able to make changes to the External File structure from the UI (for example: upload files to the file fields, delete files etc.)
Note! Setting the Permissions to Read-Only may cause inconsistent behavior inside the module. Please, make sure to disable the Edit, Delete and Upload — options for all User Access Rights.
Specify what should determine the values of fields in Module items that represent files from the file structure. For each field, you can choose between five options:
The default value of the field from the creation of the field | This assigns the default value specified for the field under Field Definition |
Please enter Fixed Value | This brings up a text box for you to enter the default value |
Folder Level from Root | This prompts you to indicate a folder in the file structure by typing a number that determines the level of the folder in the folder hierarchy (the root level is represented by 0). The folder name will be used as the field value.
|
File Name | The name of the original file is used as the field value |
Path for File on External File Server | The path to the original file is used as the field value |
Running Synchronizer Job
After the External file structure has been configured for the module, the user can add the files from the external folder specified in the settings by running Synchronizer job.
To configure parameters for Synchronizer job, perform the following steps:
Open the Scheduler.properties file.
Add the following parameters to the file:
joblist=FileSystemSynchronizer job.FileSystemSynchronizer.type=dk.encode.ebms.core.file.externalFileSystem.ExternalFSSyncJob
job.FileSystemSynchronizer.param.moduleID=...
The job.FileSystemSynchronizer.param.ModuleID parameter value specifies the ID of the Module. You can also specify SiteId parameter. In this case, the synchronizer job will process all the Modules on the given site.
In order to run synchronizer job on a regular basis, specify the interval parameter at which the job will be re-run.job.FileSystemSynchronizer.interval=30To avoid deletion of all the items in Module when the mounted drive (on which images are located) is inaccessible, special marker
.efsIdentifiercan be used. The marker, placed to the root of the external folder, will be a so-called “green light” for the synchronizer job to start synchronization. This means, that if for some reason the mounted drive (and the marker) are inaccessible, the synchronizer will not start. Add the following property in order to enabled the check:job.FileSystemSynchronizer.param.isDetectingOfEfsIdentifierEnabled=trueSave the changes in Scheduler.properties file and Run the scheduler.
When you go back to the module on site and click Search, you will see created items corresponding to the number of files stored in the specified external folder. If you specified some field to be filled in with the name of the file, file name will be the value of the specified field.
Adding and deleting files in the external folder will make the correspondent changes in the module with regards to the number of items every time you run synchronizer job.
Special characters in File names cannot be equally handled in the system when adding file via EFS and manually uploading via UI due to the following reason.
When using External file structure, drivers with different types of file system can be mounted. Special characters in different file systems are handled differently according to the system encoding.
According to this it was decided that the following characters will always be replaced with the underscore in the name of the file, irrespectively to file system and its encoding:
/ \ : * ? " < > | ! # $ % & ; = @ '
Though it is recommended to use UTF encoding on file system in order to handle special characters correctly, otherwise, characters not handled by the file system encoding will be replaced by the underscore as well.
On the point of uploading a file manually from UI we do not know the encoding of the file system the file will be placed to. That is why special characters are handled according to the local encoding + the list of characters always replaced by underscores.
But when running synchronizer job, the special characters in the name of the file on file system has already been processed according to the encoding of the file system they were uploaded to, and therefore the name of the file as it is on the file system is just copied to the File field. In this case no processing of special characters occurs.
Disabling External File Structure: Convert EFS Assets to Local
Available in version 14.0.0
Location: Site Configuration > Files > Convert Type of Storage
It is possible revert a module from EFS to regular module and import existing items from the EFS storage using 'Move EFS to Local' function in System Configuration.
Step 1. Disable External File System in Site Configuration > {Module} > External File Structure
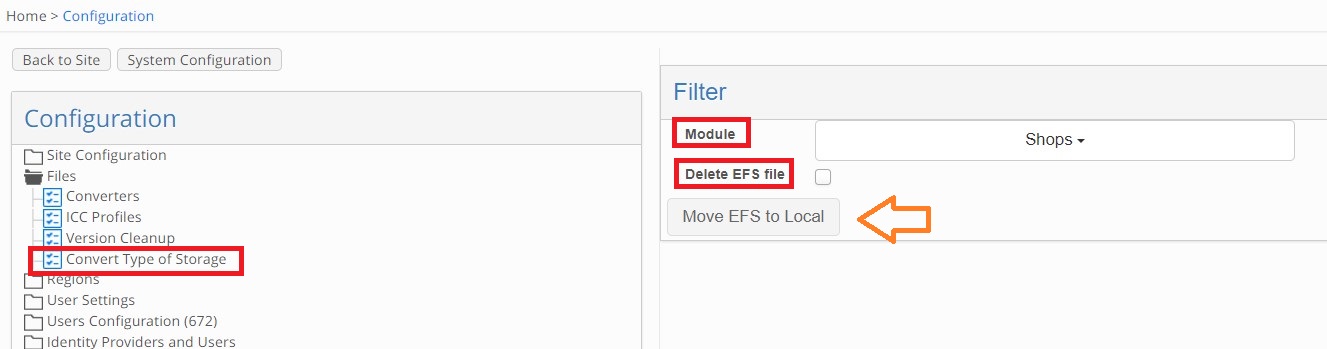
Step 2: Navigate to Site Configuration > Files > Convert Type of Storage
Select the EFS module from module dropdown list
Enable 'Delete EFS file' if assets should be removed from EFS storage (disabled by default)
Click 'Move EFS to Local' button
Conversion is in progress:

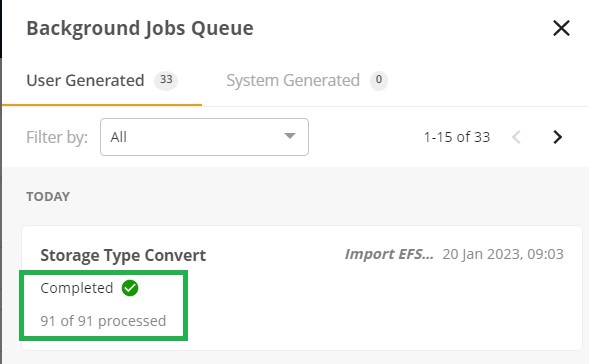
Background Jobs displays the status of the conversion:
Known Behaviour
Importing is only possible when EFS is disabled in Site Config > {Module} > External File Structure
Conversion is only available from EFS to normal files not vice versa
EFS and Versions cannot be used together on the same module
Extracting and storing file path into dedicated field
After migrating EFS to MFF some data i.e. full path, intermediate path, file name to file that can be used in other areas(i.e. in DTP export) won’t be available for extracting and storing.In order to not lose those data it is recommended to extract and store it in dedicated text field in module with EFS before migrating to MFF.
How to extract and store data in module with EFS:
Create in module with enabled and configured EFS 3 text fields i.e. “Name”, “Directory path”, “Full path”
Go to Site Configuration > Files > EFS File Utilities
Select module with EFS in list of modules(Note: only module(s) with enabled EFS are available for selection)
Select type of extraction(available options: Directory path, Full path, Name)
Select dedicated text field data to be extracted to in the list of field definitions
Click on “Extract Value to Text Field” button
Once background job is completed selectd data will bex extracted and stored in dedicated text field
.png)
Pic.1 Page for data extraction to separate field.

Pic.2 Example of data extracted to dedicated field