How to Create a Custom Data Model
Before you can create a Timeline 2.0 View, you must first configure a Custom Data Model consisting of the following components:
Nodes (also known as vertices): These represent the entities or objects within the data model. In this case, the nodes define the Source and Target modules.
Edges (also known as links or relationships): These define the connections or relationships between nodes. Here, the edges are represented by the Link Field between the Source and Target modules.
To confirm a Custom Data Model, follow the steps below:
Navigate to Home Page → Side Navigation Panel → Modules → Manage Modules → Data Model → Custom Data Model
Click Add Custom Data Model
Specify a Data Model Name, e.g. Project Plan
Click Add Connection to define the nodes and edges of the data model.
Specify a Source Module and the required Target Module.
The Link Field will be selected automatically; however, if multiple options are available, you may need to choose the appropriate field from the dropdown.
Repeat this process for each connection you need to define.
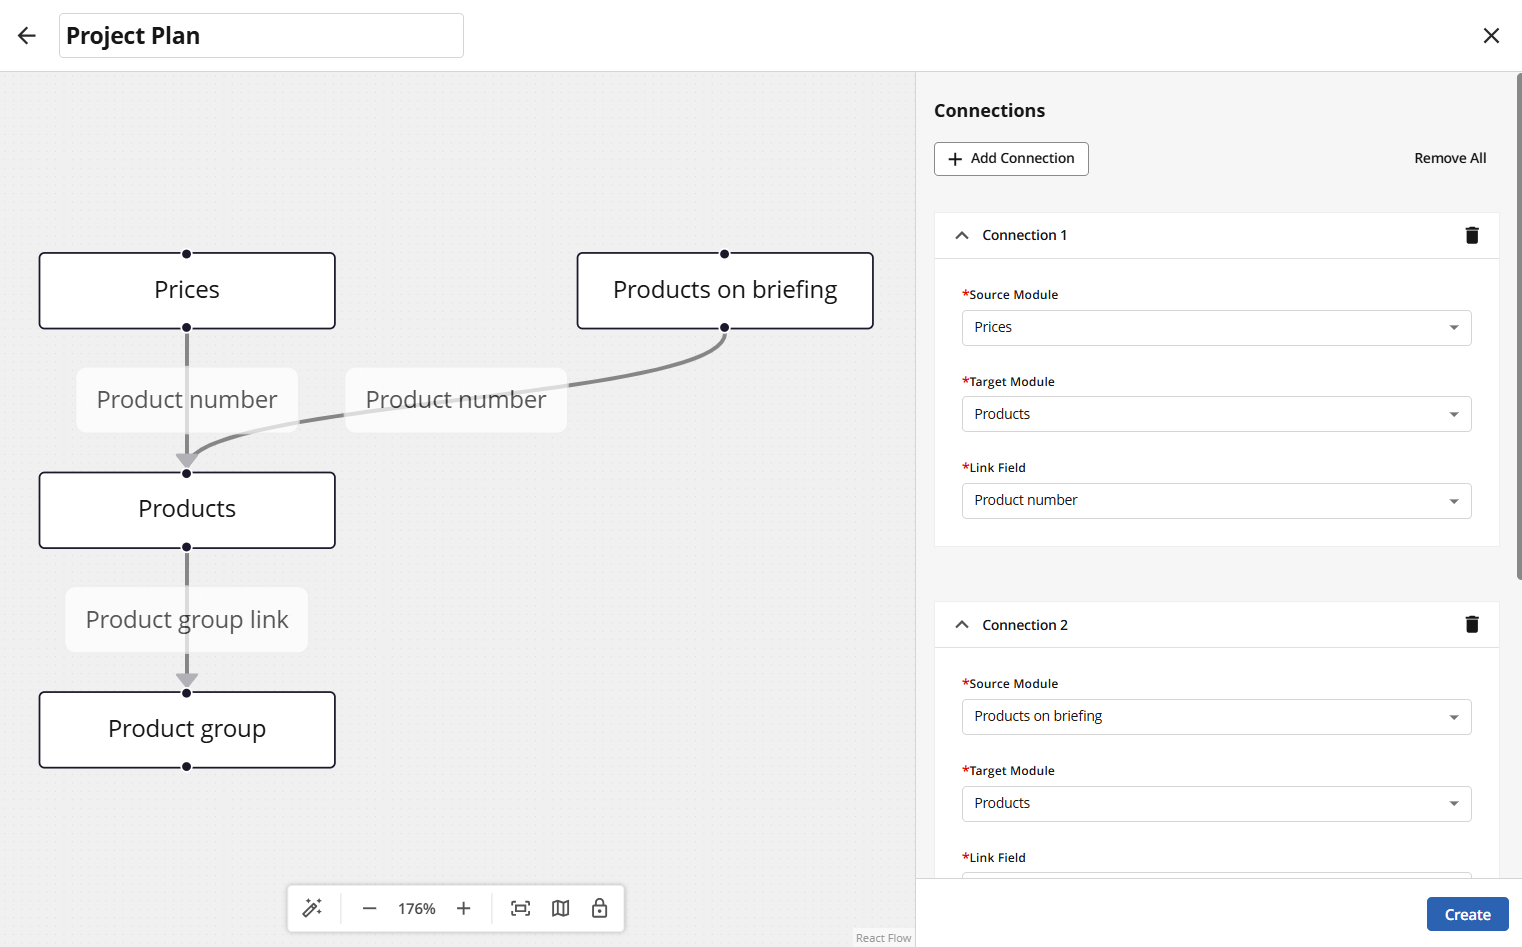
An image highlighting the Source and Target Module settings of a Custom Data Model
Known limitations:
We do not support adding the same module as a node or edge when creating a customer data model
Only module links of the single select type are supported in data models and view definitions
Only levels having entries in sub-levels are rendered (e.g., only chains with briefings). The whole level chain is scanned, and if no entries are present on level N, item (level 1 ) will not be rendered.
Briefing example: Chain > Country > Briefing type > Briefing > Product: If no products attached to
briefing > Country will not be renderedThe created data model is only available in Timeline 2.0 config when the current module is present in it
Saved auto-detected paths are shared and not deleted after the view definition(s) deletion
Using the same module as vertex and “link to itself” as Edge in the custom data model is not supported. For the case when we would want to display Main and Subproducts
Access rights: group and status restrictions for the intermediate modules linking 2 levels are ignored. Only displayed levels’ item access is respected.
How to create a Timeline 2.0 View
Note:The Timeline 2.0 View will not be available to users who do not have read access to any of the modules included in the custom data model used for the view definition(s). This also applies to intermediate modules—for example, when there are modules between Level 1 and Level 2. If a user lacks access to any module or field along the defined path, the view will not be accessible to them. The same restriction applies if the user does not have read access to any of the fields mapped in the view definition.
To create a Timeline 2.0 View, follow these steps:
Navigate to the Module View Library (see Manage Views for more details)
Locate Timeline 2.0 and click on the card.
Click Add New Timeline 2.0 to open the configuration wizard.
Enter a Name and, optionally, a Description.
Choose whether to enable or disable the Events App.
.png)
An image highlighting the General settings of Timeline 2.0 View
Navigate to the Data Model tab or click Next.
n the Select Data Model dropdown, locate and choose the desired data model.
Note: To preview the selected data model, click the ![]() icon.
icon.

An image highlighting the Data Model settings of Timeline 2.0 View
Navigate to the Levels and Paths tab or click Next.
Click Add Level to define Level 1 (e.g. Projects).
Click Add Level again to define Level 2 (e.g. Briefs).
Once two levels have been added, select the appropriate Path from the available options.
Repeat this process to define each additional level as needed.
Decide whether to show or hide parent items that have no child items. By default, this setting is disabled to optimise performance.
.png)
An image highlighting the Levels and Paths settings of Timeline 2.0 View
Navigate to the Fields tab or click Next.
For each level, select the Side Panel Label, Bar Label, Start Date, and End Date fields.
Optionally, you can select an additional date field to display Milestones.
Decide whether to Filter results based on date fields. At least one level must have this enabled for the view to function correctly.

An image highlighting the Fields settings of Timeline 2.0 View
Navigate to the Appearance tab or click Next.
For each level, select a specific Bar Colour and Milestone Colour, and specify whether media files should be previewed.
Click Create to confirm your settings and create the view.

An image highlighting the Appearance settings of Timeline 2.0 View