Setting up SSO for Okta
This guide provides step-by-step instructions and screenshots from the Encodify system and from the Okta admin console to help you configure Okta whether using SAML or OpenID.
Configuring OpenID Connect for Encodify through Okta
Configuring IdP
First, navigate to Site Configuration → Identity Providers and Users → Identity Providers in the Encodify system.
To create a new provider click button “Add New IdP”
For the field Name ID, use only English letters and no spaces. This value will be used later as part of the URL.
For Display Name for Login Page, use a name that you would like users to see on the login page as a label for the login button.
Ensure the Authentication Method is set to OpenID Connect.
The Email Domains field is optional but can be used to add a restriction based on allowed email domains for authorisation. Any user with an email address that belongs to specified domains will be able to log in. You can specify domain names separated by a comma, e.g. encode.dk, microsoft.com
Click Next to proceed to step 2
Link your IdP configuration to an existing Login URL and Login Page, or create new ones. Each IdP can be linked to only one Login URL. See Configuration of Login URL for more details.
Click Next to proceed to step 3
At this step, we will need data from both the Okta Admin Console and data from this page.
First copy link specified at a page as Callback URL, for example: “https://mpa.dev.encode.dk/mpa/login/oauth2/code/OidOkta”.
Okta Admin Console
Now we have to switch to Okta Admin Console. (link looks like https://dev-XXXXXXXX-admin.okta.com/admin/dashboard)
First, navigate to Applications → Applications and click the button Create App Integration.
Select OIDC - OpenID Connect from the list of Sign-in methods and Web Application for Application type.
Click Next to proceed
Type a name for the application within App integration name field. This name is only shown in the Admin panel in Okta.
With the field Sign-in redirect URIs paste the Callback URL you previously copied from IdP configuration step 3. It should include the value of the Name ID field of the Identity provider. It should look like “https://mpa.dev.encode.dk/mpa/login/oauth2/code/OidOkta”.
Sign-out redirect URIs: put empty
Within the Assignments section you should specify the appropriate Controlled access option according to the security of concrete customers, in the current guide it’s not limited to specific groups. After specifying those parameters click Save.
After saving, copy the Client ID from the section Client Credentials and Client secret from the section CLIENT SECRETS by using the "copy" icon next to each section.
We also need to get additional parameters which are needed for configuring Okta in addition to Client ID and Client secret. Navigate to Security → API → default
Now let’s look at how to configure provisioning extra attributes. Existing user attributes can be reviewed, and extra can be added in Directory → Profile Editor → User (default).
People and groups can be edited in the same group Directory: Groups, People.
Attributes can be mapped to a field, or user groups/access rights. For an attribute to be available in the token it has to be explicitly exposed within Security → Api → default:
From the tab Claims click button Add Claim
Finalise IdP Configuration
Return to the Encodify system, select "Okta" in OpenID Connect Type field on step 3 of IdP configuration.
You can specify next parameters - OpenID Connect JWK URI, Oauth2 Authorization Url, Oauth2 Access Token Url either via separate call or by inputting them manually.(Pay attention - these fields are read only if config url is specified in OpenID Connect Config URL and become editable if OpenID Connect Config URL is empty)
To fetch described parameters via call:
Replace in field OpenID Connect Config URL {{okta-subdomain}} in url path with subdomain from your Okta configuration where url should be as: https://dev-xxxxxxxx.okta.com/oauth2/default/.well-known/openid-configuration and make a call by pressing "Enter" to fetch parameters (Pay attention: in case of url is correct after call OpenID Connect JWK URI, Oauth2 Authorization Url, Oauth2 Access Token Url get prefilled with values)
To specify manually:
Clear field OpenID Connect Config URL and fill:
OpenID Connect JWK URI: https://dev-XXXXXXXX.okta.com/oauth2/default/v1/keys
Oauth2 Authorization Url: https://dev-XXXXXXXX.okta.com/oauth2/default/v1/authorize
Oauth2 Access Token Url: https://dev-XXXXXXXX.okta.com/oauth2/default/v1/token
Fill in the Client ID, Client secret, and common parameters. These can be obtained from the URL: https://dev-XXXXXXXX.okta.com/oauth2/default/.well-known/oauth-authorization-server.
The following parameters should be used:
Oauth2 Scope: openid,profile,email
OpenID Connect JWK URI: https://dev-XXXXXXXX.okta.com/oauth2/default/v1/keys
Oauth2 Authorization Url: https://dev-XXXXXXXX.okta.com/oauth2/default/v1/authorize
Oauth2 Access Token Url: https://dev-XXXXXXXX.okta.com/oauth2/default/v1/token
OAuth2 Client ID:
OAuth2 Client Secret:
External User ID Attribute: email
Mapped attribute: name → Name, email → Email
Additional Attributes exposed in tokens can be mapped to additional fields within Encodifyuser management modules
Click Next to proceed to step 4
It is also possible to map attributes to Encodify Access Rights to be automatically set for the new user on login with auto-provisioning.
Click Next to proceed to step 5
It is also possible to map attributes to Encodify User Groups to be automatically set for the new user on login with auto-provisioning.
Click Next to proceed to step 6
Alternatively you can specify Default User Properties which allows specific params like Access Rights and some fixed attribute values, like in my example Division is set to Managers for users, which will be set for the new user on login with auto-provisioning.
Click Next to proceed to step 7
This step allows setting default user groups for users, which will be set for the new user on login with auto-provisioning.
Click Next to proceed to the last step
The last step of the wizard allows specifying a Welcome Email and “First Login” Message for new users. If those are enabled, a user who logs in to the Encodify system first time will receive the email and will see the modal window with welcome text on entering the site using current IdP authentication.
Click Save IdP to finalise the IdP configuration
After saving new Identity provider should be present in the list of Identity Providers
Logging into Encodify using SSO
If the new identity provider is the only configured authentication method for the login URL, an automatic authentication attempt will be made upon entering the URL.
When other providers or "Internal" are also configured, the login URL will display a button for logging in via the new identity provider (e.g., "Sign in with Okta SSO").
Once the user has authenticated an linked Encodify user will auto-provisioned with appropriate attributes based on the IdP configuration
Configuring SAML for Encodify through Okta
Please, note that all configurations in OKTA should be done in Classic UI
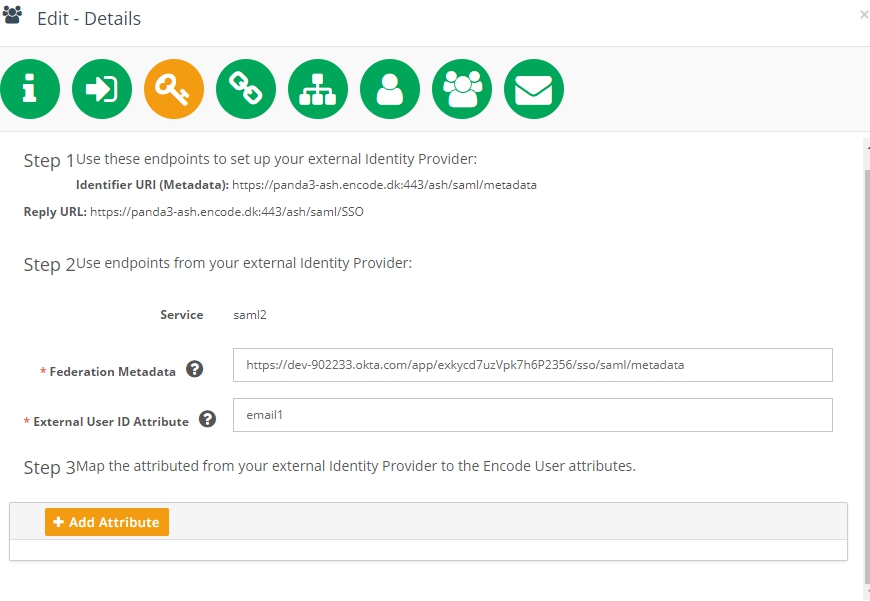
Receiving the Federation Metadata
Account and Application should be created in order to be able to recreate following instructions. Please use "How to..." instructions represented below in case if needed.
Sign in to your Okta portal page using the Your Okta domain as URL. (Note: Domain was generated after account creation and was sent to you in activation email)
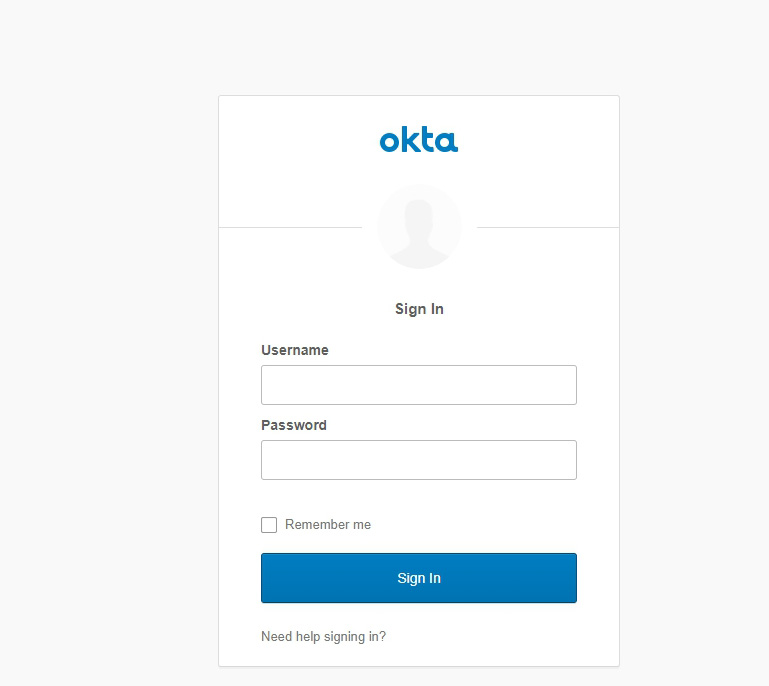
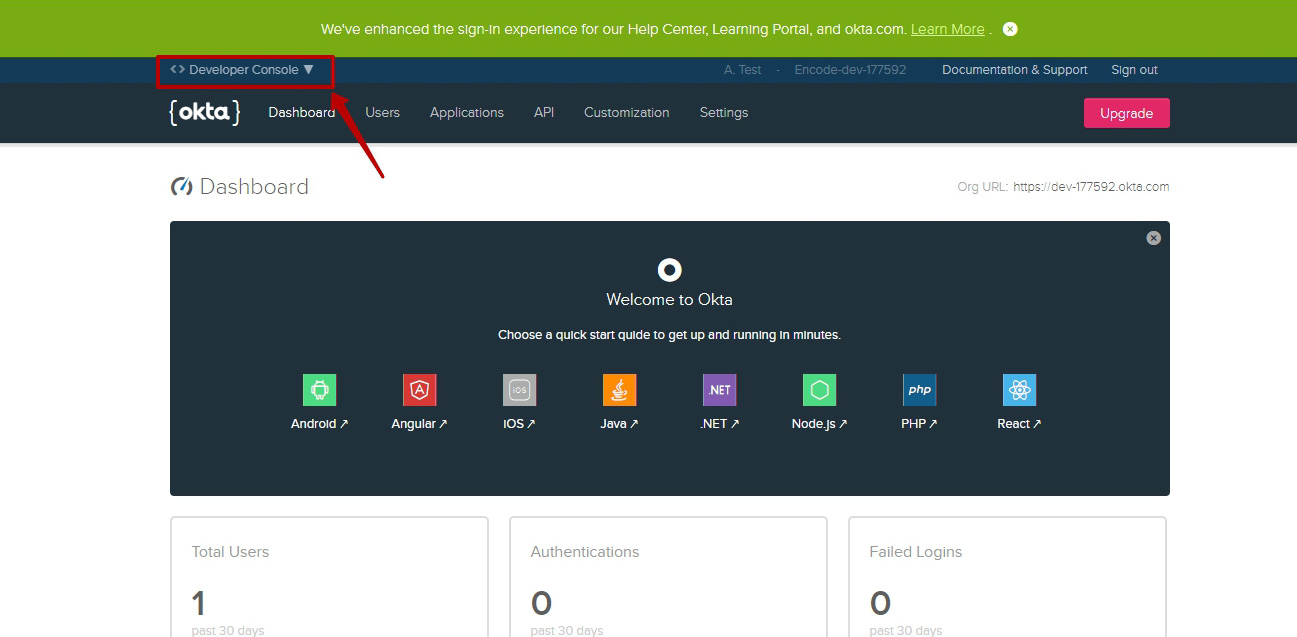
Click on "Admin" button
Switch to Classic UI
Click on "Applications" tab > Select "Applications" option
Go into selected application
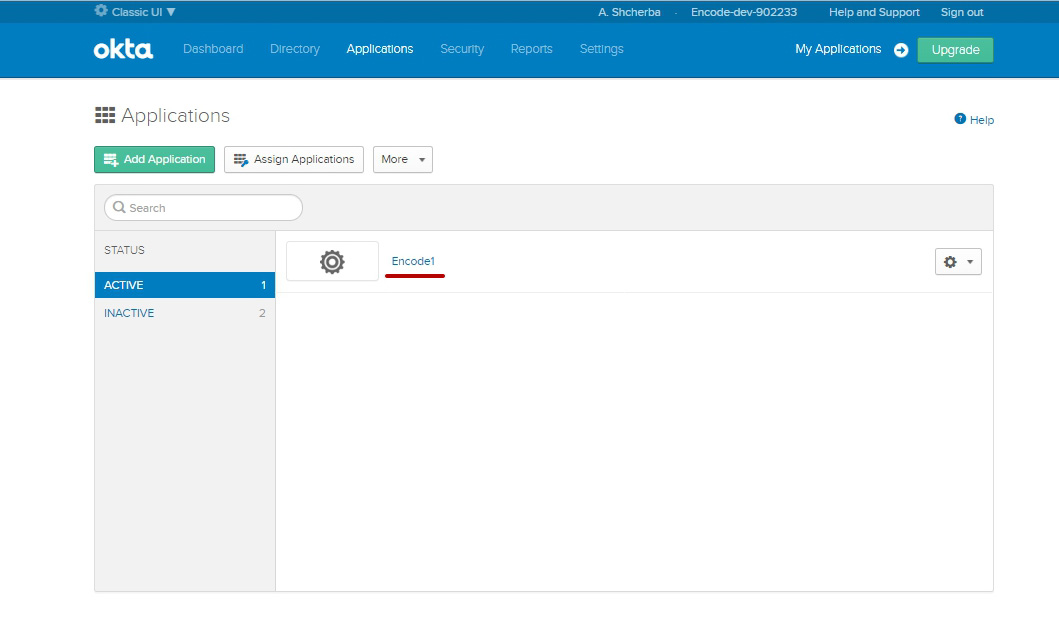
Switch to "Sign on" tab
Click on "Identity Provider metadata" link
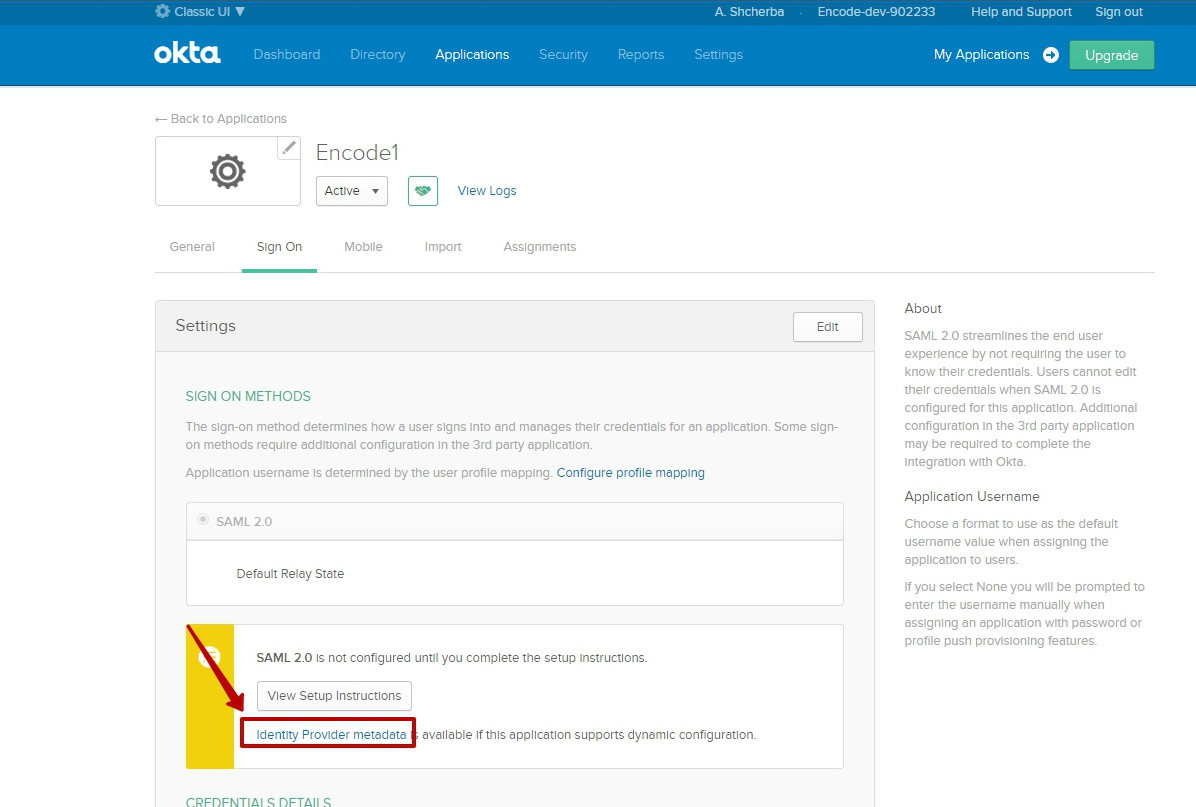
Copy URL
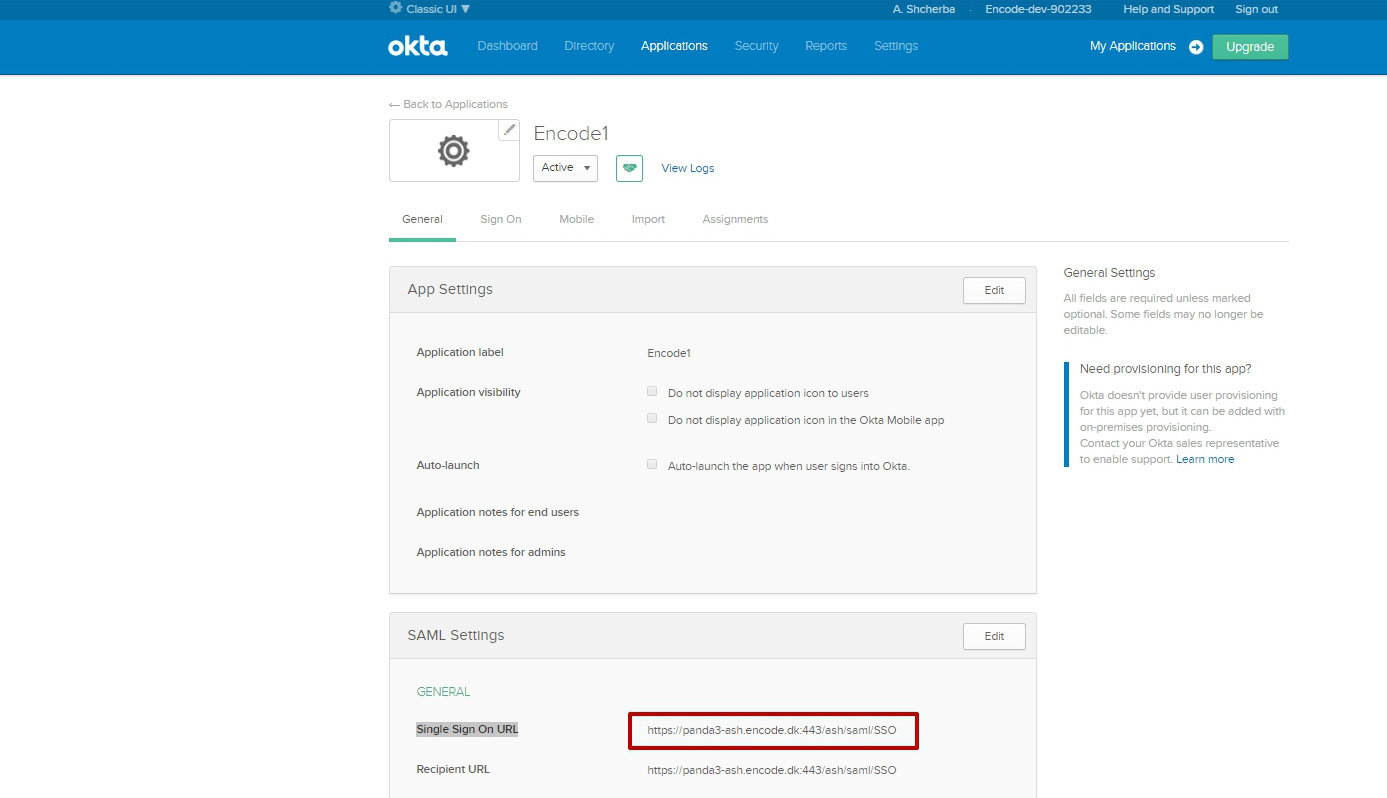
Receiving the Reply URL
Go into selected application in Classic UI
Switch to "General" tab
Copy link entered into "Single Sign On URL" field in SAML Settings
Receiving the External User ID Attribute
Go into selected application in Classic UI
Switch to "General" tab
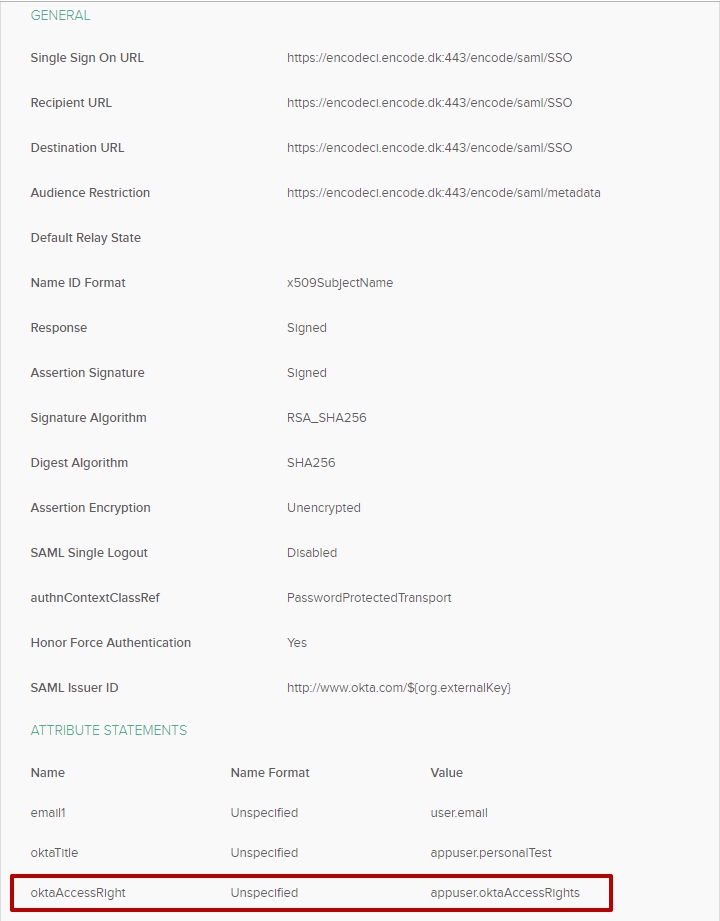
Edit SAML Settings > Go to "Configure SAML" step
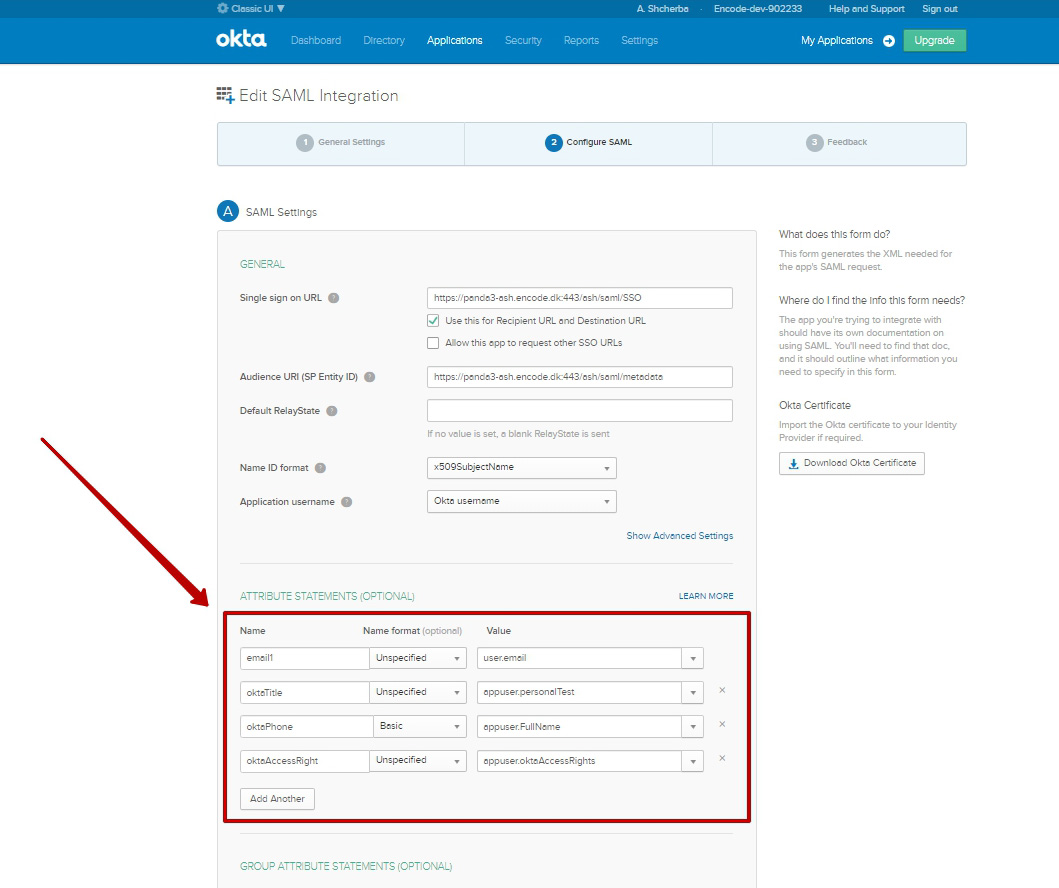
In "ATTRIBUTE STATEMENTS (OPTIONAL)" section click on "Add Another" button
Enter any name
Enter value: user.email
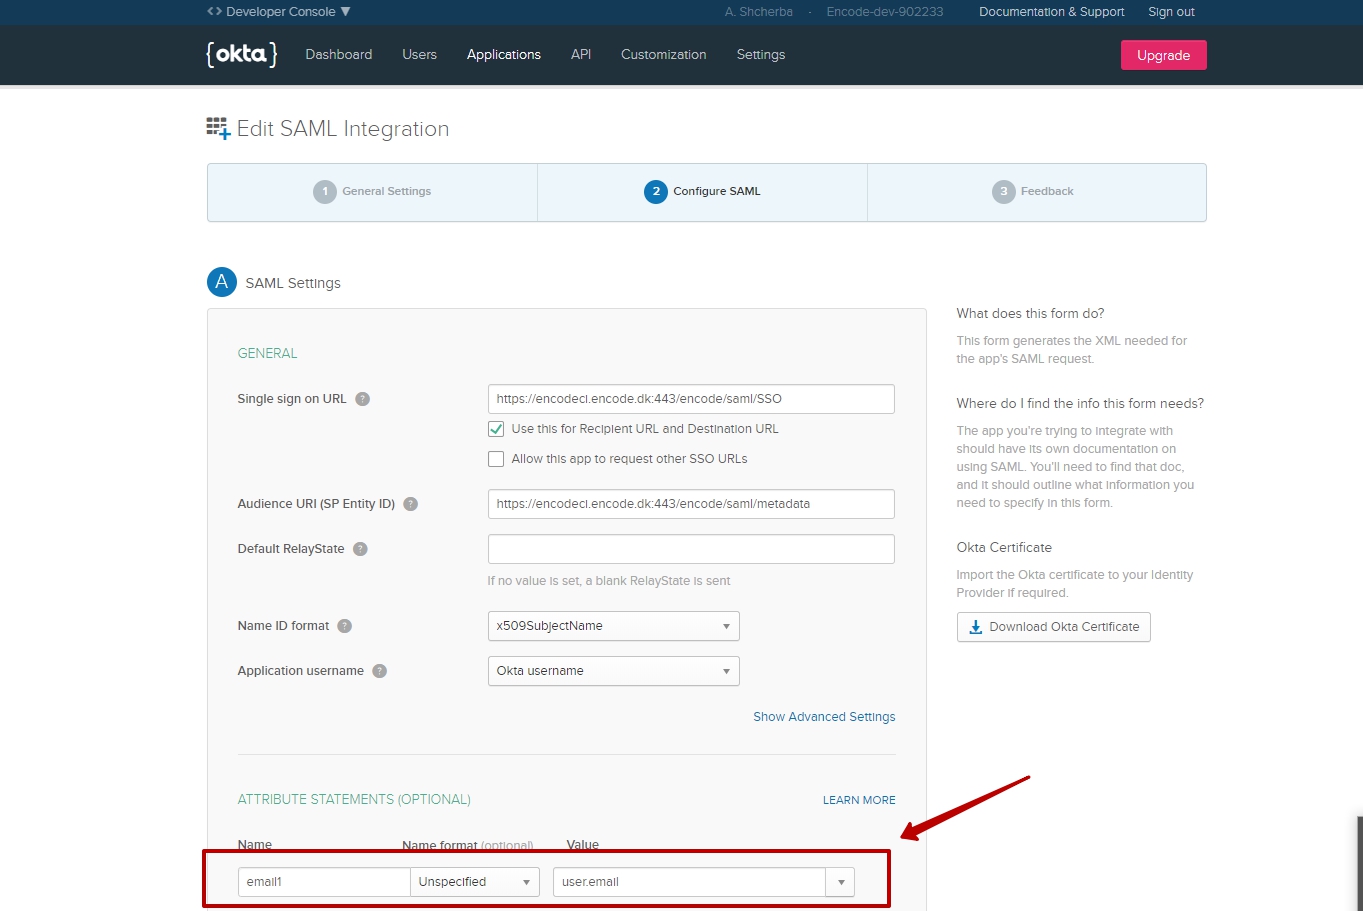
Proceed to the next page > Save changes
Copy the name of created attribute
Enter it as "External User ID Attribute" on the third step of IdP creation
How to perform access right mapping
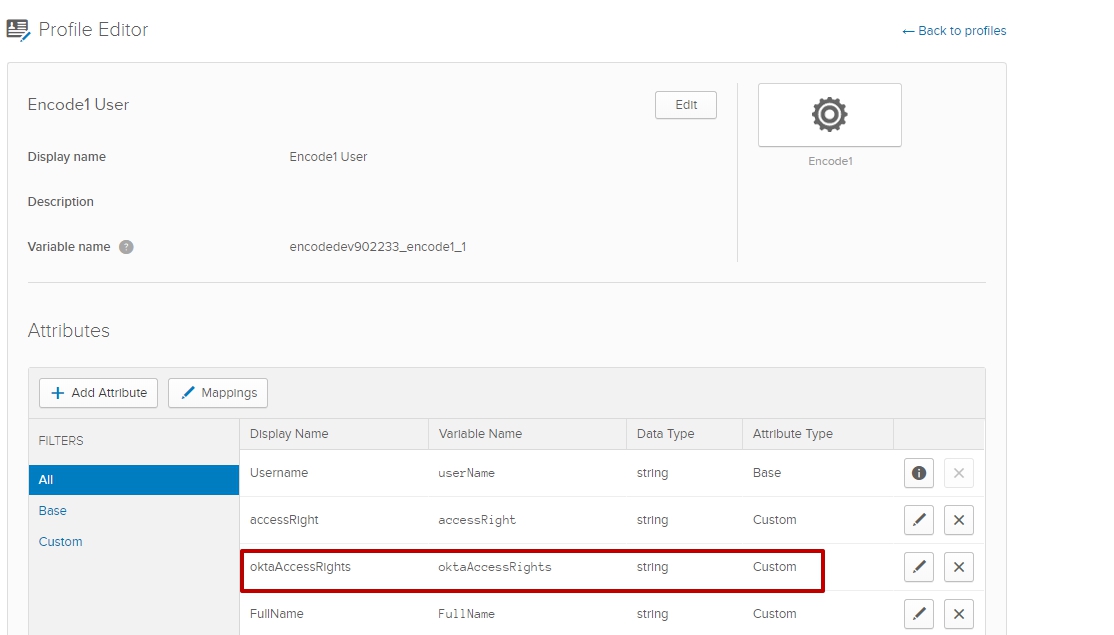
Create attributes with correspondent name in OKTA (Use article "How to add/manage attributes in OKTA" for more information)
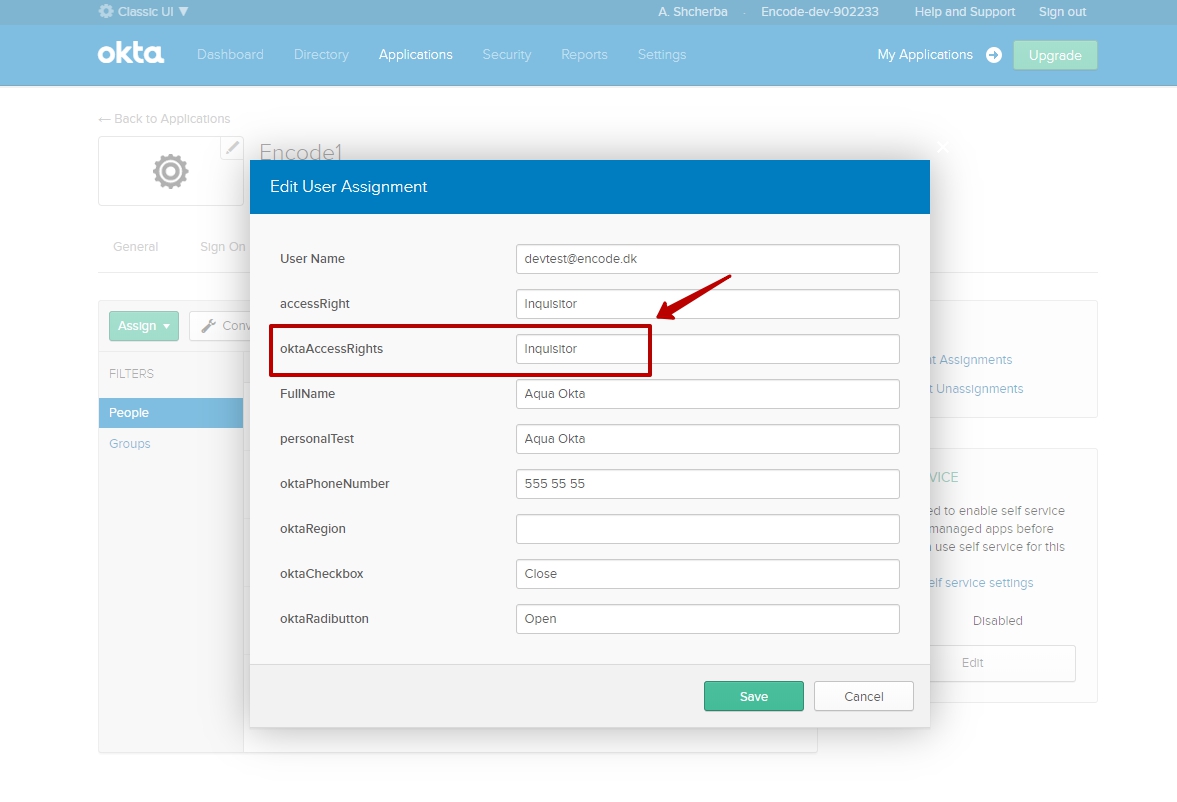
Open selected Application > Go to Assignments tab
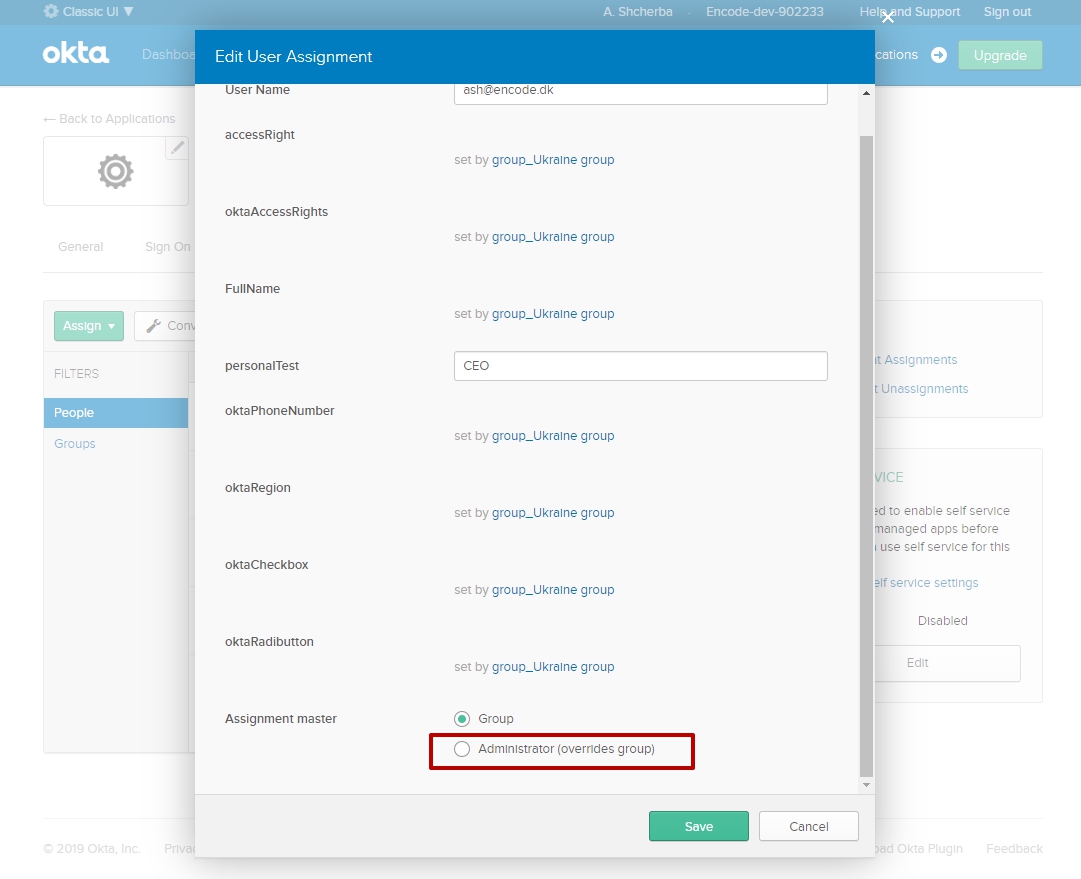
Open Edit page of the selected person from the "People" list
Enter value into the attribute field > Save changes
Generate XML file for access right mapping
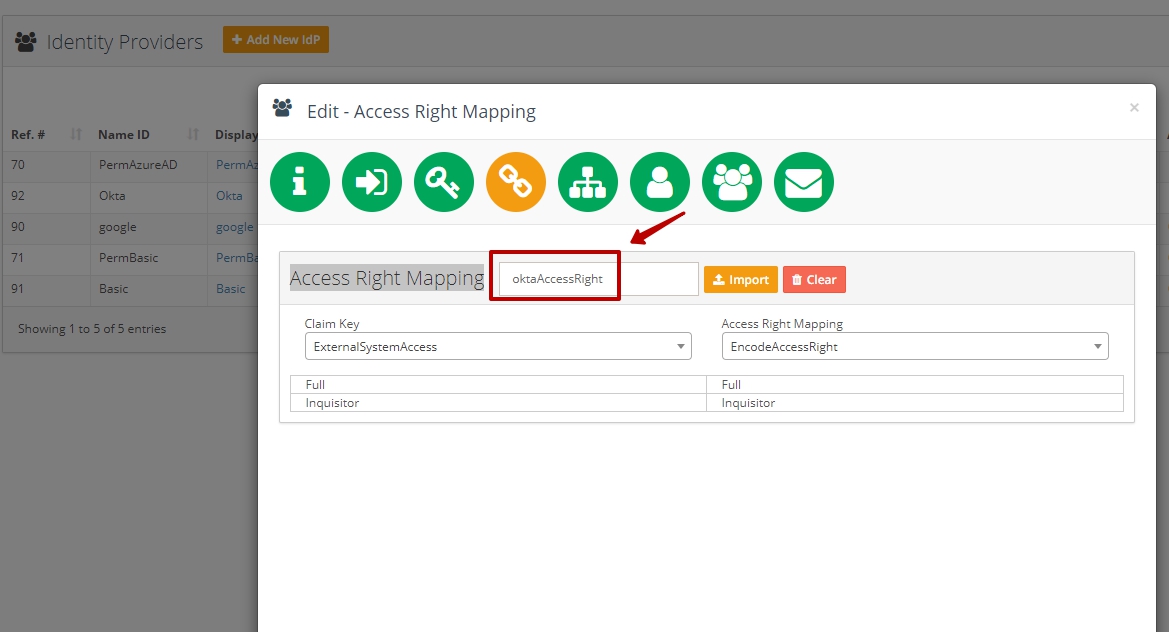
Go to the "Access Right Mapping" step of IdP SAML configuration wizard
Enter attributes name into the "Access Right Mapping" field
Import previously generated file > Select correspondent values from Claim Key and Access Right Mapping drop downs
How to perform User Groups Mapping
In Okta: Create a group and assign it to the selected person and add created group to the list of attributes (Use article "How to create/manage groups in OKTA" for more information)
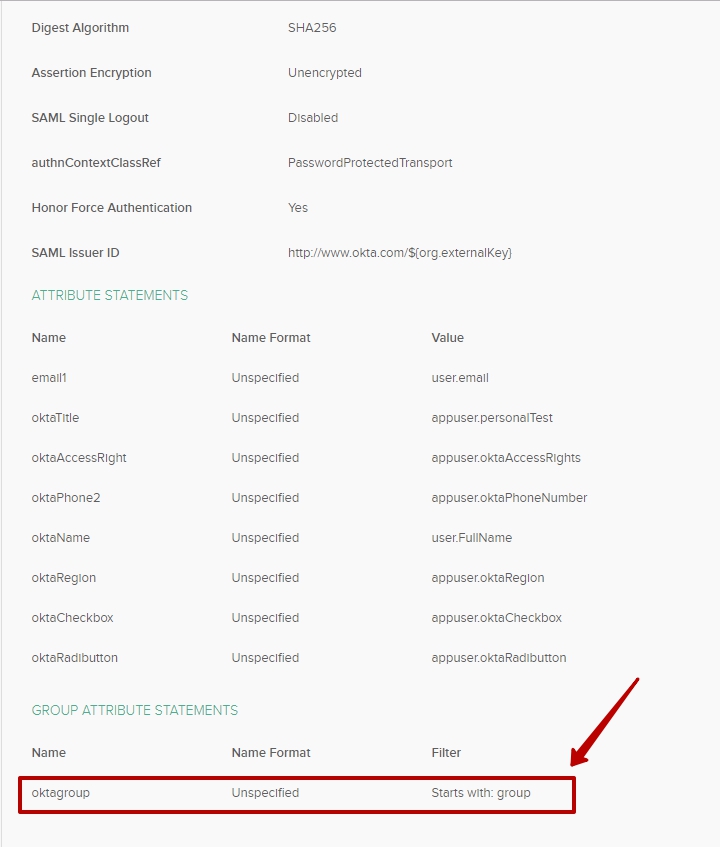
Generate XML file for user groups mapping
Go to the "User Groups Mapping" step of IdP SAML configuration wizard
Enter attributes name into the "User Groups Mapping" field
Import previously generated file > Select correspondent values from Claim Key and Access Right Mapping drop downs
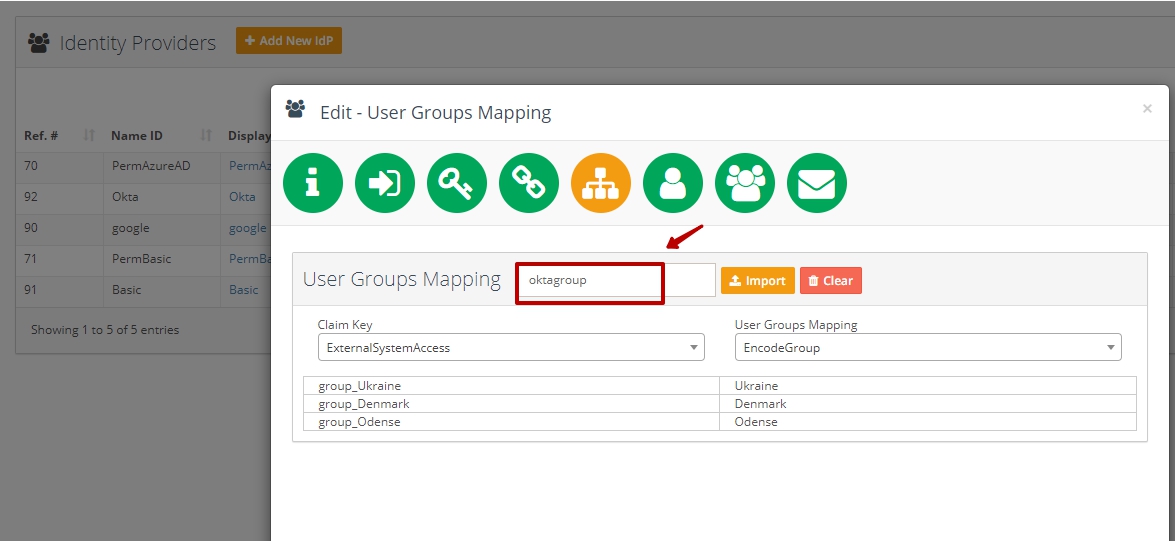
How to map the attributes from OKTA to the Encodify User attributes
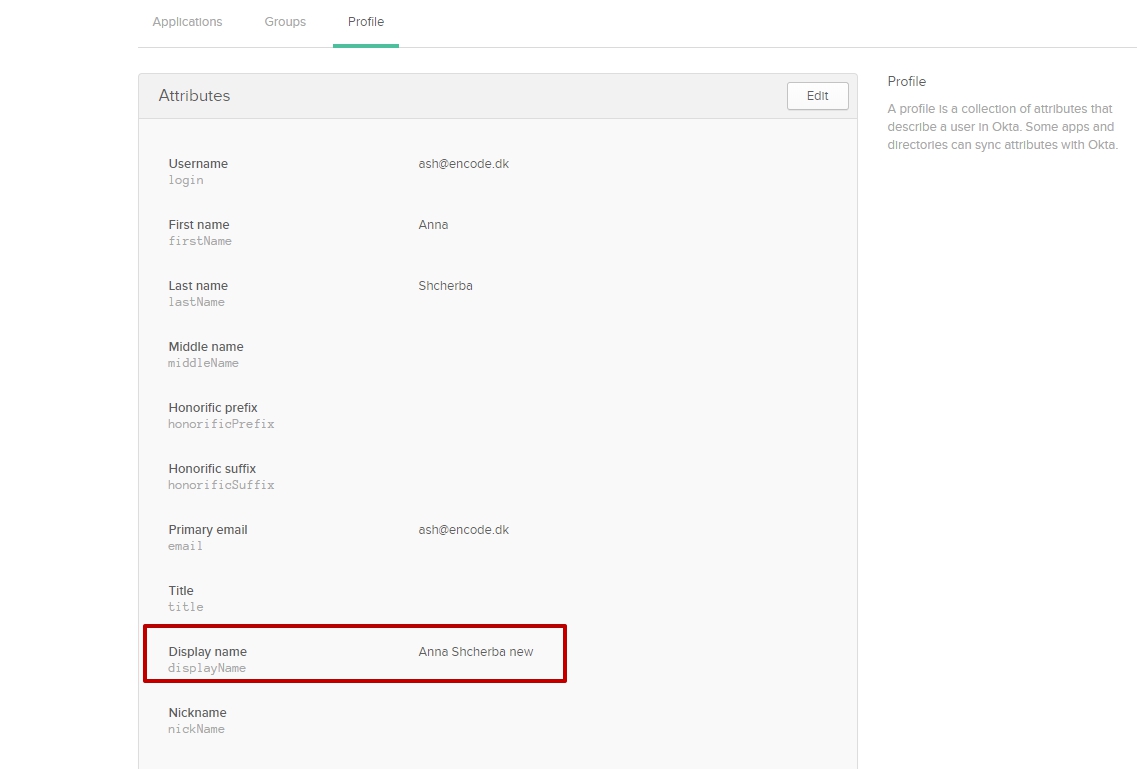
CASE 1: mapping of original attributes from the User Profile in OKTA
Go to OKTA > Switch to Classic UI > Open created application
Open profile of created person: Directory > People > Click on Name >Profile tab
Fill in attribute that need to be mapped
Go to the Applications > General tab > Create new attribute
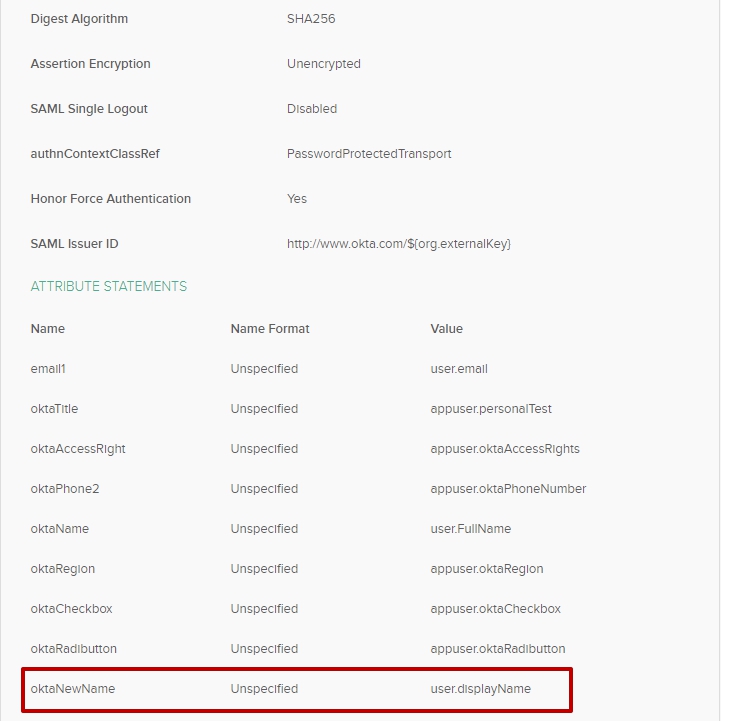
Go to the Encodify system > Open IdP configuration widget > Add new attribute
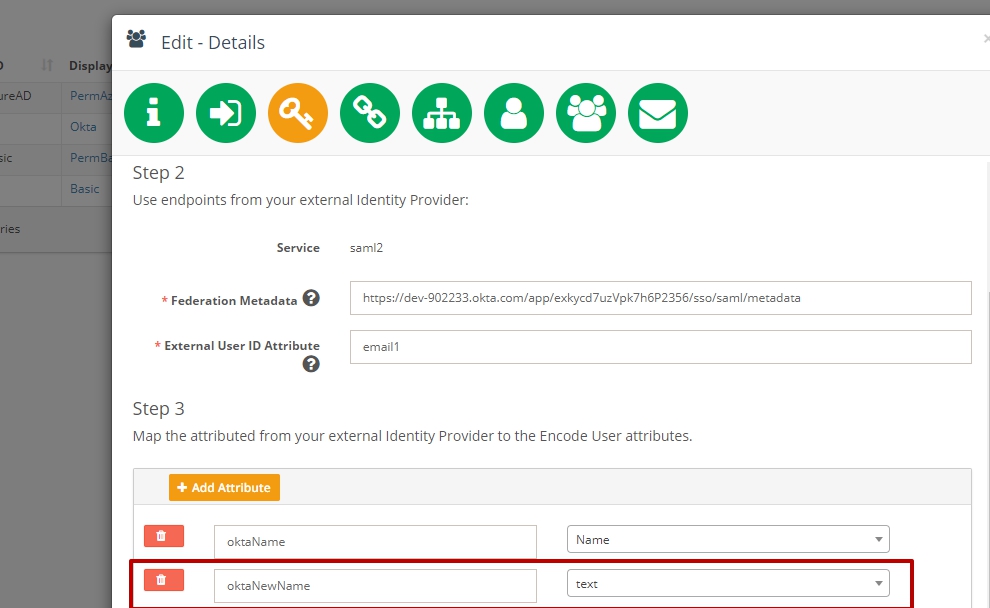
CASE 2: mapping of custom attributes from OKTA
Create new attributes in OKTA using steps from article "How to add/manage attributes in OKTA"
Go to the Encodify system > Open IdP configuration widget > Add new attribute
How to create an account in OKTA
Click on "CREATE FREE ACCOUNT" button > Fill in the form > Click on "GET STARTED" button
Activate your account using the link in received email message
Fill in the form
Save changes
How to add new project application in OKTA
Switch to the Classic UI
Go to Applications tab
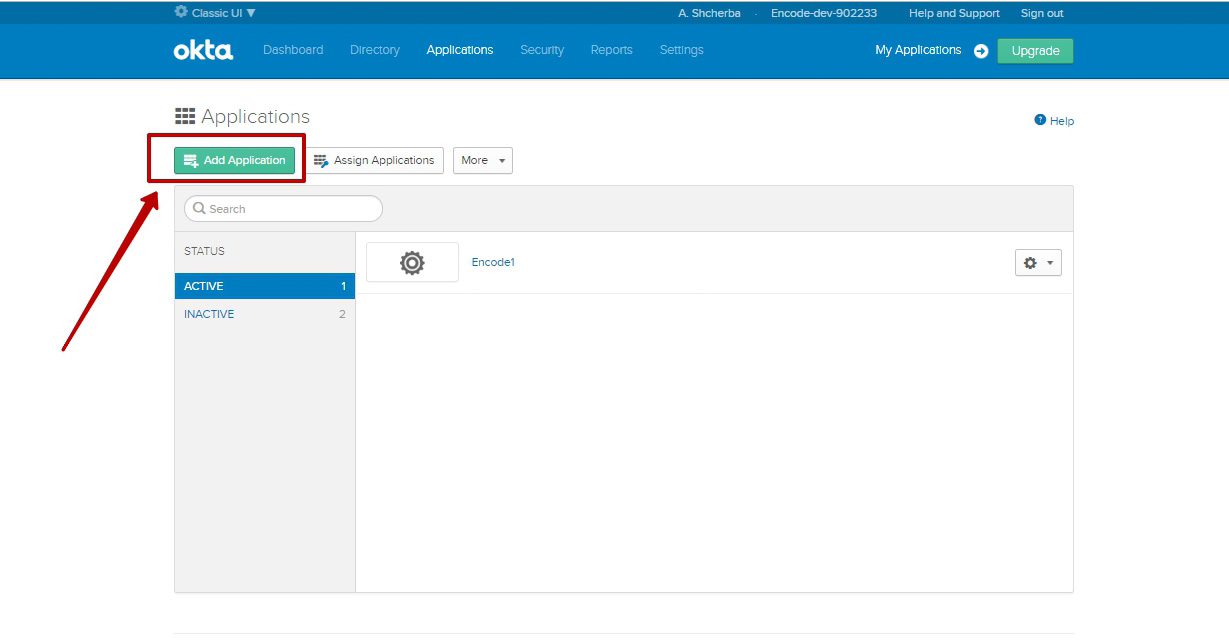
Click on “Add Application” button
Click on “Create new App”> Choose Web platform + SAML 2.0 > Create
Enter value into “App name” field > Proceed to the “Configure SAML“ step
Use data from the screenshot below as a sample > Fill in data on the form
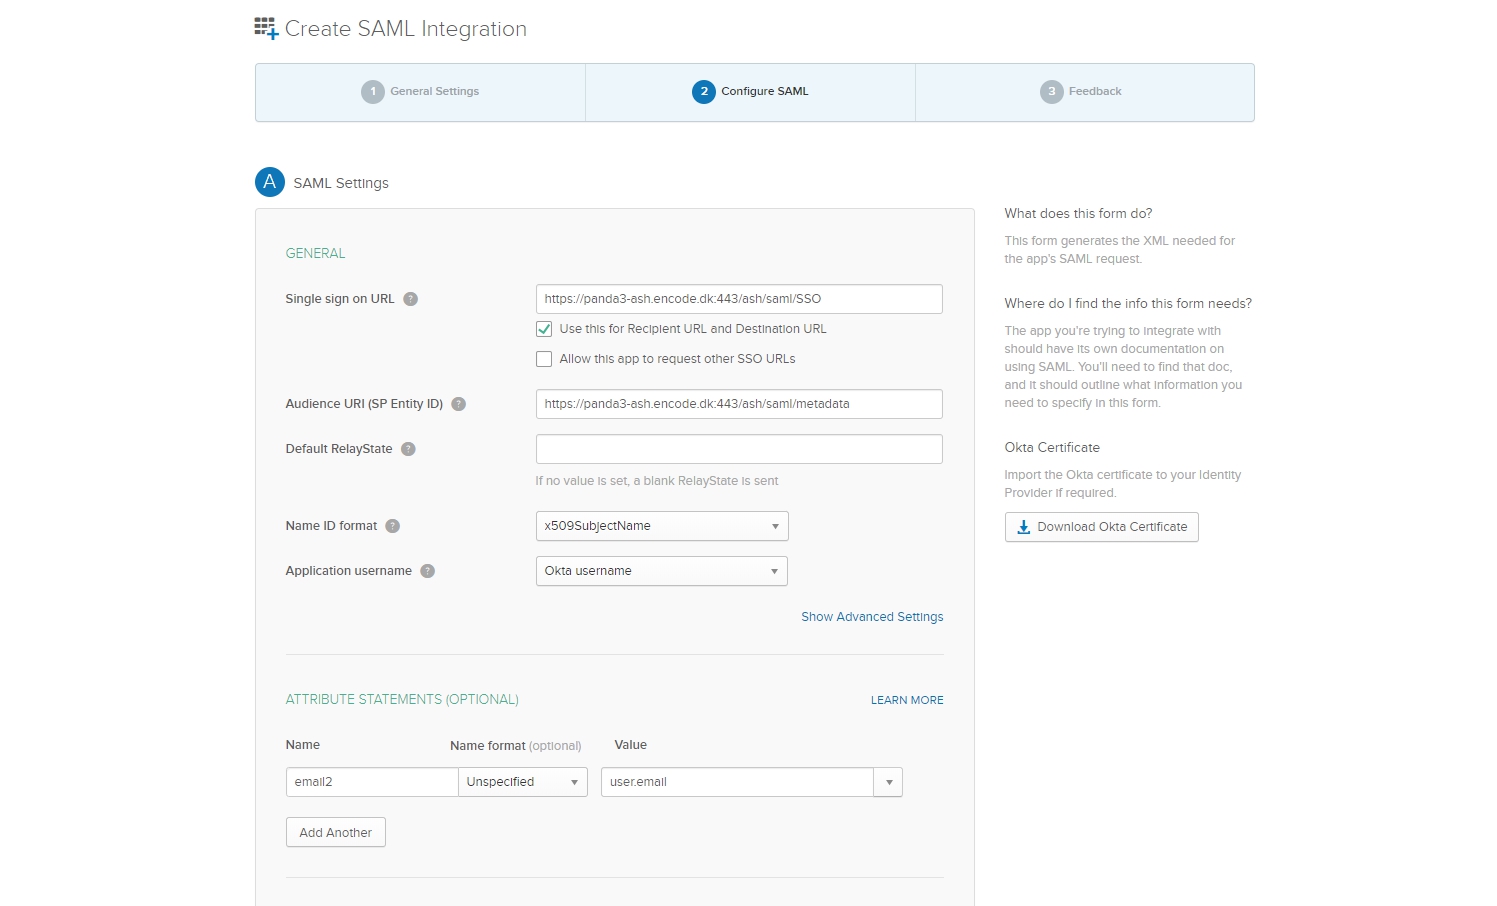
Proceed to the next screen
Select “I'm a software vendor. I'd like to integrate my app with Okta“ radio button
Click on “Finish” button
How to create personal accounts in OKTA
Click on "Directory" tab (use Classic UI) > Select "People" sub tab
Click on “Add Person” button
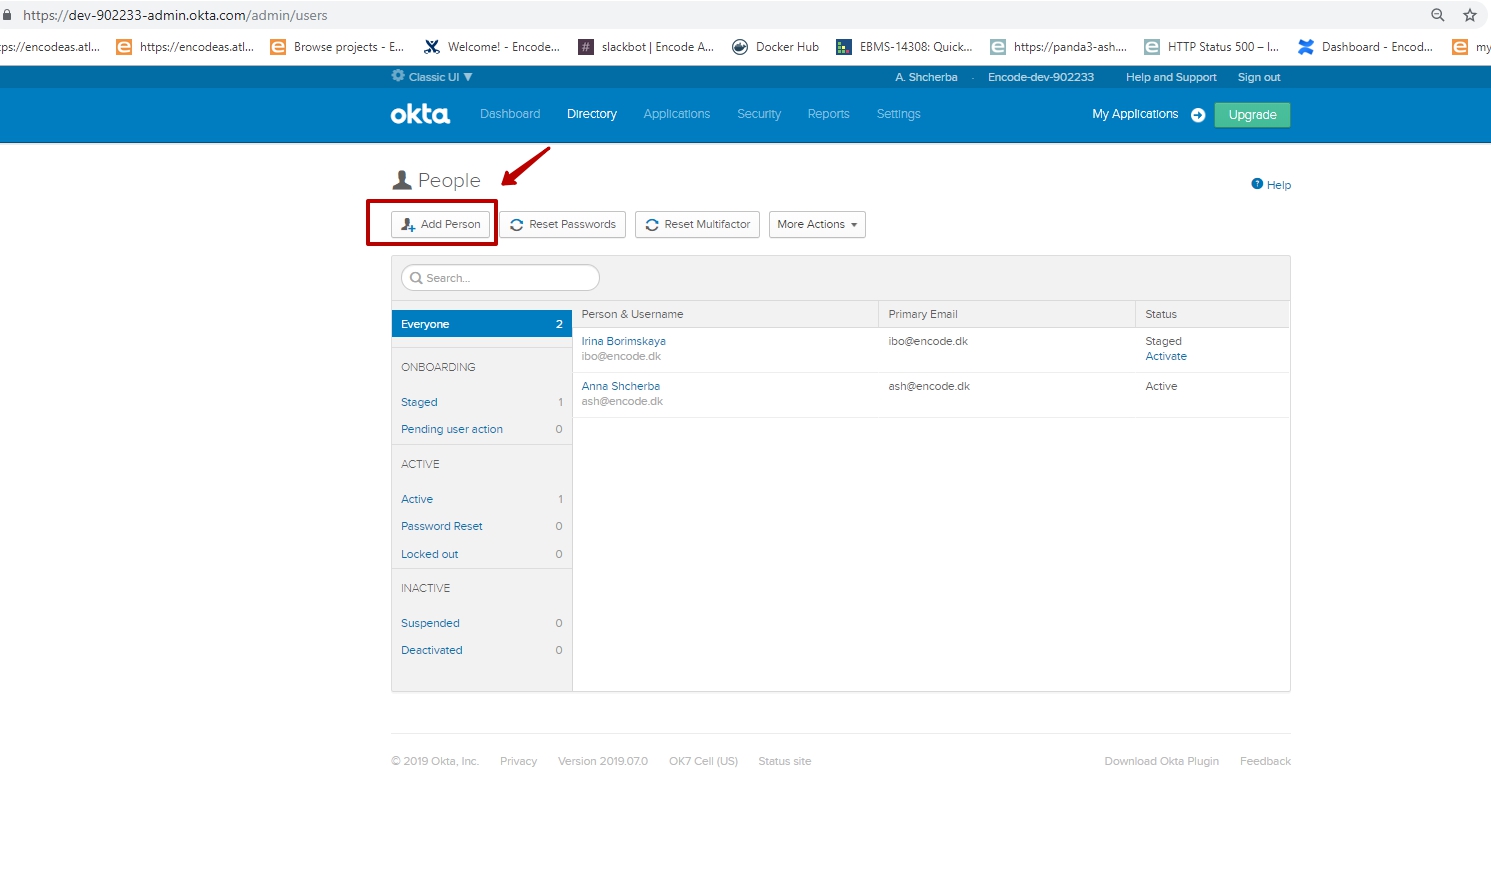
Fill in required fields
Click on “Save” button
How to assign people to the corresponding application in OKTA
Switch to "Applications” tab (use Classic UI)
Switch to “Assignment” sub tab
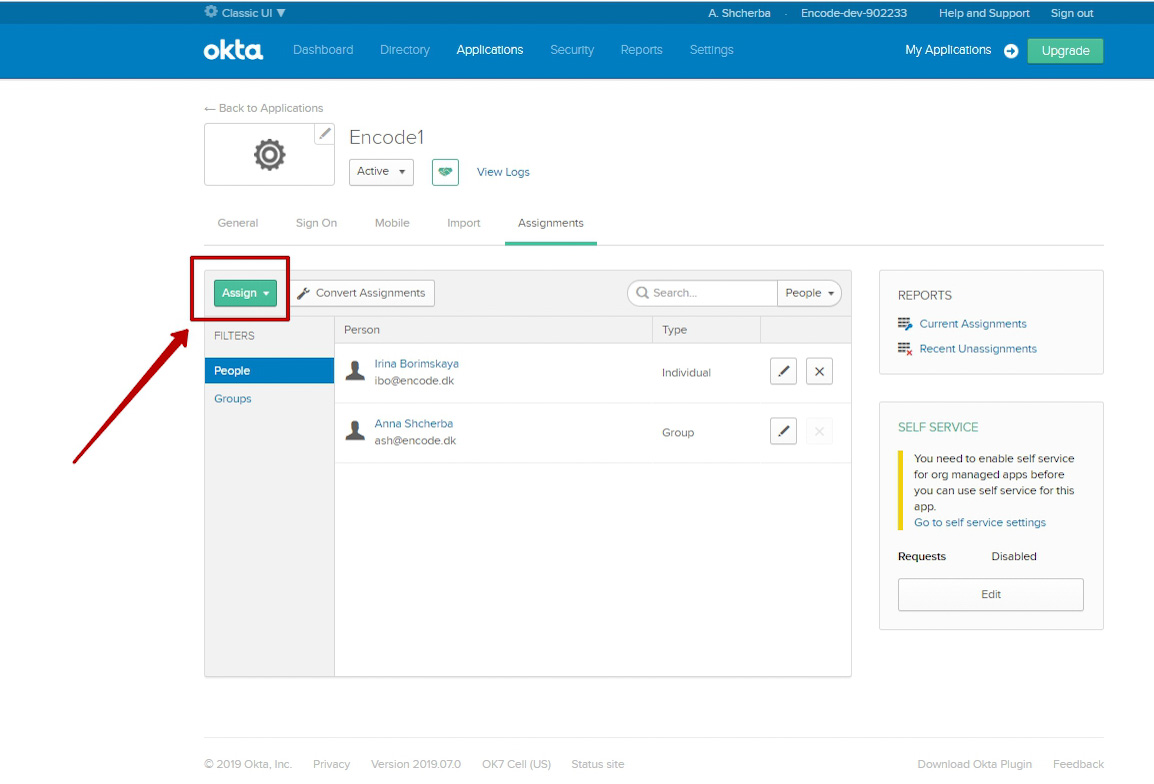
Click on “Assign” button > Click on “Assign to People” option
Select users from the list
Click on “Done” button
How to create/manage groups in OKTA
Create group:
Click on "Directory" tab (use Classic UI) > Select "Groups" option
Click on Add Group button > Enter group name that starts with “group” > Save changes
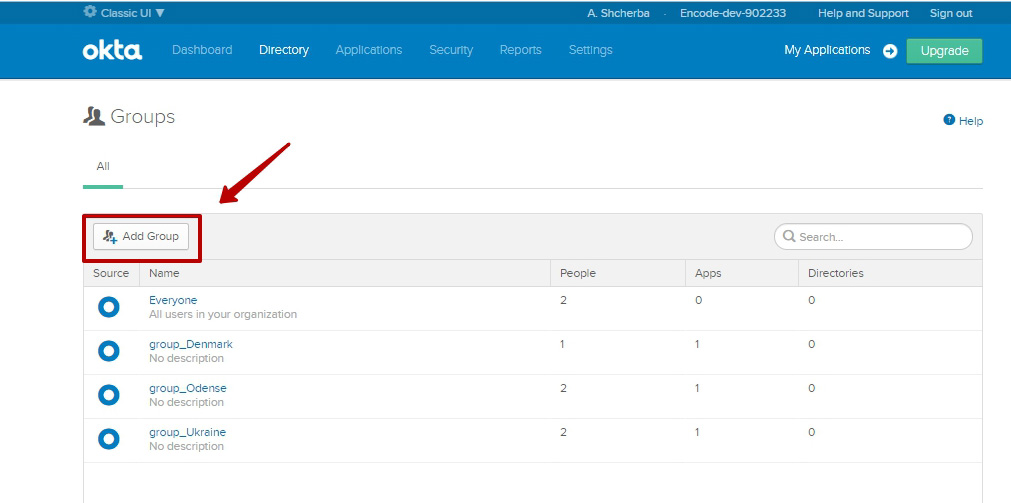
Assign people to the group:
Click on the name of created group
Click on “Manage People” button
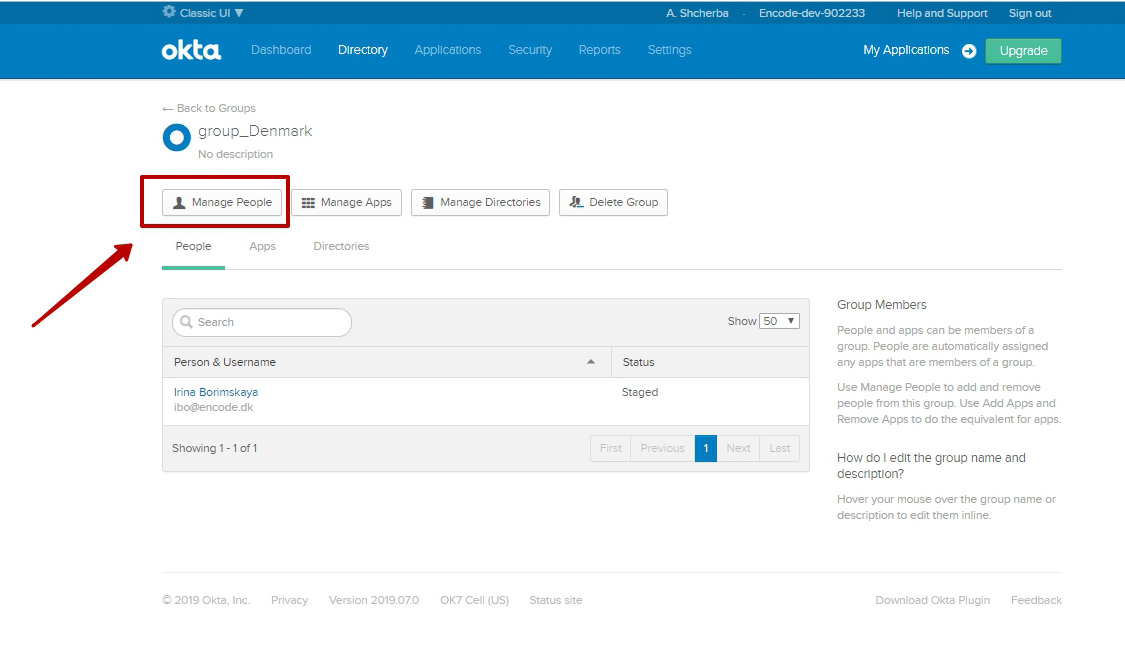
Select people that need to be added to the group > Save changes
Add created groups to the list of attributes:
Switch to "Applications” tab > Enter into selected application
Switch to the "General" tab > Edit SAML Settings
Add group attribute to the GROUP ATTRIBUTE STATEMENTS > in Filter select Starts with “group”
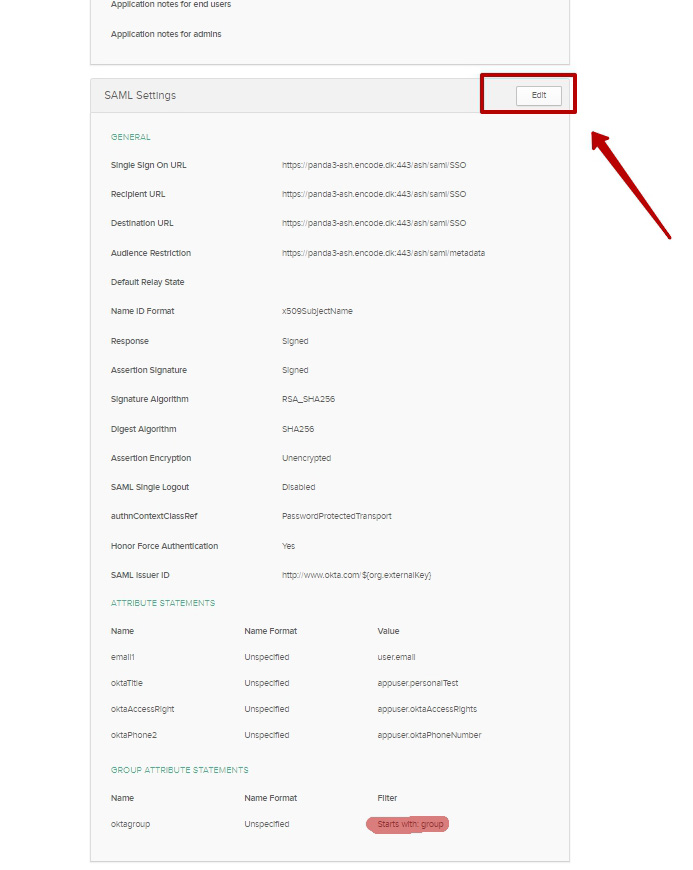
Save changes
How to add/manage attributes in OKTA
Click on “Directory” tab (use Classic UI) > Select "Profile Editor" option
Click on "Edit" button near the selected profile > Add attribute
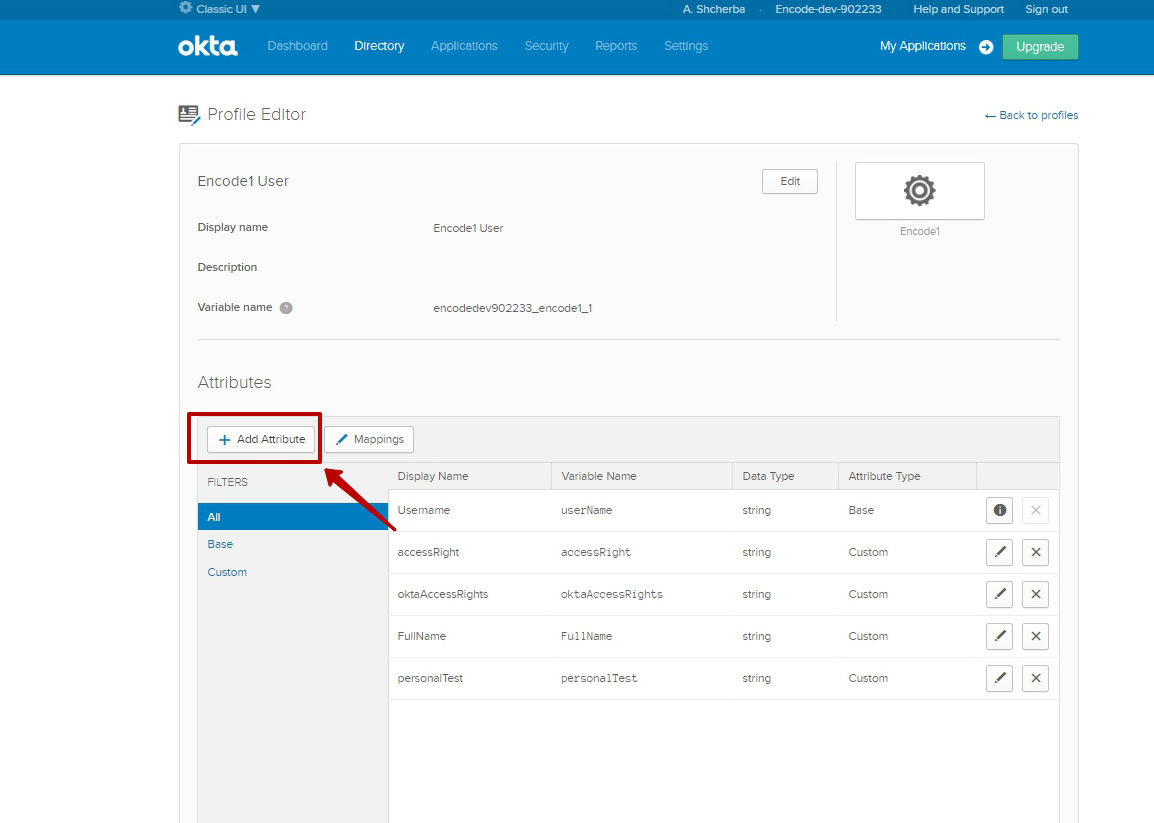
Go to “Applications” tab > Enter into selected Application
Switch to "General" sub tab > Edit SAML Settings > Add attribute(s)
How to create people with Individual type by default (in OKTA)
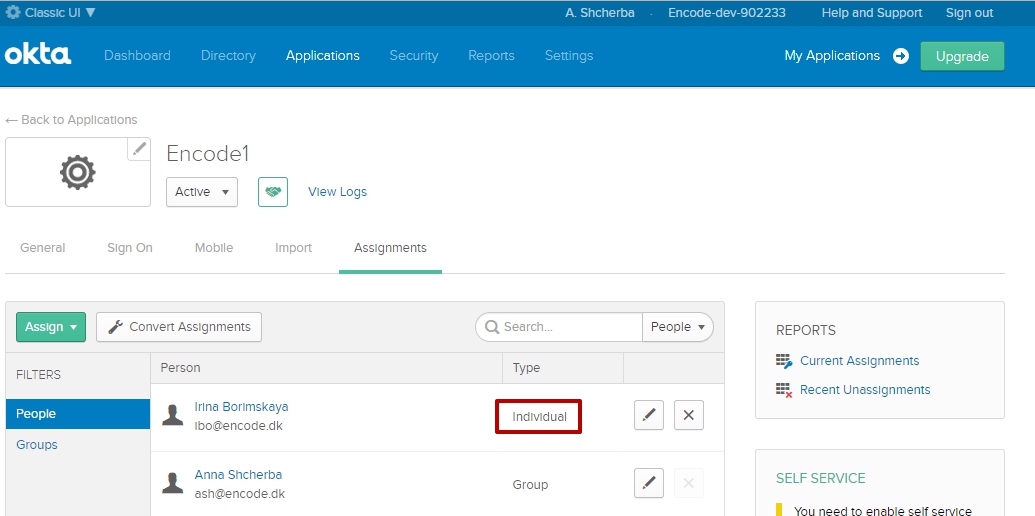
Create Groups and assign them to specific applications (use article "How to create/manage groups in OKTA" for more information)
Create person (use article "How to create personal accounts in OKTA" for more information)
Assign person to the application (use article "How to assign people to the corresponding application in OKTA" for more information)
Only after that assign person to different Groups
How to create people with Group type by default (in OKTA)
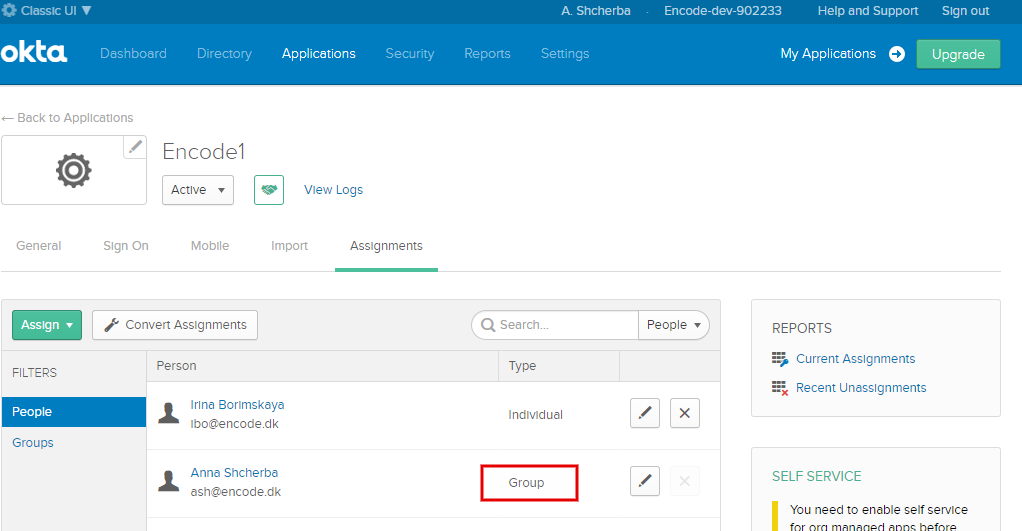
Create Groups and assign them to specific applications (use article "How to create/manage groups in OKTA" for more information)
Create person (use article "How to create personal accounts in OKTA" for more information)
Assign person to the Group (use article "How to create/manage groups in OKTA" for more information)
As result, person automatically becomes assign to the same application as it group AND person have an Group type by default.
It means that User will inherit all personal information from the Group profile that he belongs to. And all user data need to be entered on Edit Group page
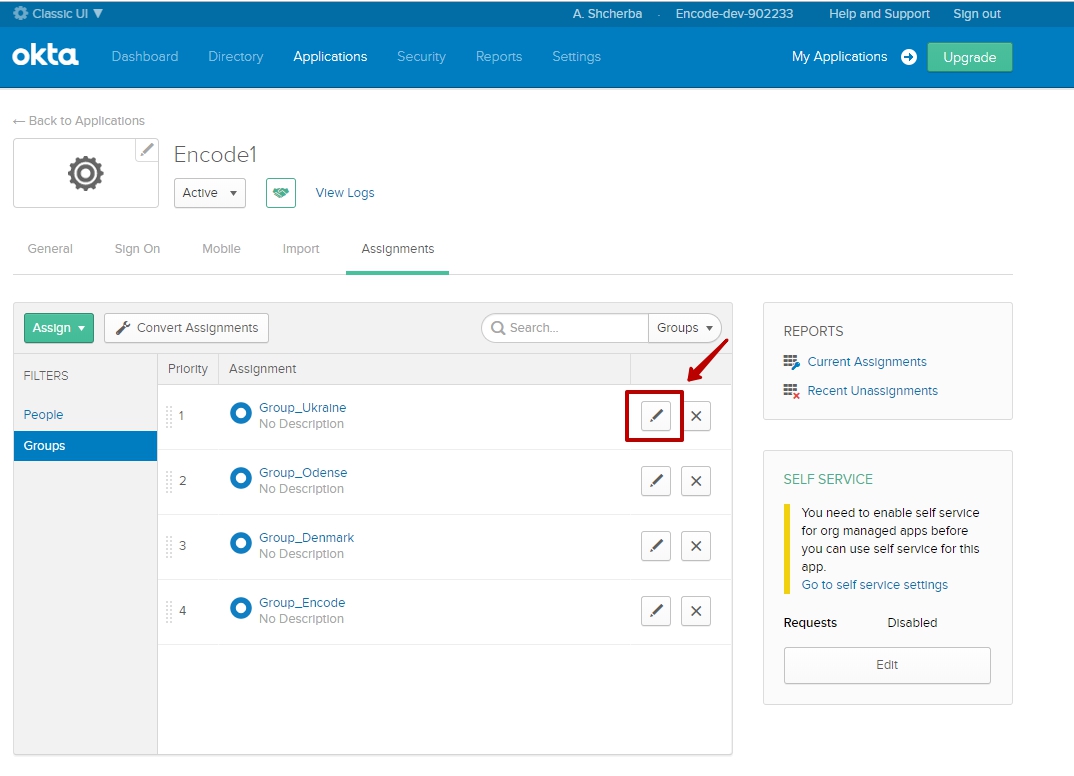
To change user type:
Open Edit page of the user (Applications > selected application > Assignments) > Select radio button "Administrator (overrides group)" from "Assignment master" field