Overview
The ordering function configuration involves creating two main modules: Catalog module and Order module.
Order module serves as the recipient of orders, which is then linked with the one that stores items available for ordering.
Catalog module is a sort of catalog or directory from which items can be selected, and the Order module becomes a record of the selection. Each item is represented by a single entry in the Catalog module, but may be found in more than one order in the Order module.
To set up ordering function properly, configuration of each module will be described separately.
Configure the Order module
Only a module that has Workflow enabled can qualify for the role of the Order module. Modules meeting these criteria appear in the Order Module list displayed when configuring the Ordering function. You must therefore configure the Order module prior to enabling the Ordering function.
To configure a module as the Order module, follow these steps:
Go to the Field Definition section of the module configuration menu and create fields that an order (regardless of type) can contain, including fields that correspond to fields in the module that orders are to be made from. Create the following fields as for an example:
Name
Quantity
Color
Size
Status
Order type
Create an Order type as a “select box” field with the options (e.g. Orderable and Not Orderable).
For the Status field create statuses for workflow that will regulate the lifecycle of each order. e.g. On Order, Order met, Cancelled.
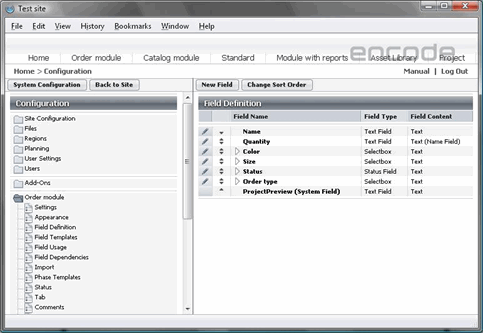
Fig.1.: Fields configuration for Order module
Go to Module > Workflow and configure the Workflow for the module.
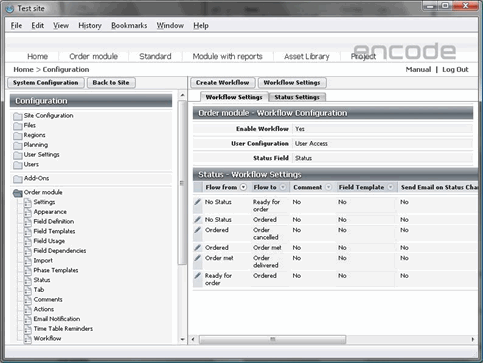
Fig.2.: Workflow configuration for Order module
Go to Field Templates and create template (e.g. Ordering template) that will be linked to an Order Type that will be later defined in the Catalog module.
Go to Field Usage and configure the template that you have just created (Ordering template) by selecting the necessary fields (e.g. Name, Quantity and Color).
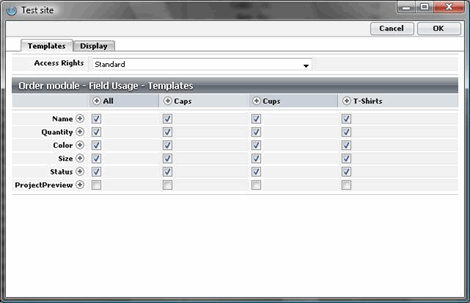
Fig.3.: Templates configuration for Order module
Go to Menu Elements and create a menu element (e.g. Ordering tab) where files involved in orders will be placed. The existing menu element can also be used.
Create new file area for files on chosen menu element using “Create File Area” button. Enable show info from checkbox and map a field template for file service module.
Configure the Catalog module
After the Order module is configured Catalog module should be set up next to be used in ordering function.
To configure a module as the Catalog module, follow these steps:
Go to Field Definition section and create the following fields as for an example:
Name_Asset
Quantity_Asset
Color_Asset
Size_Asset
The fields that you have created will be used for mapping when enabling ordering function.
Media File — create a separate field, or use the default Media File field in the Module.
Order type
Note! It is necessary to have File field in order you can upload files for items in Catalog. Without file uploaded the “Order This!” button will not be available and you won’t be able to proceed with ordering workflow.
Create an Order type as a “selectbox” field with the options (e.g. Orderable and Not Orderable). To the values of this field in Module settings you will later attach templates that were created in the Order module.
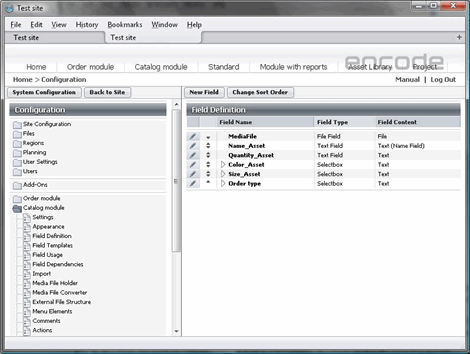
Fig.4.: Fields configuration for Catalog module
Go to Catalog module > Actions > Create Action. Select the UI Event as Event Type. Select action type "Create new in another module (Ordering)". Select the Enable ordering function check box. The Enable Order Basket check box will appear next. Select this check box if you want to make the Order Basket functionality available to users.
Selecting the Use Default Media Holder check box will then ensure that each time the user adds an item to the basket, the file extracted from that item will be the one stored in the Media Holder specified as Default Media File Holder in the module’s settings.
In the Order Module box, select the module that is to serve as the Order module.
In the File box, specify the link field of the file service module you want to use as a file storage.
In the Text on Order Button box, type the text to be shown on the button used for sending orders to the Order module. For example: “Order this.”
In the Field with Order Type field, select the field that lists order types defined in the module (Order type). The values of this field (e.g. Orderable and Not Orderable) will appear below, with the lists of field templates previously created in the Order module.
Assign the field templates to the order types, selecting them in the lists opposite each type.
Map the fields of the Catalog module with the respective Order module fields, by selecting the latter in the lists opposite the names of this module’s fields. Mapped fields will be pre-filled in Order field template on submitting the order.
e.g.
Name_Asset — Name
Quantity_Asset — Quantity
Color_Asset — Color
Size_Asset — Size
Note! Prefilling according to the Ordering mapping settings works only when “Order Basket” is disabled, that is, when submitting an order directly from the item’s Info window. This is due to the fact, that there can be more than 1 item in Order Basket > these items may have different field values, therefore, it is not clear for the system which values should be taken for the pre-filling.
Click Save settings.
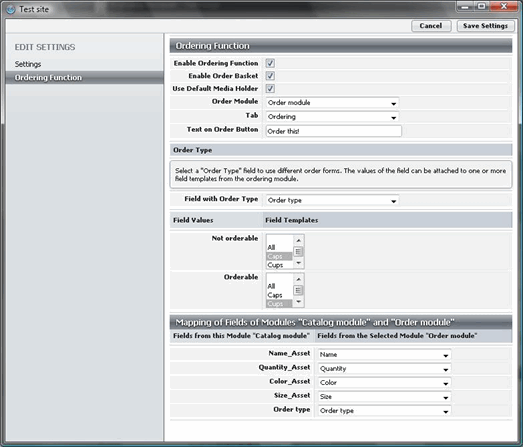
Fig.5.: Ordering Function configuration page