Configuring SSO with Microsoft AD FS On-Premise

Prev Next

Setting up SSO for Microsoft AD FS On-Premise


This guide provides step-by-step instructions and screenshots from the Encodify system and your Windows Server to help you configure Okta whether using SAML or OpenID.

Configuring OpenID Connect for Encodify through MS AD FS On-Premise


Configuring IdP

  • First, navigate to Site Configuration → Identity Providers and Users → Identity Providers in the Encodify system.

  • Click Add new IdP and start creating IdP with the authentication method Open ID Connect.

  • Click Next to proceed to step 2

  • Link your IdP configuration to an existing Login URL and Login Page, or create new ones. Each IdP can be linked to only one Login URL. See Configuration of Login URL for more details.

  • Click Next to proceed to step 3

  • Copy the Callback URL: /login/oauth2/code/adfsoidc and Authorization Base URL: /oauth2/authorization/adfsoidc

Creating Server application

Minimum version supporting Open ID: Windows Server 2016

  • Open the AD FS administration console on your Windows Server and add a new Application Group:

  • Provide a name for the integration, select Server Application from the Standalone applications section and click Next:

  • Copy the Client Identifier and leave the wizard for the moment:

  • With the field Redirect URI paste the Callback URL you previously copied from IdP configuration step 3 then click Next

  • Check the Generate a shared secret box, use the Copy to clipboard button to retrieve the secret and click Next.

  • On the summary screen press Next again to complete setup

Add Web API

  • Double click on the new Application Group you've created then click on Add application but this time select Web API and press Next:

  • In Identifier, add the Base URL of your Jira or Confluence and the AD FS Server app client ID from earlier
    (03f0e403-9943-4339-ad5f-56a8a9abccc8 in this tutorial) and click Next:

  • On the Access Control Policy screen, select the a policy, usually Permit everyone and click Next:

  • On the Configure Application Permissions screen, select scopes:

    • allatclaims

    • email

    • openid

  • Then press Next:

  • Confirm the summary screen and close the setup wizard.

Set LDAP Attributes as Claims

  • There is one more thing which needs to be changed now on the new Application group.
    Open it again and double-click on the Web-API entry.

  • Open the Issuance Transform Rules tab and click on Add Rule:

  • Select the Send LDAP Attributes as Claims template and click Next:

  • Give it a Claim rule name, select Active Directory as Attribute store, add map LDAP attributes as Outgoing Claim Type.

LDAP Attribute

Outgoing Claim Type

E-Mail-Addresses

E-Mail Address

Display Name

Name

Department

Role

Token Groups - Unqualified Names

Group

  • Click Finish/ OK/ OK to leave the configuration again.

Finalise IdP Configuration

  • Return to the Encodify system, select "Microsoft Archive Directory Federation (MS ADFS)" in "OpenID Connect Type" field on step 3 of IdP configuration.

You can specify next parameters - OpenID Connect JWK URI, Oauth2 Authorization Url, Oauth2 Access Token Url either via separate call or by inputting them manually.(Pay attention - these fields are read only if config url is specified in OpenID Connect Config URL and become editable if OpenID Connect Config URL is empty)

To fetch described parameters via call:

  • Replace in field OpenID Connect Config URL {{ms-adfs-domain}} in url path with domain from your ADFS configuration where url should be as i.e.: https://adfs.encode.dk/adfs/.well-known/openid-configuration and make a call by pressing "Enter" to fetch parameters (Pay attention: in case of url is correct after call OpenID Connect JWK URI, Oauth2 Authorization Url, Oauth2 Access Token Url get prefilled with values)

To specify manually:

  • Clear field OpenID Connect Config URL and fill:

  • OpenID Connect JWK URI: https://adfs.encode.dk/adfs/.well-known/openid-configuration

  • Oauth2 Authorization Url: https://adfs.encode.dk/adfs/oauth2/authorize/

  • Oauth2 Access Token Url: https://adfs.encode.dk/adfs/oauth2/token/

  • Fill in the Client ID, Client secret, and common parameters.

The following parameters should be used:

Oauth2 Scope

email,openid,allatclaims

OpenID Connect JWK URI

https://adfs.encode.dk/adfs/discovery/keys

Oauth2 Authorization Url

https://adfs.encode.dk/adfs/oauth2/authorize/

Oauth2 Access Token Url

https://adfs.encode.dk/adfs/oauth2/token/

OAuth2 Client ID

03f0e403-9943-4339-ad5f-56a8a9abccc8

OAuth2 Client Secret

External User ID Attribute

email

  • The endpoints can be retrieved by calling

https://adfs.encode.dk/adfs/.well-known/openid-configuration
{
  "issuer": "https://adfs.encode.dk/adfs",
  "authorization_endpoint": "https://adfs.encode.dk/adfs/oauth2/authorize/",
  "token_endpoint": "https://adfs.encode.dk/adfs/oauth2/token/",
  "jwks_uri": "https://adfs.encode.dk/adfs/discovery/keys",
  "token_endpoint_auth_methods_supported": [
    "client_secret_post",
    "client_secret_basic",
    "private_key_jwt",
    "windows_client_authentication"
....
}
  • Map the custom additional attributes from the AD FS to Encodify user, e.g.

ADFS attribute

Encodify attribute

unique_name

Name

ADFS.png

ADFS_2.png

  • Save IdP wizard.

Please note, for some reason the ADFS attribute names do not always correspond to the names of Outgoing Claims mapped in ADFS Rule settings

For example, Name claim is sent as unique_name and E-Mail Address is sent as email.

Login with AD FS OpenID Connect

  • Now that the configuration is complete on both sides, it's time to test if everything works. Go to the Encodify login page and click "ADFS OIDC" IdP button. It should redirect you to the MS AD FS server login page allowing you to enter credentials of the MS ADFS user

Configuring SAML for Encodify through MS AD FS On-Premise


Common settings

  • To use AD FS 2.0 Windows Server 2008 should be configured to maintain the following roles:

    • Active Directory Certificate Services

    • Active Directory Domain Services

    • Active Directory Federation Services

  • You can check and install roles in Server Manager (go to Start menu, type “Server Manager” in Search field and click on the Service Manager program found).
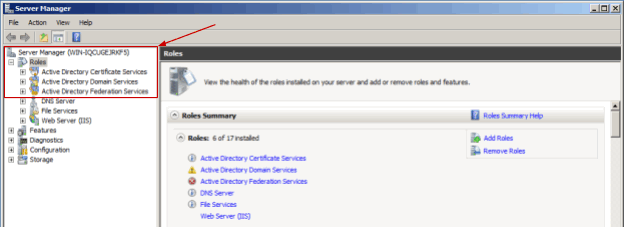
    image5.png

  • Configuring the roles is out of scope of this manual, for more details please refer to Microsoft documentation.

  • Assuming that you have already installed AD FS 2.0 to your Windows Server. If not, please refer to the Microsoft Install the AD FS software documentation. You can download AD FS 2.0 software from Active Directory Federation Services 2.0 RTW page.

Receiving the Federation Metadata URL

  • Get the Federation metadata link on Windows Server with AD FS installed, to use for configuring Identity Provider profile in Encodify System. It will look like the following: https://{ServerName}/FederationMetadata/2007-06/FederationMetadata.xml

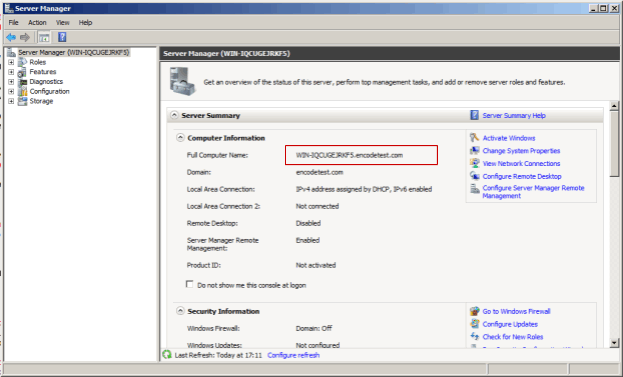
  • The {ServerName} can be found on Server Manager overview screen:

  • Go to Start menu, type “Server Manager” in Search field and click on the Server Manager program found);

  • Find Full Computer Name in the Computer Information section;

  • Specify this full name as a {ServerName} into the Federation metadata link.

    image4.png

  • For example, you will get the following URL: https://WIN-IQCUGEJRKF5.encodetest.com/FederationMetadata/2007-06/FederationMetadata.xml

Configuration of SAML Application

  • Start AD FS 2.0 Management tool from Windows Start menu.
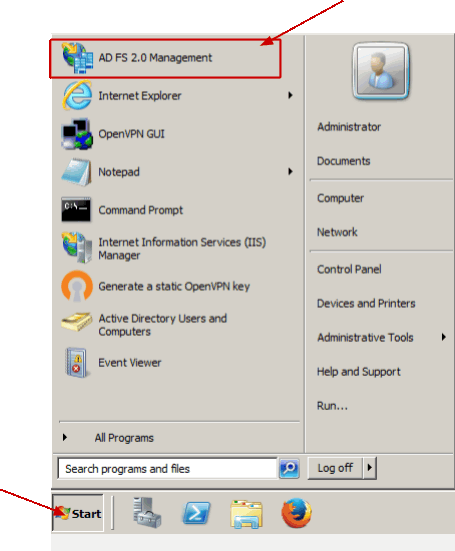
    image1.png

  • Expand Trust Relationships > Relying Party Trust and click Add Relying Party Trust.
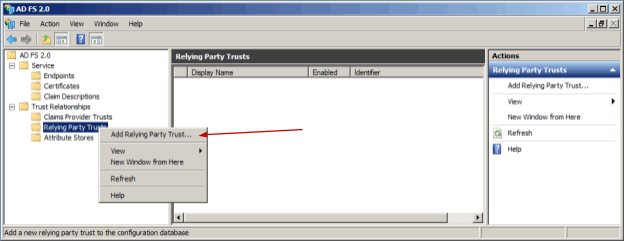
    image11.png

  • Click Start in opened Add Relying Party Trust Wizard

  • Insert the following link to Federation metadata address field: https://{EncodifyServer}:{port}/{worker}/saml/metadata for example, https://qa.test.com:443/qa/saml/metadata. Note, that AD FS 2.0 requires secure HTTPS protocol in the URL, so you have to run your Encodify system on the secure domain. Otherwise, you will not be able to finish the configuration.
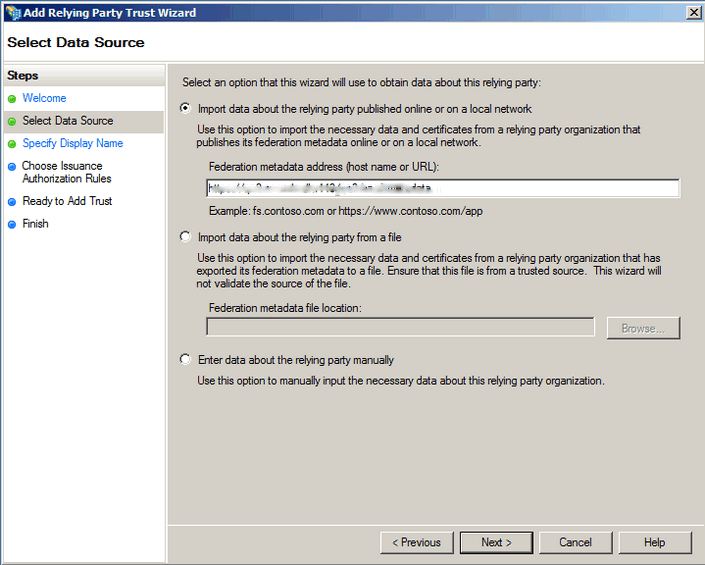
    image10.png

  • Click Next several times confirming the default settings until the configuration is done. In the last screen leave the checkbox Open the Edit Claim Rules dialog enabled. Click Close.

  • In the opened Edit Claim Rules window click Add Rule.

  • In the opened Add Claim Rule Wizard select Claim rule template as Send LDAP Attributes as Claims. Click Next.
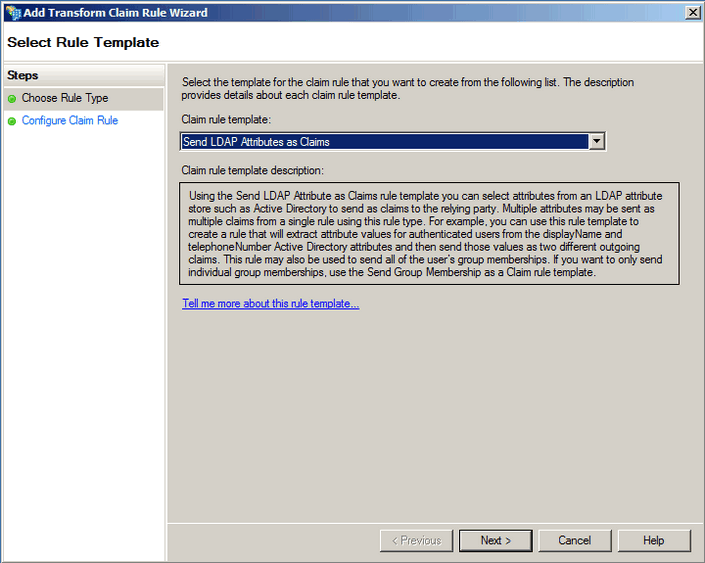
    image9.png

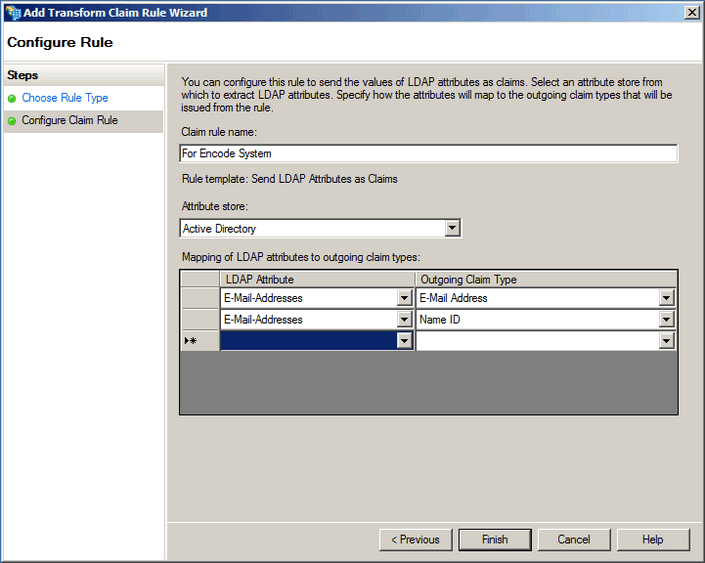
  • Configure Claim rule:

    • Specify a name for claim rule (e.g. “For Encodify System”)

    • Select attribute store Active Directory

    • Map LDAP attributes to outgoing claim types:

LDAP attributes

Outgoing Claim Type

E-Mail-Addresses

E-Mail Address

E-Mail-Addresses

Name ID

image2.png

  • Click Finish.

  • Confirm changes In Edit Claim Rules window by clicking Apply and then OK.
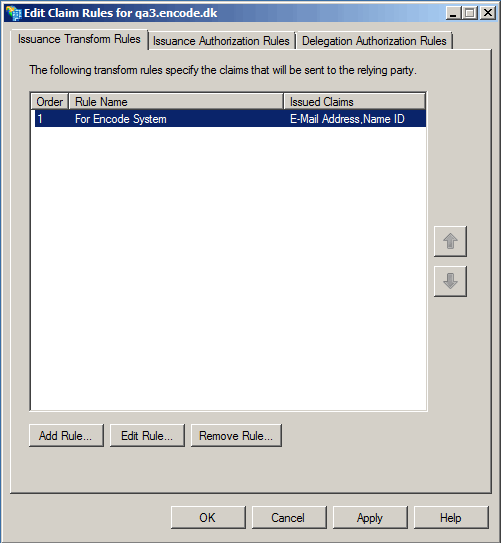
    image3.png

  • In AD FS 2.0 management window do the right click on the added Relying Party Trust record and select Properties.
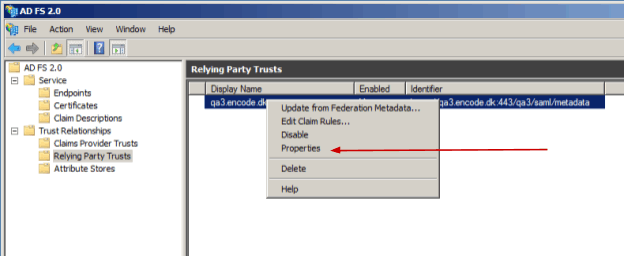
    image8.png

  • Check that user that will login to Encodify system via SAML has a valid email address. You can do this in Active Directory Users and Computers manager (go to Start menu, type “Active Directory Users and Computers” in Search field and click on the Active Directory Users and Computers program found). Double-click the user name and verify her E-mail field.
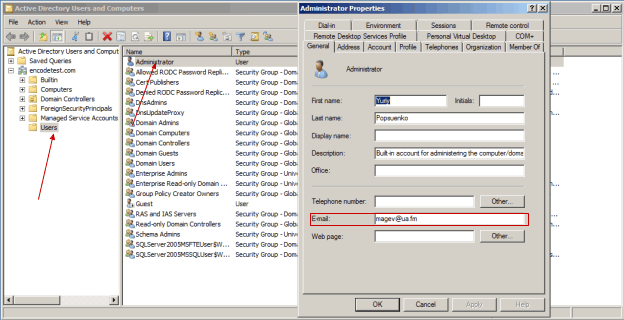
    image7.png