Configuring SAML for Encodify through Amazon Cognito
Overview
In order to use the SSO services provided by the Amazon Cognito, the following precondition steps should be performed:
Create Amazon account with enabled Multifactor authentication. (operations team can be called for the assistance).
Create a new User Pool
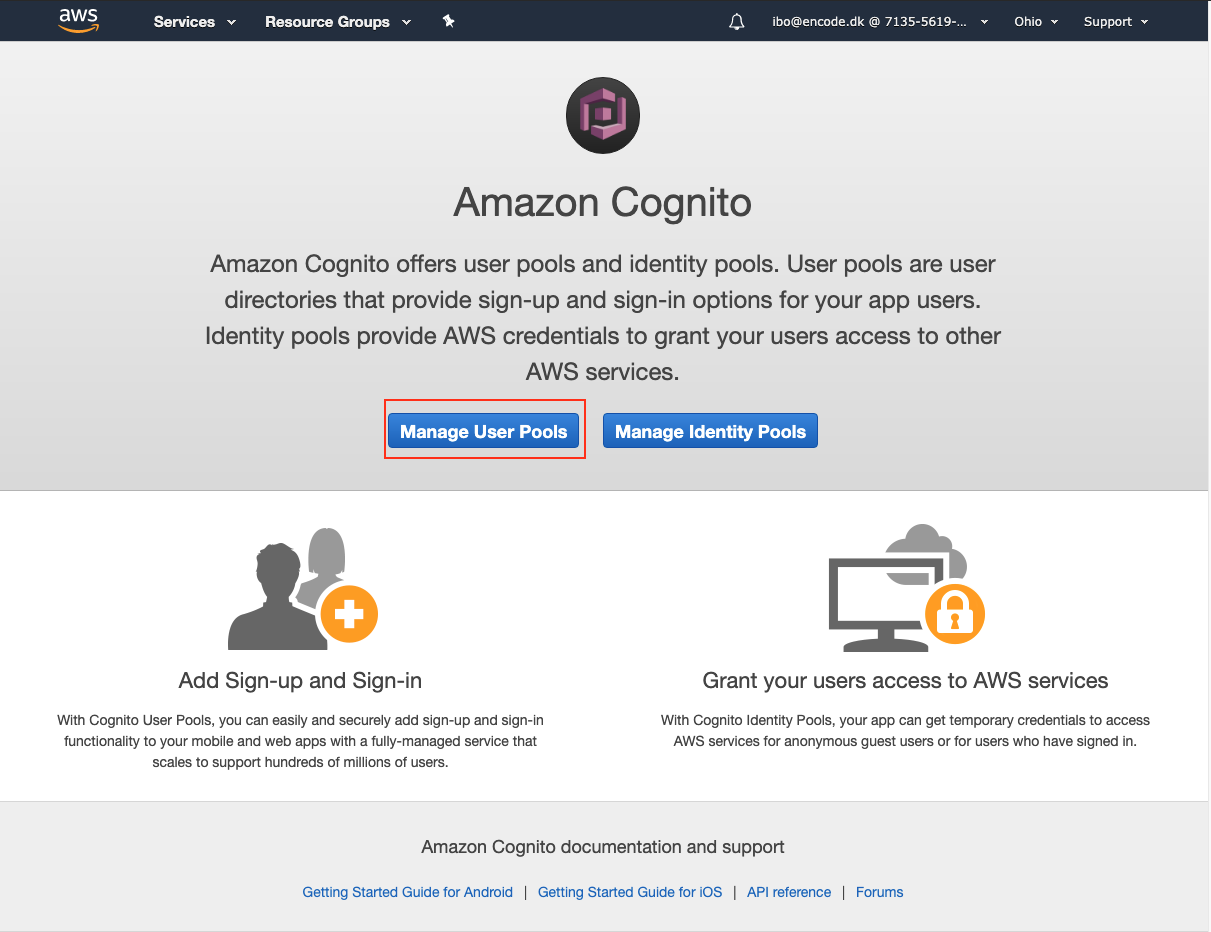
From the AWS Management Console page, type "Cognito" in the Find Services search field and select Cognito User Identity and App Data Synchronization.
After being redirected to the Amazon Congnito page, click Manage User Pools.
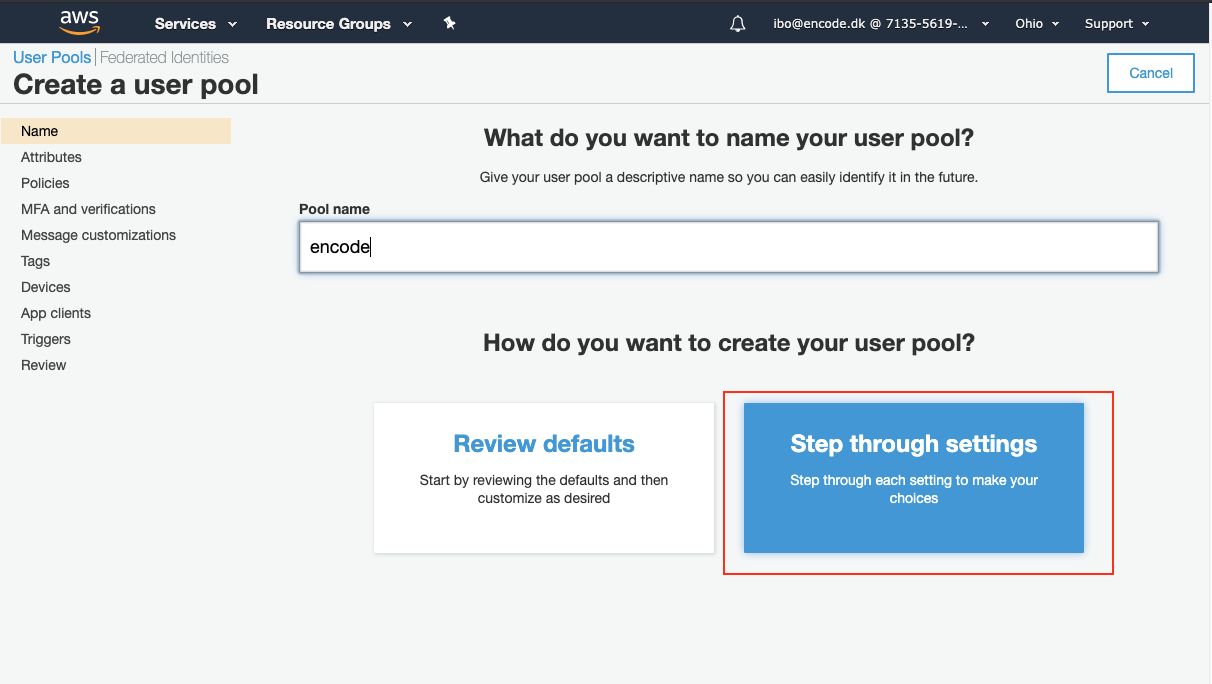
Click Create a user pool in the top right corner of the page.
Enter a descriptive name for your pool in the Pool name field, and click Step through settings.
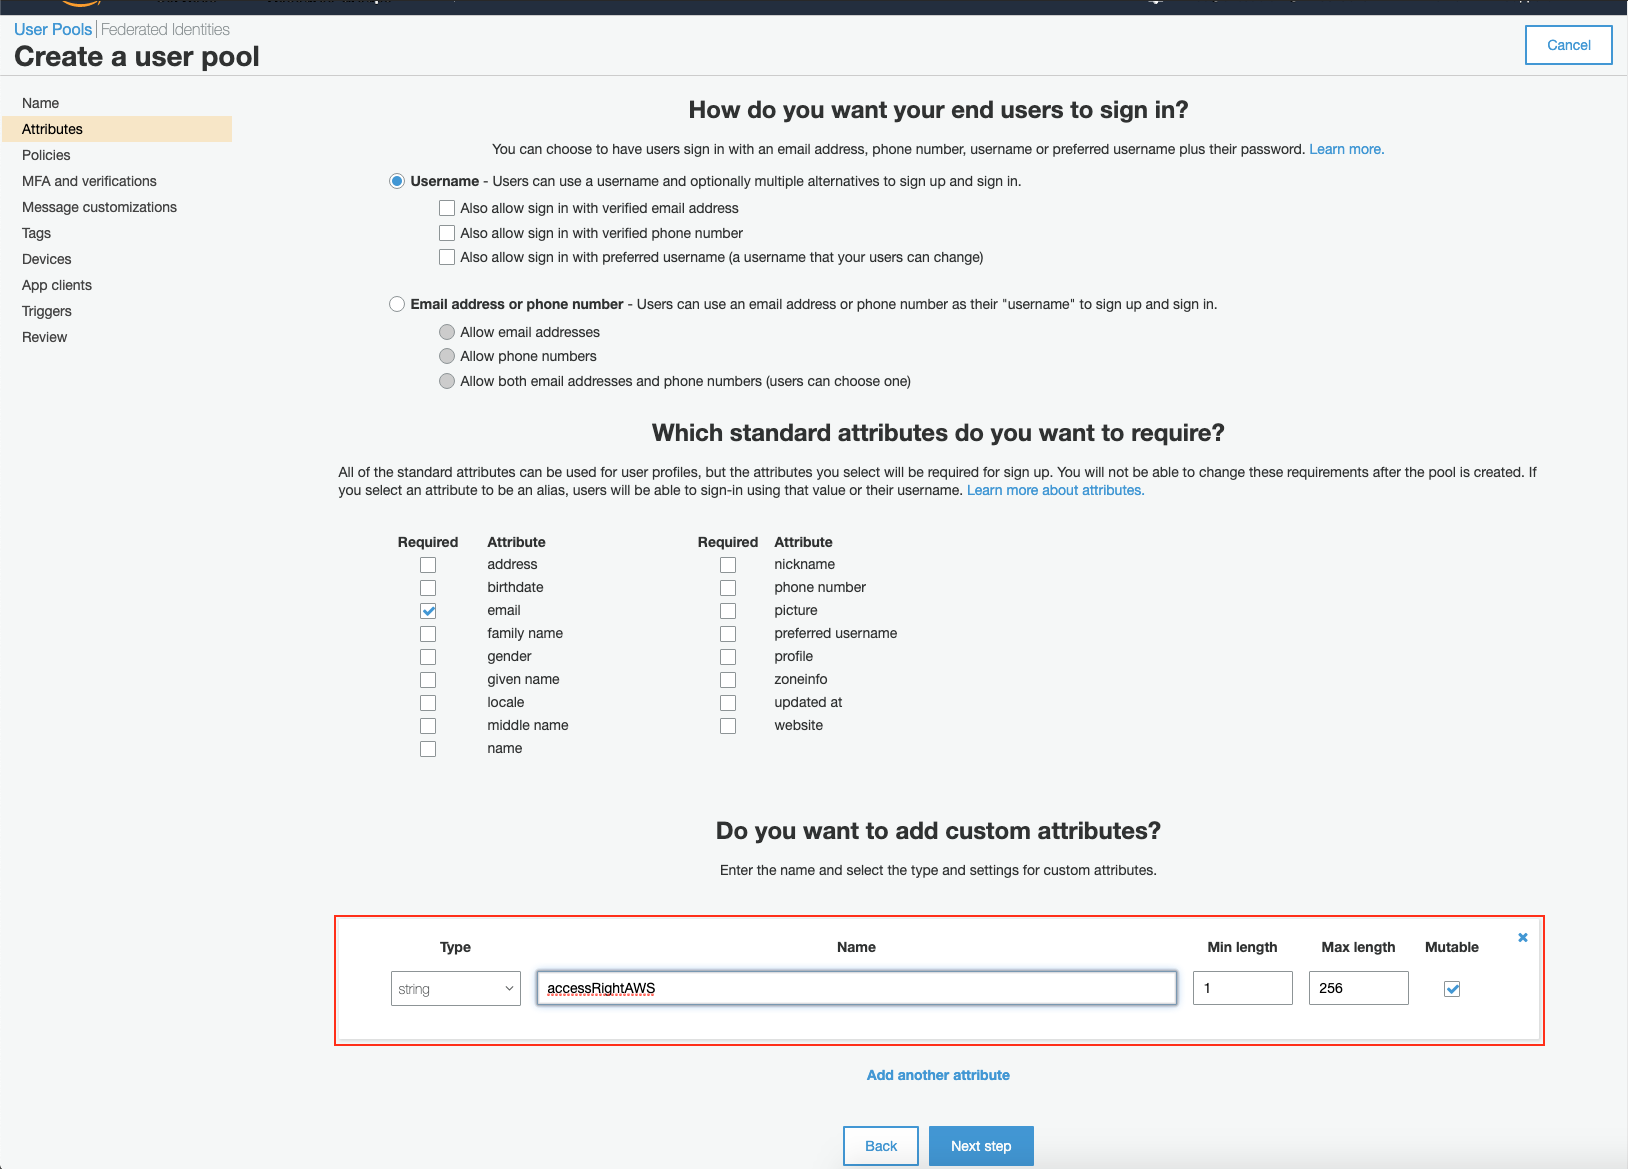
Leave the default settings on the next page in the first 2 configuration sections, and click Add custom attribute link in the Do you want to add custom attributes section.
Enter a meaningful attribute name that will be used to denote access rights of the users. Note that spaces are not allowed in the custom attribute name. Click Next step when done.
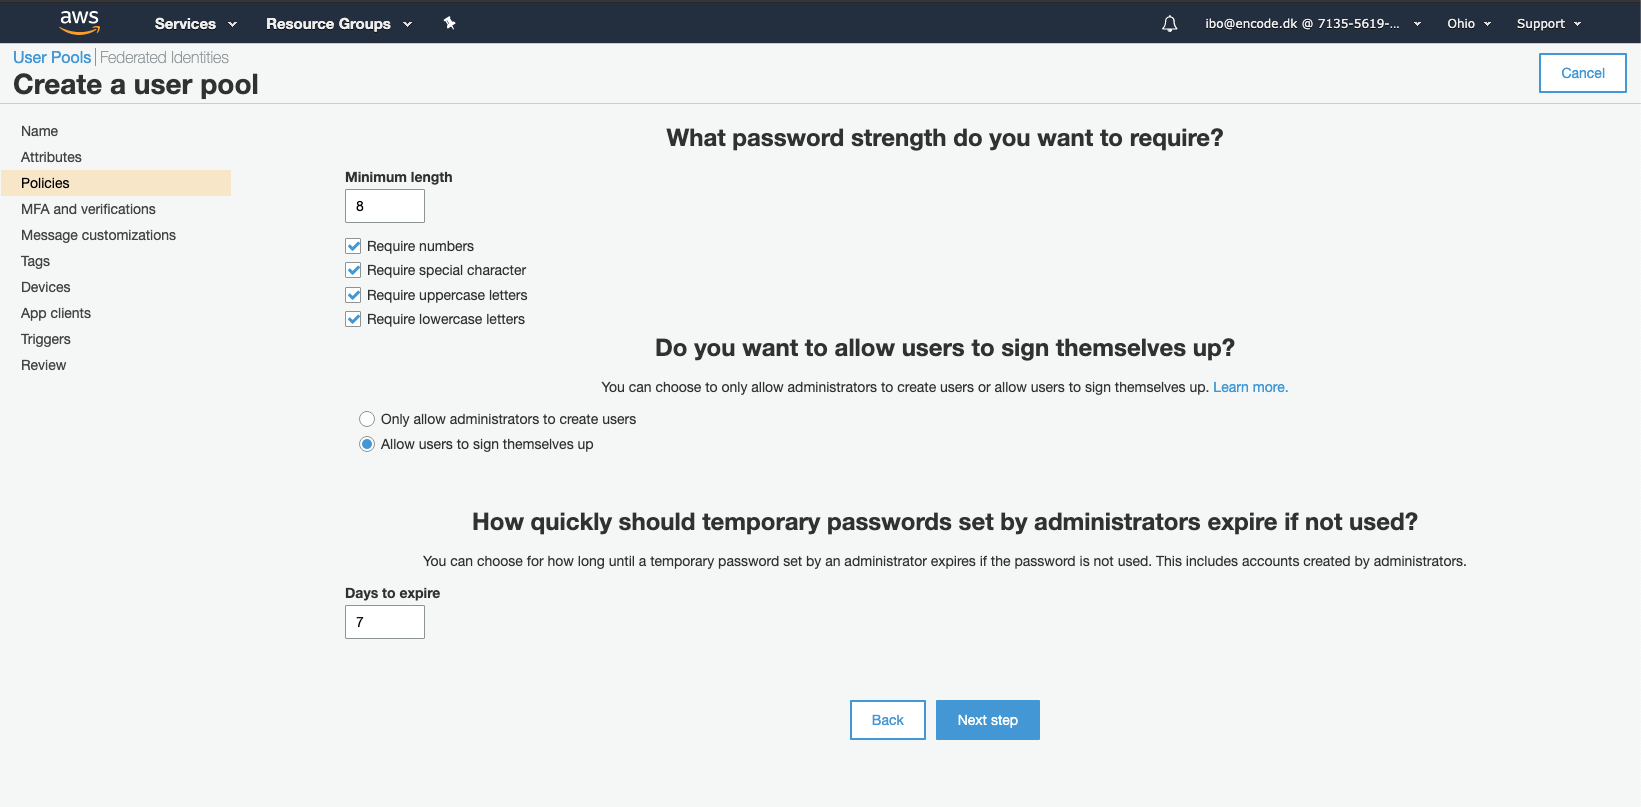
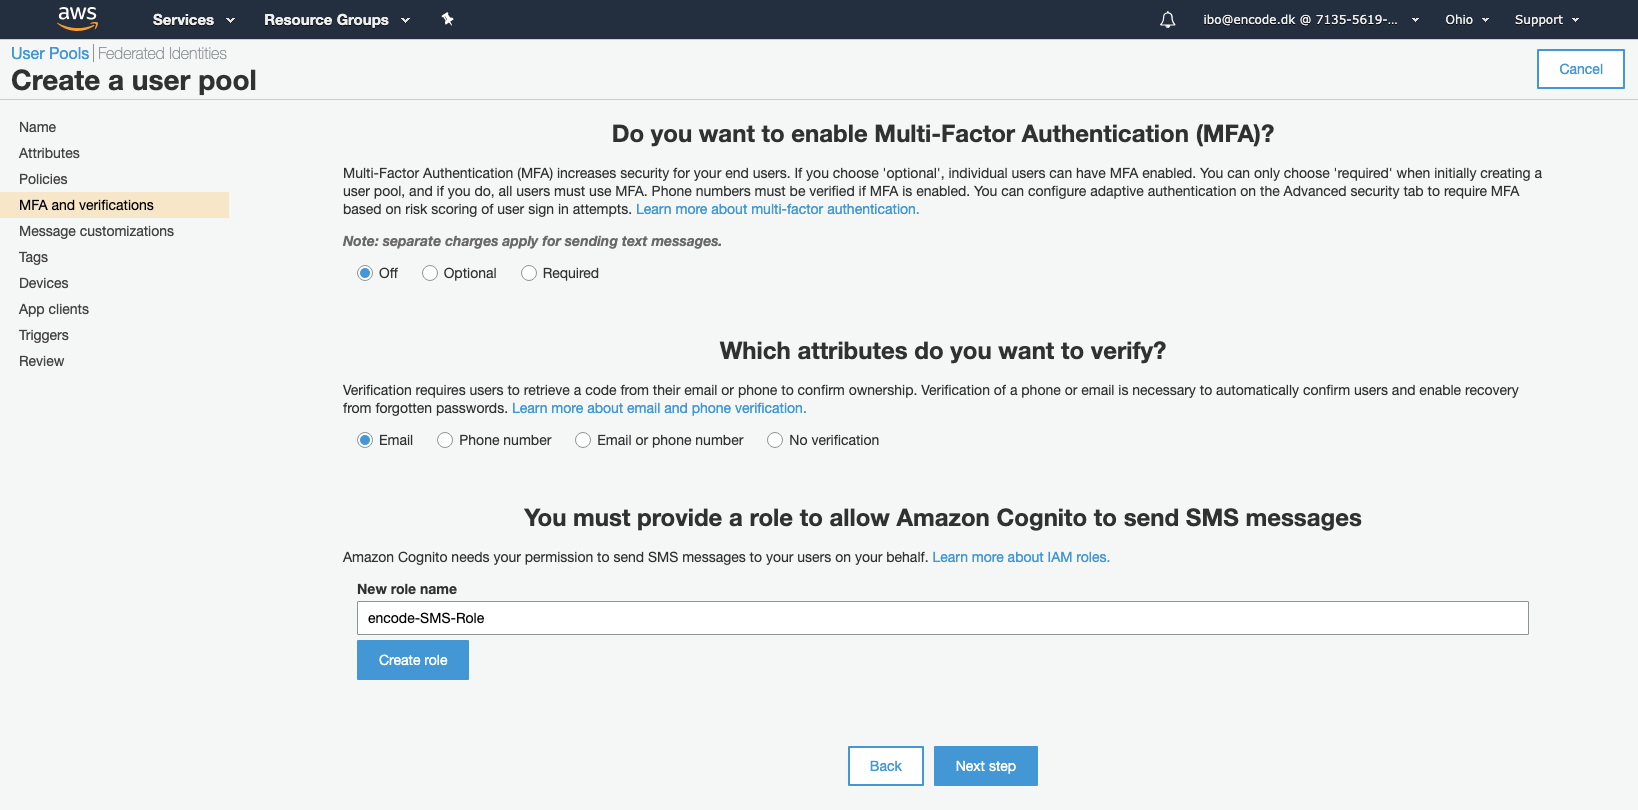
Leave all the default settings on the next page and click Next step.
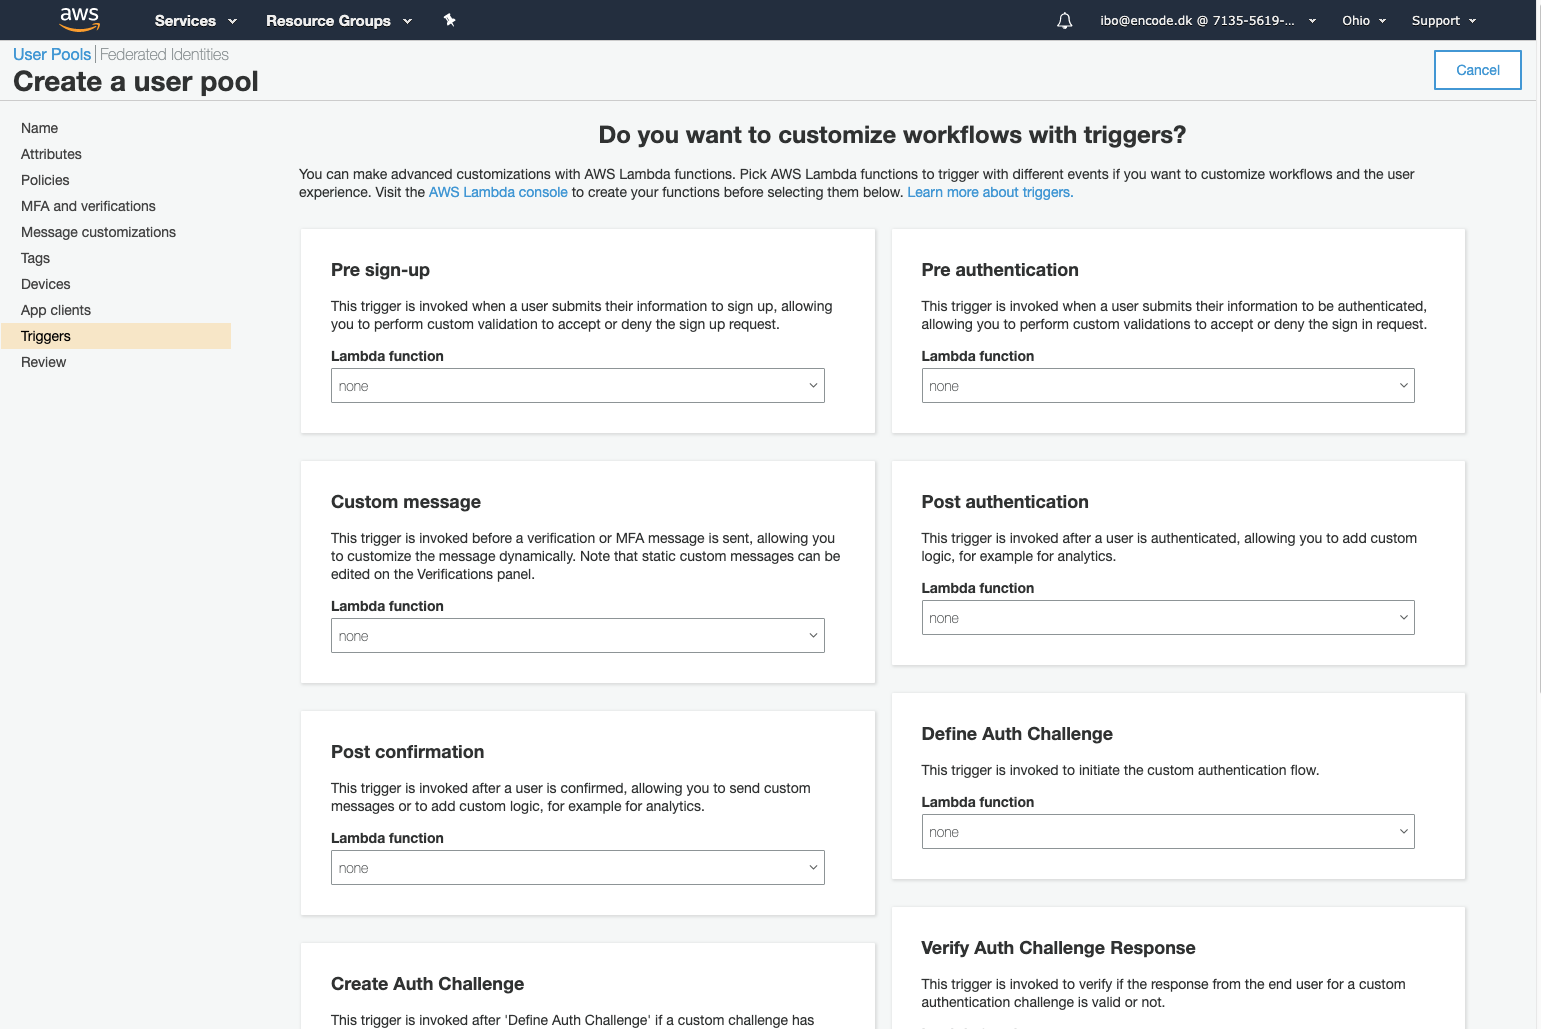
Click Next step and leave the default settings on the following 4 steps.
When you have reached the Which app clients will have access to this user pool section, click Add an app client.
Type the app name in the App client name field, leave all the default settings and click Next step.
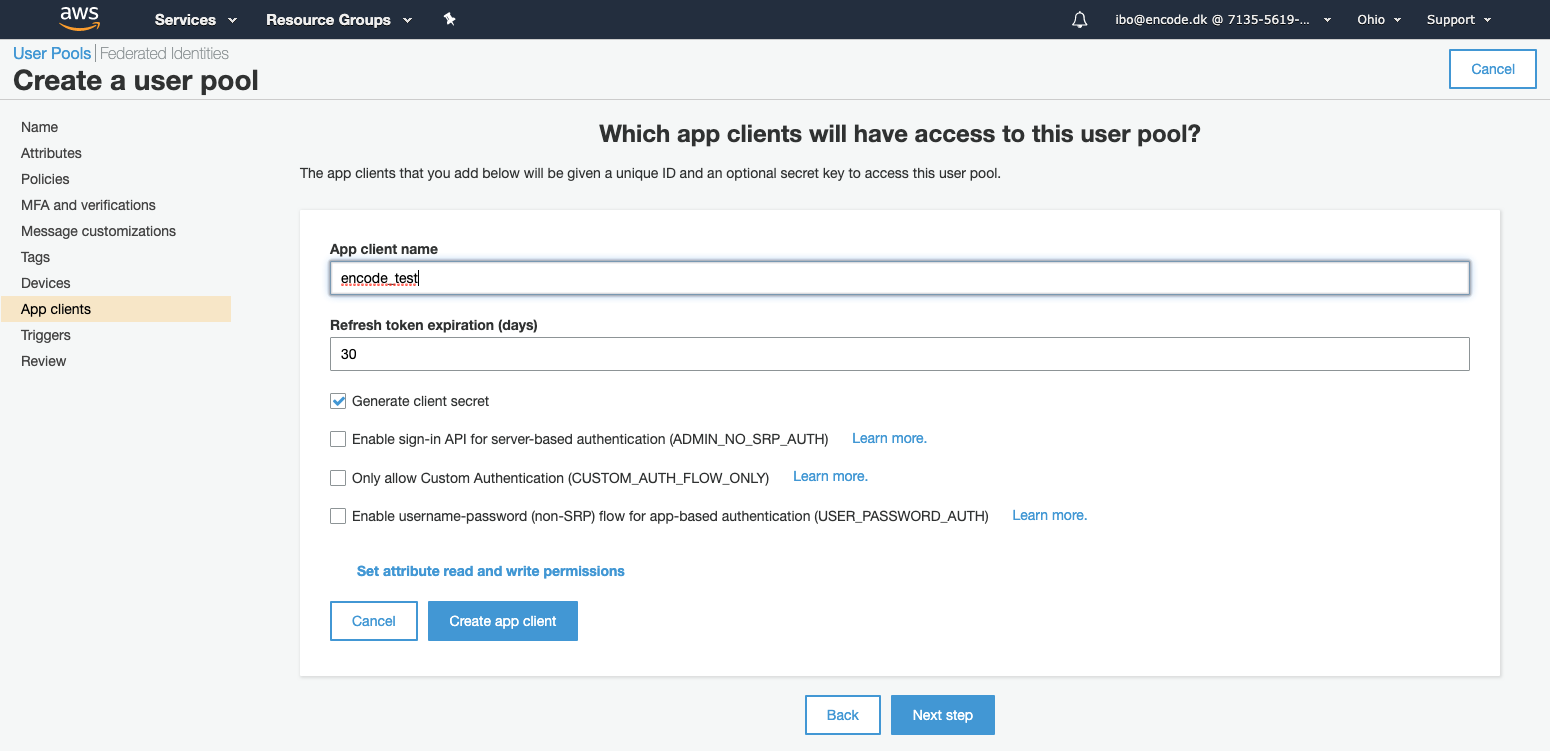
Leave all the default settings on the next page and click Next step.
Click Create pool on the last wizard step.
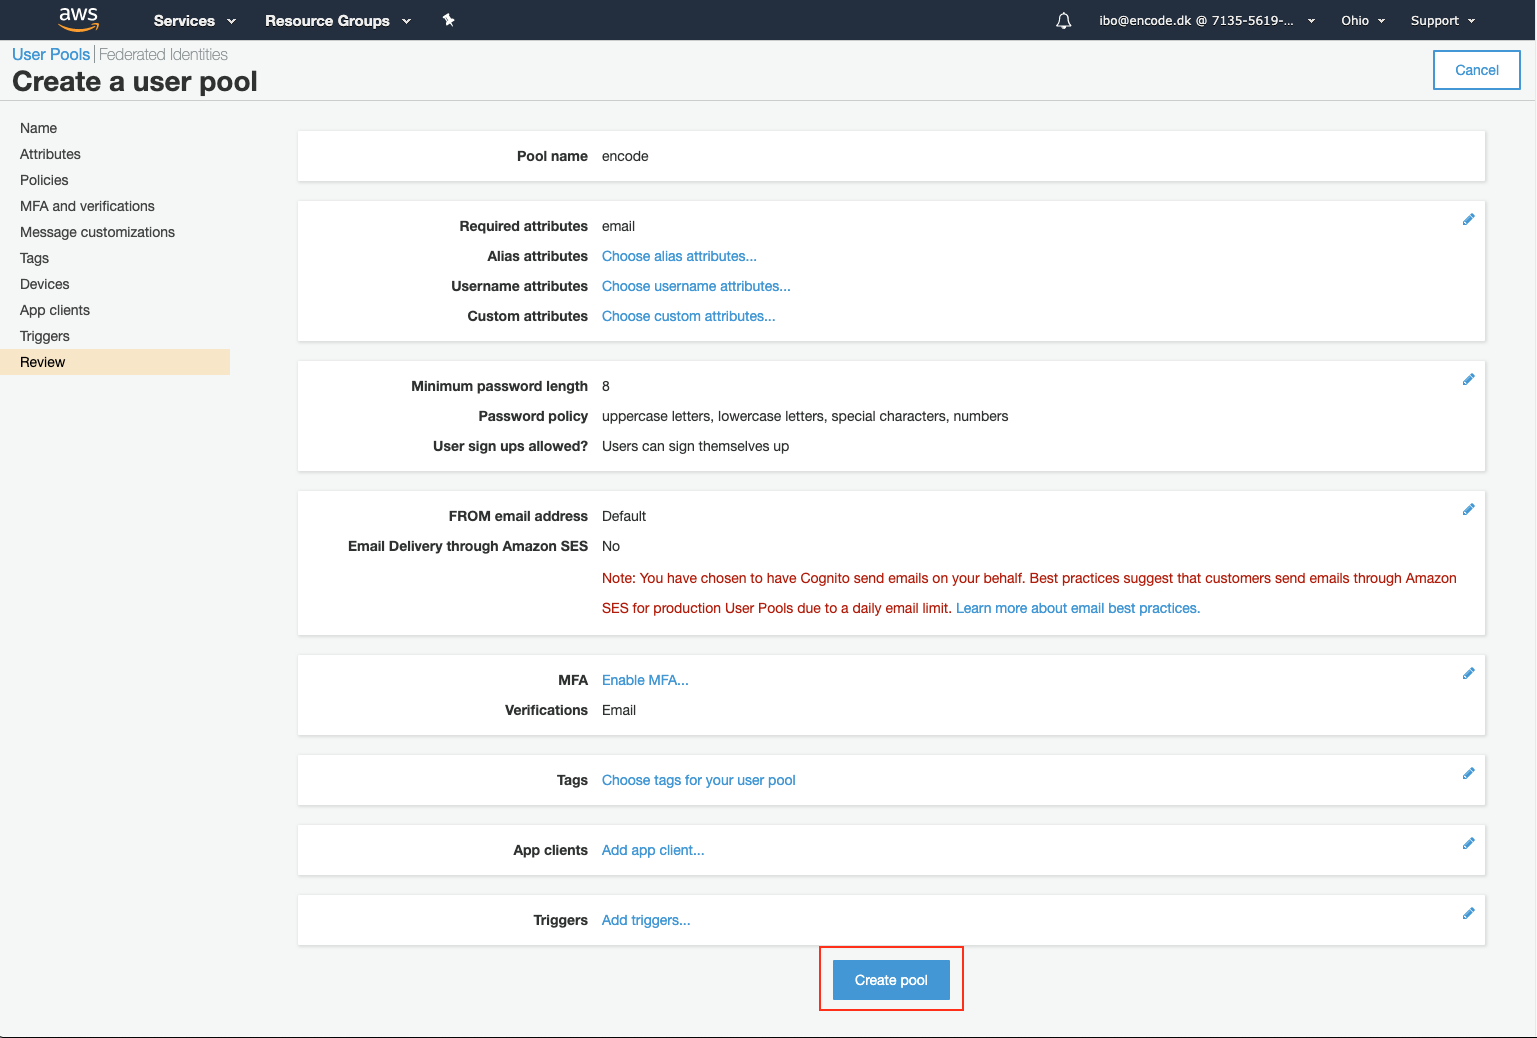
Confirmation about successfully created user pool will be displayed.
Configure App integration
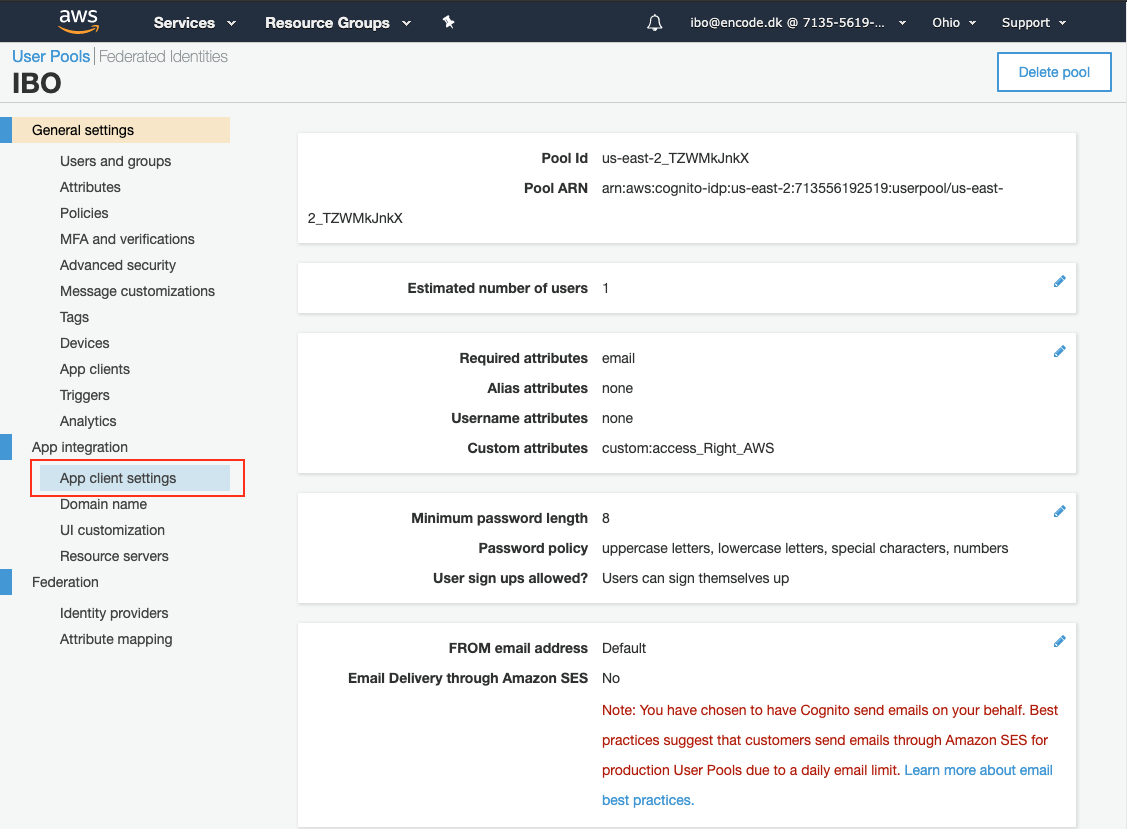
Open the User Pools|Federated Identities page for the previously created user pool.
Click App client settings under the App integration section in the left pane.
On the configuration page that loads, select the Cognito user Pool check box.
Enter the following URL in the Callbacks URL(s) field substituting the server name and context with the values that corresponds to your server.
Please, note!
Be careful while copying the callpack URL from the Encodify IDP settings. It is important that Callback URL does not contain port, otherwise authorization will not work and the following error will be displayed on login attempt: "An error was encountered with the requested page." In the Network you will see Bad Request respone
Example of correct URL
https://server.name.dk/context/login/oauth2/code/cognito
Example of incorrect URL
https://server.name.dk:443/context/login/oauth2/code/cognito
Select the Authorization code grant checkbox in the Allowed OAuth Flows configuration section.
Select the following options under the Allowed OAuth Scopes configuration section: phone, email, openid, aws.cognito.signin.user.admin, profile and click Save changes.

Create and configure Cognito users and user groups
Groups
If not already on it, open the User Pools|Federated Identities page for the user pool in question.
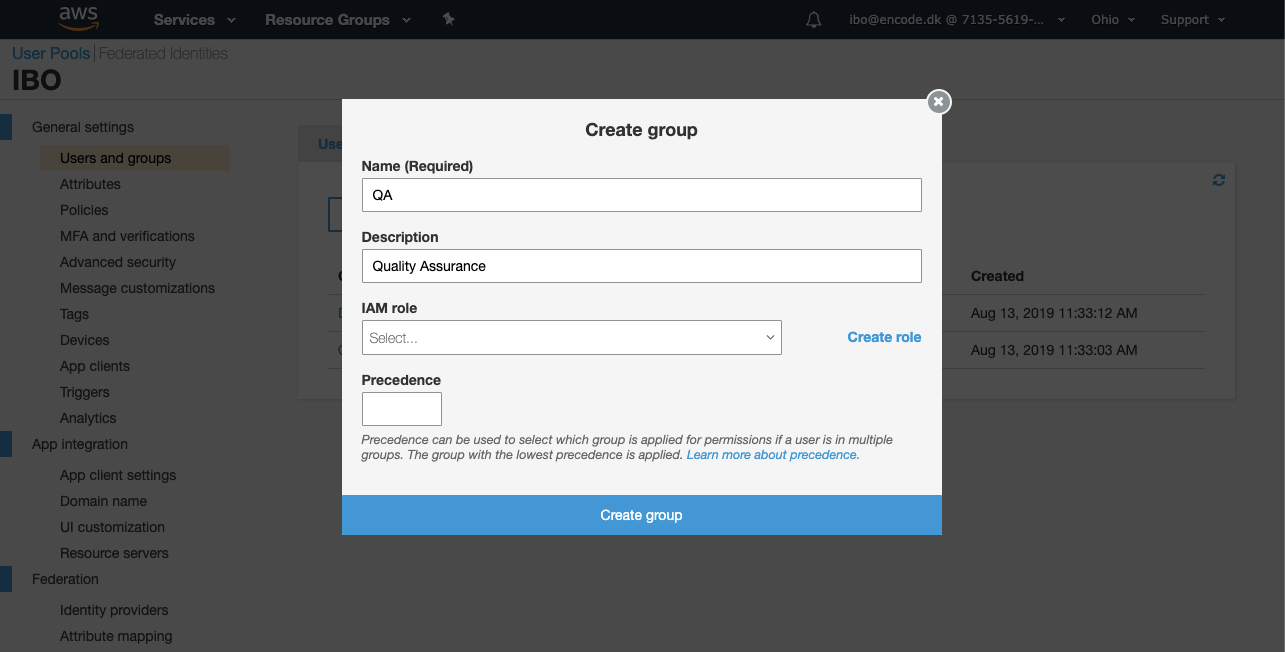
Click Users and groups under the General settings configuration section > switch to the Groups tab and click Create group.
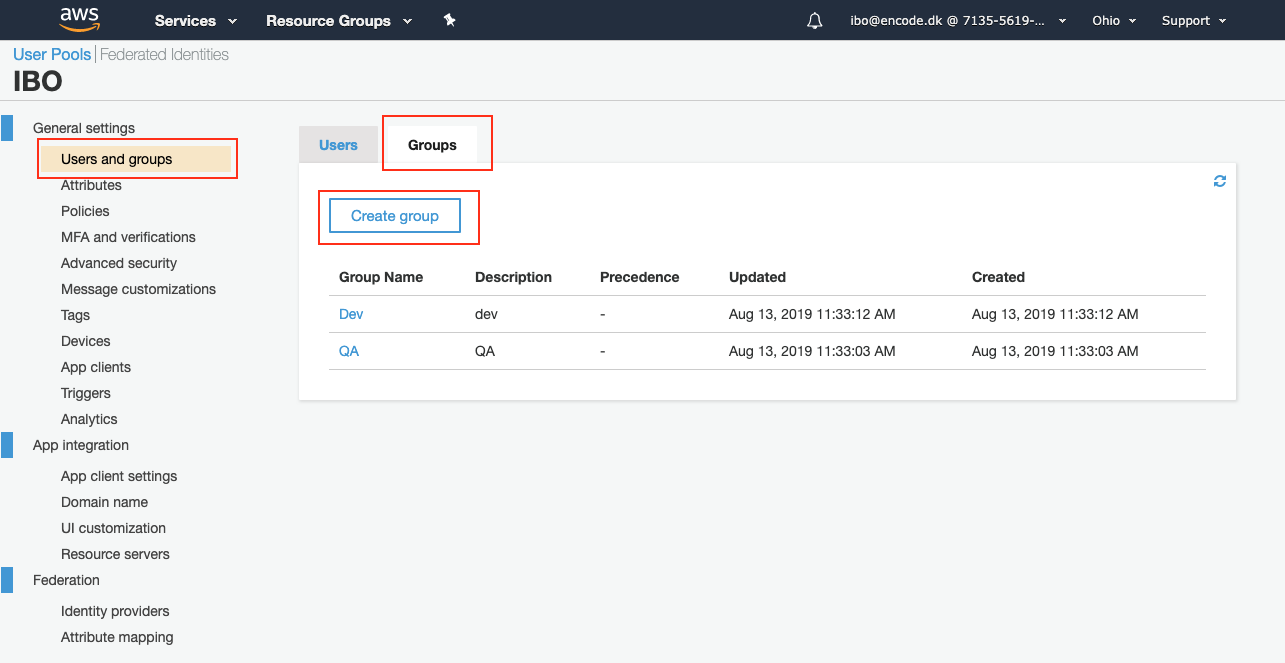
Create as many groups as you need by entering the Name and clicking Create group.
Users
Still being on the Users and Groups page, switch to the Users tab and click Create user.
Enter user name, password ,phone number and email into the corresponding fields > click Create user.
Repeat for as many users as you need.

Configure custom user attributes
You can add up to 25 custom attributes to your user pool. You can specify a minimum and/or maximum length for custom attributes. However, the maximum length for any custom attribute can be no more than 2048 characters.
Each custom attribute:
Can be defined as a string or a number.
Cannot be required.
Cannot be removed or changed once added to the user pool.
Can have a name with a character length that is within the limit that is accepted by Amazon Cognito.
To add a custom attribute using the console
From the navigation bar on the left choose Attributes.
For each new attribute:
Choose Add another attribute under Do you want to add custom attributes?.
Choose the properties for each custom attribute, such as the data Type (string or number), the Name, Min length, and Max length.
If you want to allow the user to change the value of a custom attribute after the value has been provided by the user, select Mutable.
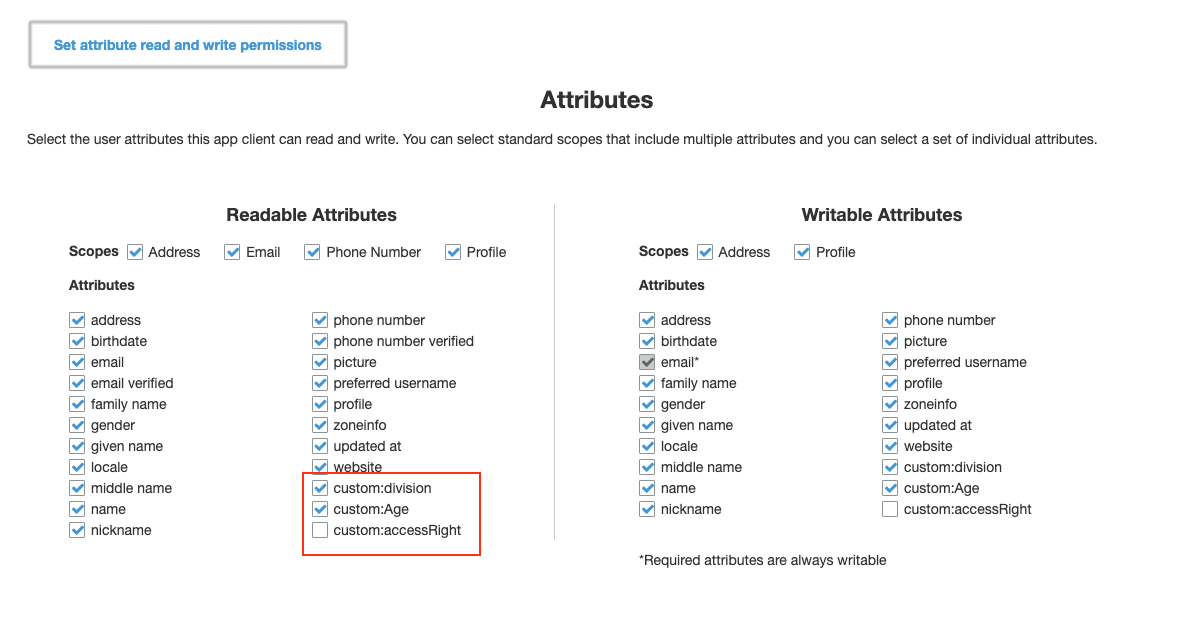
Attribute permissions
You can set per-app read and write permissions for each user attribute. This gives you the ability to control which applications can see and/or modify each of the attributes that are stored for your users.
By default any new custom attributes will not be available until you set read and write permissions for them.
To set or change attribute permissions using the console
From the navigation bar on the left choose App clients.
Choose Show Details for the app client you want update.
Choose Set the attribute read and write permissions for each attribute.
Choose Save app client changes.
Repeat these steps for each app client using the custom attribute.
Please, note that in order to enter custom user attributes in cognito, user import needs to be used.
To import users in Cognito, do the following:
Go to General Settings > Users and groups in Cognito.
Click Import users > click Download CSV header.
Open the downlaoded CSV and enter user attributes.
Export the csv with the user data.
Go back to Cognito > Click Create import job.
Type the job name > select Cognito_UserImport_Role in the IAM name.
Upload the csv file with user data and click Create job.
In the list of jobs, click Start in front of the just created job.
Refresh the page to get the latest job status.
If status of the job is Failed, use CloudWatch to access logs and investigate the cause of failure.
Note!
You can download the example of the csv with user data for import from the attachment.
If new user is created, password should be reset for the newly created user, therefore, it is important to specify the real email address where the code will be sent to.
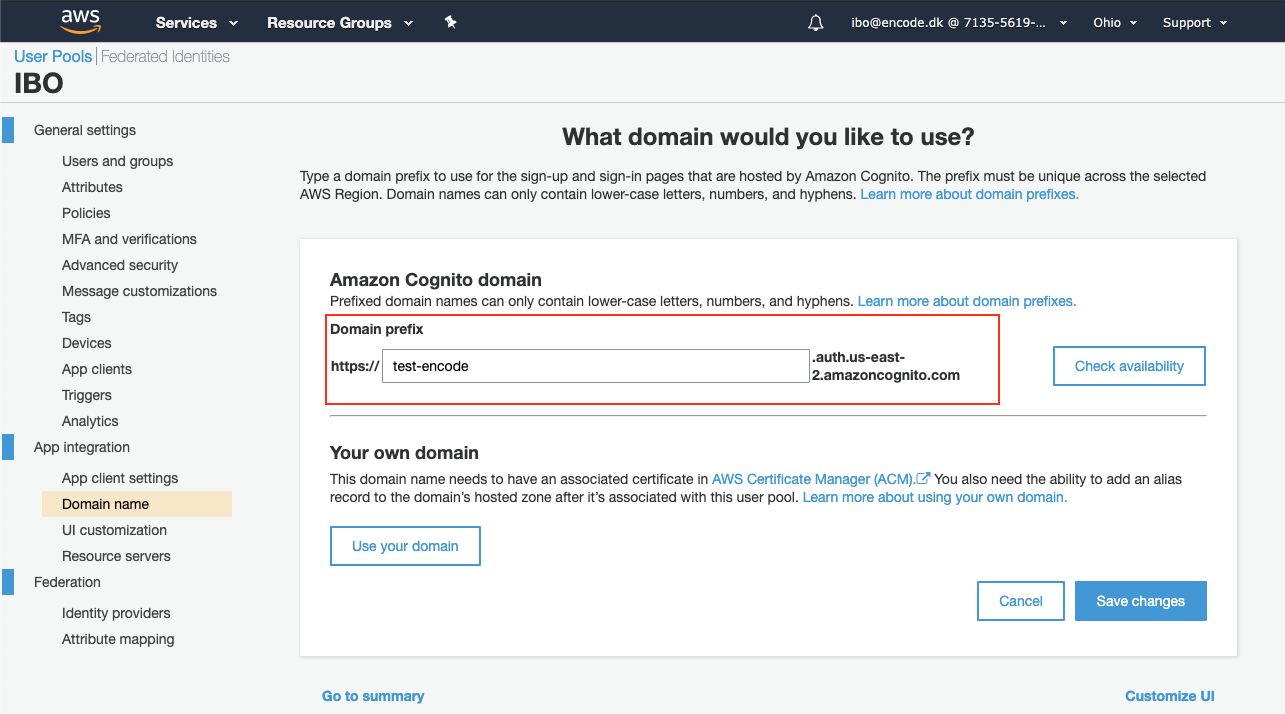
Configure domain name for Apps integration
Under the App integration section, click Domain name.
Enter domain prefix that will be used for the sign-in pages that are hosted by Amazon Cognito > Save the changes.
Create and configure Cognito Identity provider in Encodify
Next step in configuration of the SSO with Amazon Cognito is creating and configuration of the identity provider in Encodify system.
Note! Starting from v16.1.0 identity provider with type Cognito migrated to OpenID Connect. All previously configured IdP will be working without any additional changes required. For creating new identity providers, use the instructions below.
Info
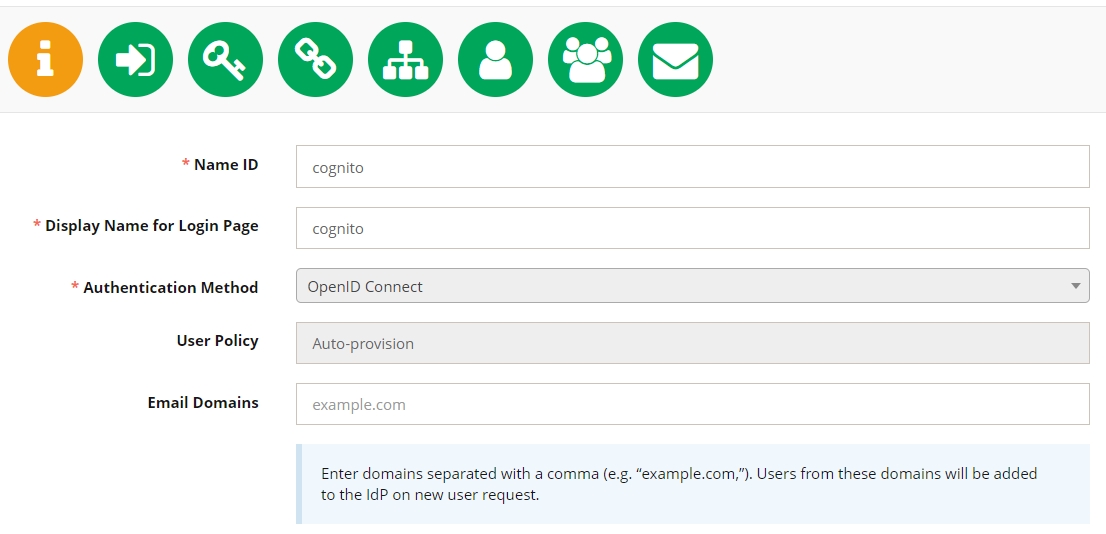
Go Site Configuration > Identity Providers and Users and click Add New Idp.
Fill in the Name ID and Display name for Login Page fields with the idp name. (Please, notethat only latin letters and numbers are allowed in NameId field).
Select or OpenID Connect (before v16.1.0 method called Cognito) in the Authentication Method and enter email domains that will be allowed to log in with current Idp (email domains is a comma-separated list). Starting from v16.1.0 Email Domains field can be empty: in such cases users from any domain can be added to the IdP.
Click Next to proceed to the next configuration page.
Select login url in the Encodify Login URL and select the Hide Login Button check box if button should not be displayed on the login page. Click Next.
Step 1:
The Callback URL displayed on the next step is the url that is used in App client settings Callback URL(s) in Cognito User Pool configuration.
The Authorization Base URL is a url that can be used to log in to the Encodify system via Cognito Idp. Pasting this URL in browser is the same as clicking the Login with Idp button from the Encodify login page.
Allowed Redirect URL (optional) is a url where user will be redirected to after autherization with Amazon Cognito SSO.
Please note: in order to login in CC Plugin via Amazon Cognito SSO - Redirected URL should be provided(example of url: https://{yourWorker}.panda.encode.dk/panda)
Step 2:
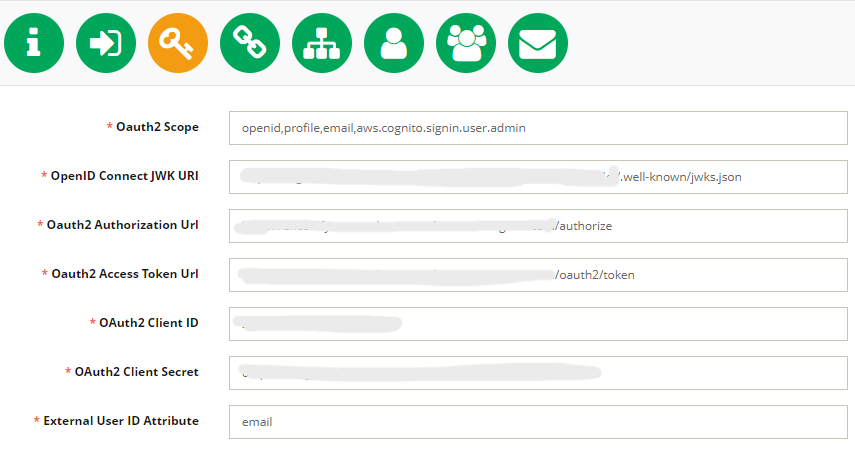
Select "Cognito" in OpenID Connect Type field on step 3 of IdP configuration.
You can specify next parameters - OpenID Connect JWK URI, Oauth2 Authorization Url, Oauth2 Access Token Url either via separate call or by inputting them manually.(Pay attention - these fields are read only if config url is specified in OpenID Connect Config URL and become editable if OpenID Connect Config URL is empty)
To fetch described parameters via call:
In field OpenID Connect Config URL replace {{region}} and {{userPool}} in url path https://cognito-idp.{{region}}.amazonaws.com/{{userPool}}/.well-known/openid-configuration with corresponding values from your Cognito configuration and make a call by pressing "Enter" to fetch parameters (Pay attention: in case of url is correct after call OpenID Connect JWK URI, Oauth2 Authorization Url, Oauth2 Access Token Url get prefilled with values)
To specify manually:
Clear field OpenID Connect Config URL and fill OpenID Connect JWK URI, Oauth2 Authorization Url, Oauth2 Access Token Url with corresponding urls from table below
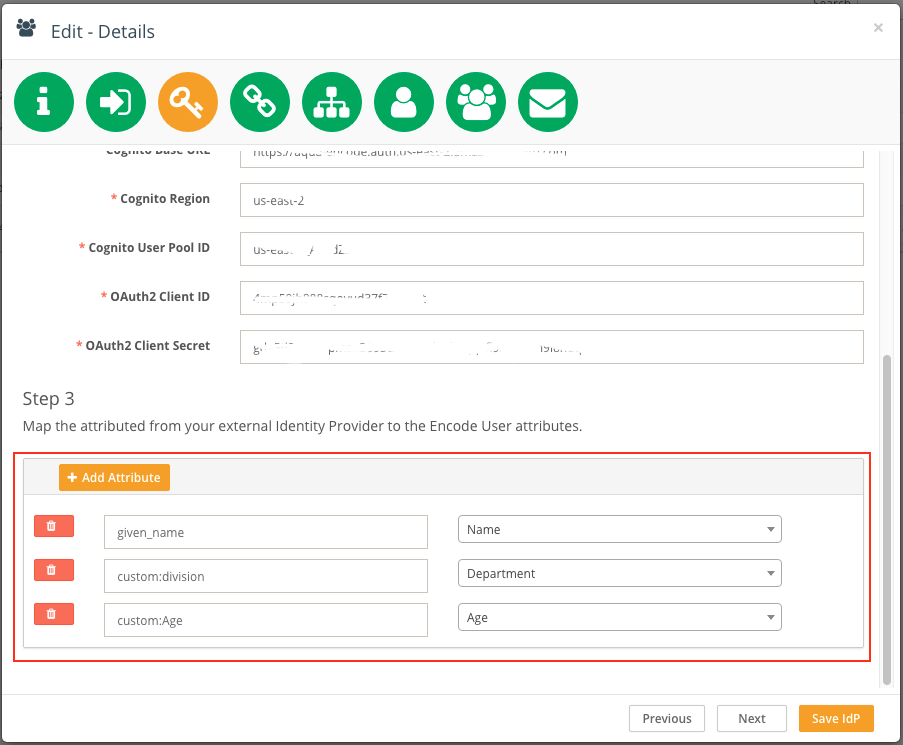
Fill in the fields with the following data from the Cognito User Pool Configuration page:
Cognito Base URL *deprecated in v16.1.0 | Amazon Cognito domain to use for the sign-up and sign-in pages that are hosted by Amazon Cognito. Located in App Integration > Domain name in User pool configuration. |
Cognito Region *deprecated in v16.1.0 | Cognito region value that can be copied from the Pool Id value located on the General settings page. |
Cognito User Pool ID *deprecated in v16.1.0 | Pool Id value located on the General settings page. |
Oauth2 Scope | Insert a value:
|
OpenID Connect JWK URI | The JWKS URI contains public information about the private key that signed your user's token. To set the JWKS URI for your user pool use the following scratch: https://cognito-idp.<Region>.amazonaws.com/<userPoolId>/.well-known/jwks.json |
Oauth2 Authorization Url | Authorize endpoint is a redirection endpoint. It can be set using the following scratch:
|
Oauth2 Access Token Url | Token endpoint is used to get JSON web tokens (JWTs) for a user or service. It can be set using the following scratch:
|
OAuth2 Client ID | App client ID located in App clients configuration page. |
OAuth2 Client Secret | App client secret located in App clients configuration page > Show Details. |
External User ID Attribute | Insert a value:
|

before v16.1.0
starting from v16.1.0
starting from v.20.0.0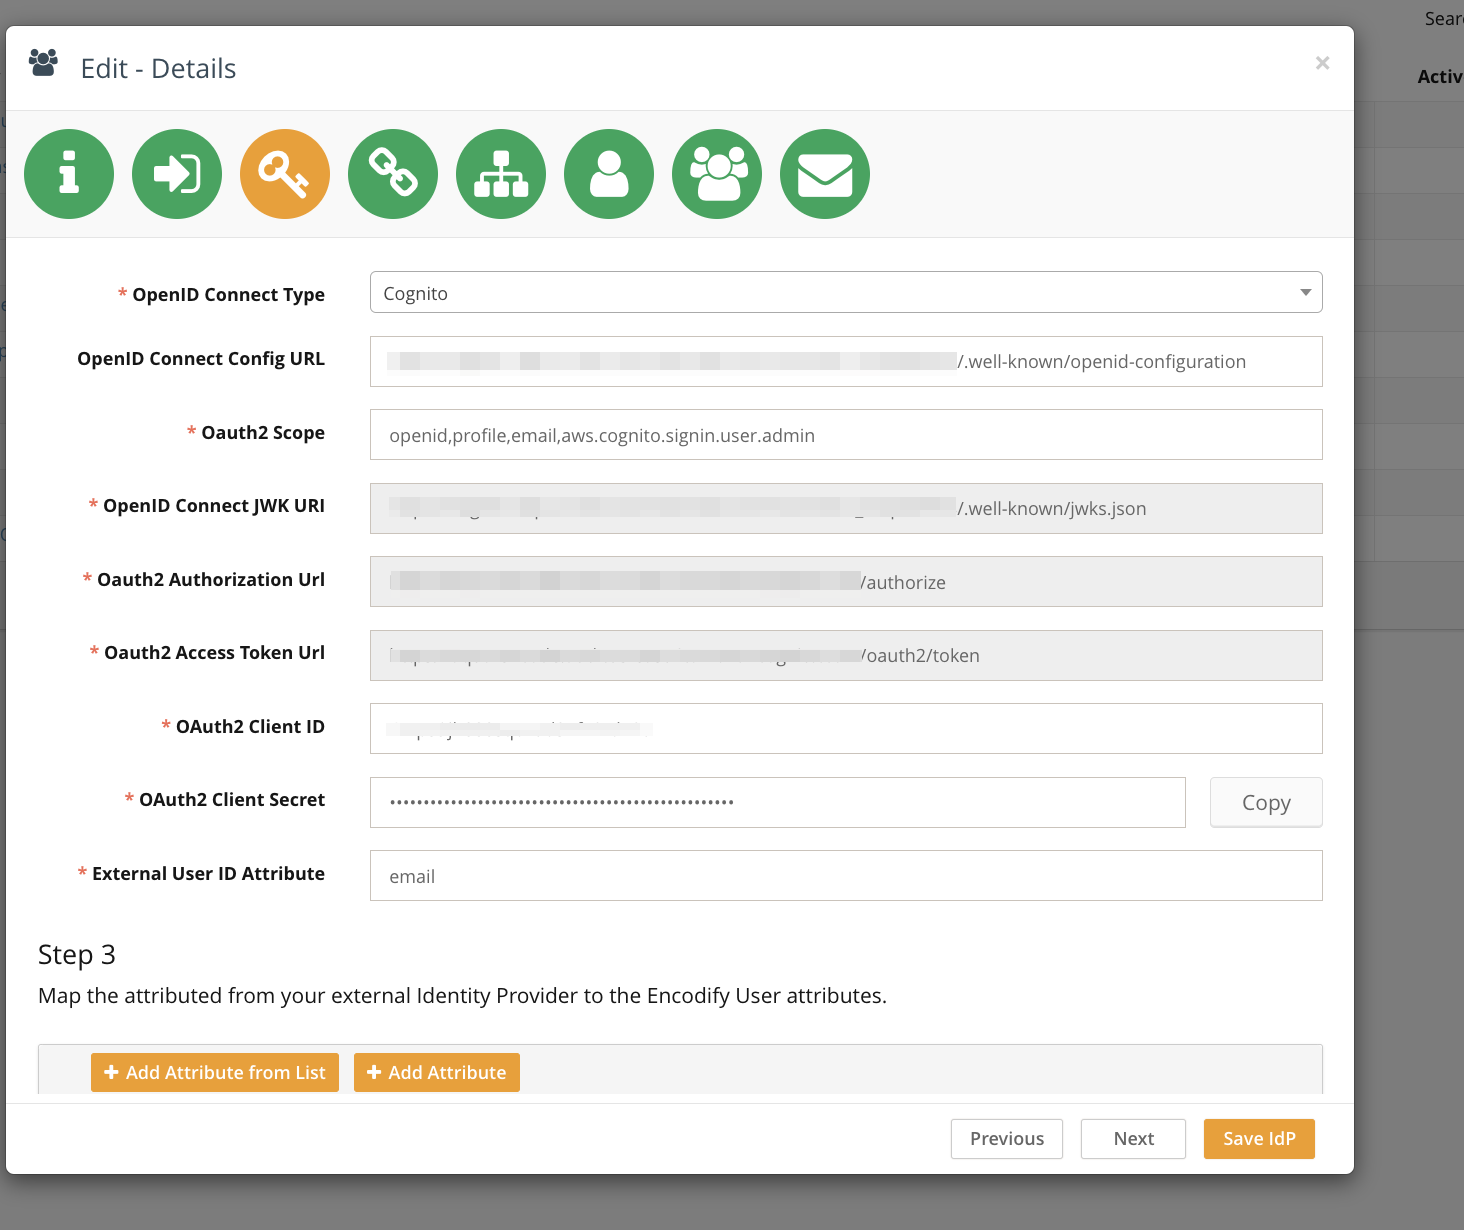
starting from v.20.0.0
Step 3:
Map cognito user attributes to User management module fields in Encodify system. It is possible to map the standard Cognito user attributes and added cutsom ones.
Click Add Attribute in the Step 3 section.
In the left input field enter the cognito user attribute name and select the corresponding user management module field in the selectbox to the right.
Add as many user attributes as needed and proceed to the next step.
Please note!
There are 2 ways to get the correct cognito attribute names:
By downloading the CSV headers in User Pool configuration > General Settings > Users and groups > Import Users > Download CSV header.
Decrypting the JWT token that is sent on user authorization. See the How to get user attributes from JWT token section for details.
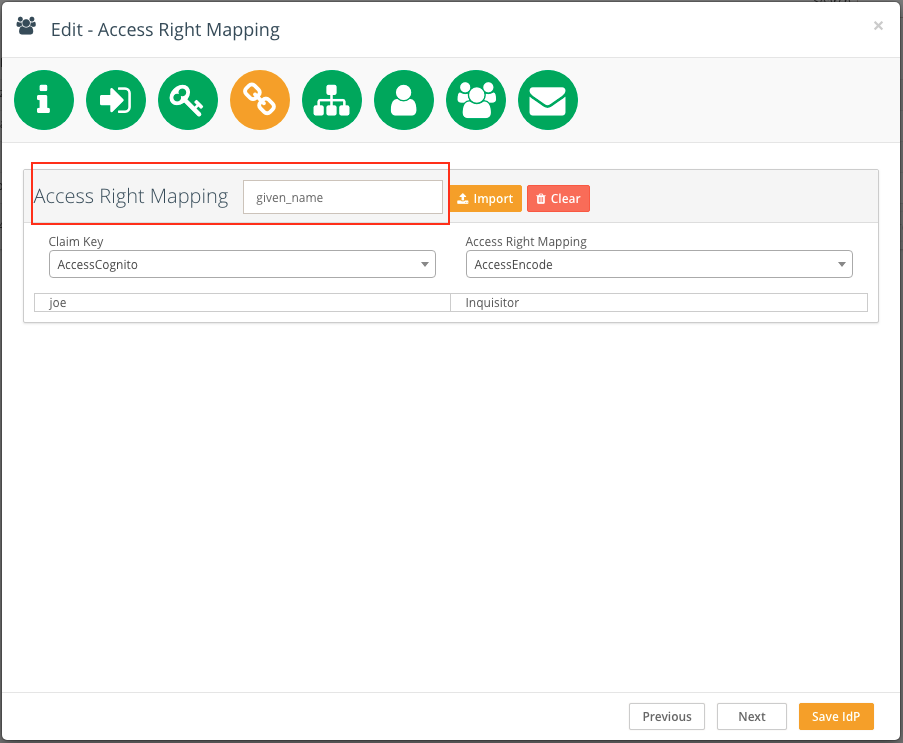
Access Rights Mapping
On this screen it is possible to set mapping of external access rights to local Encodify access rights respectively. This allows to synchronize user access with external system, so user privileges in Encodify will be respected and updated from Identity Provider each time the user logs in. Access rights mapping is done using an XML file that describes the mapping pairs. See example:
<?xml version="1.0" encoding="UTF-8"?>
<MappingDocument>
	<Mapping>
		<ExternalSystemAccess>Global Company</ExternalSystemAccess>
		<EncodeAccessRight>Admin</EncodeAccessRight>
	</Mapping>
	<Mapping>
		<ExternalSystemAccess>Local Company</ExternalSystemAccess>
		<EncodeAccessRight>Sales Manager</EncodeAccessRight>
	</Mapping>
</MappingDocument>
Note! The structure is not determined, it depends on the client needs and might be different.
This XML describes the external system access and corresponding access in Encodify system as a separate XML nodes . For example, this node matches the external access right “Global Company” to Encodify “Admin”:
<Mapping>
	<ExternalSystemAccess>Global Company</ExternalSystemAccess>
	<EncodeAccessRight>Admin</EncodeAccessRight>
</Mapping>pping>
To configure Access Right mapping follow the steps:
Click Import and upload the mapping XML.
In the Access Right Mapping field, enter the Cognito claim attribute which is responsible for carrying the access right from the external system (the exact claim depends on external system configuration).
In the Claim Key selectbox select XML node that represents access in the external system (ExternalSystemAccess).
In the Access Right Mapping selectbox select XML node that represents access in Encodify (EncodeAccessRight).
The read-only mapping table will be generated and shown on the page.
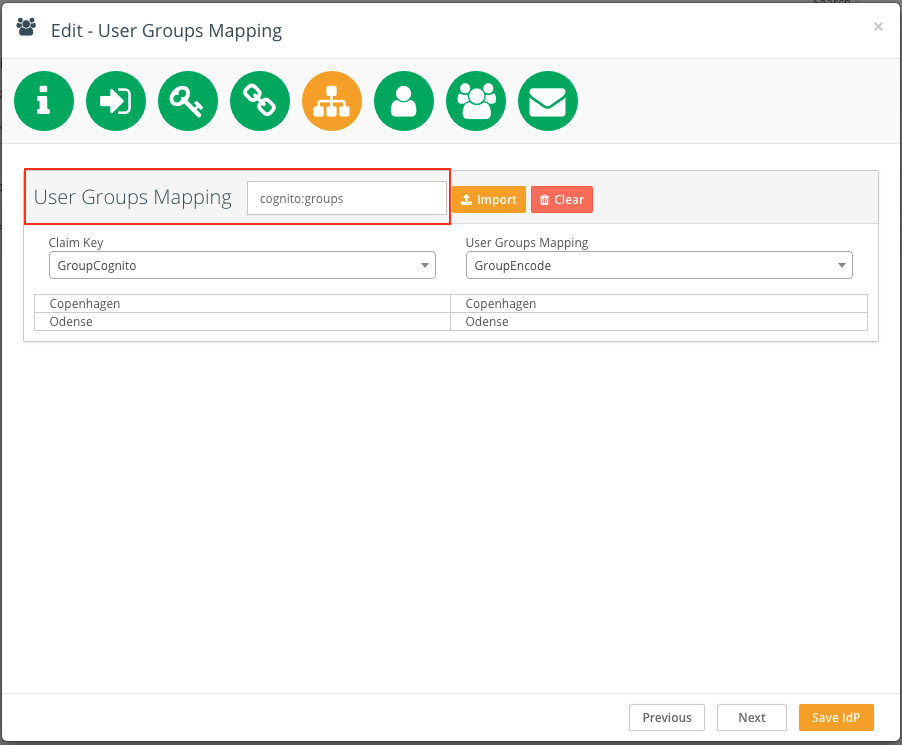
User Groups Mapping
On this screen, it is possible to set mapping of external user groups to local Encodify user groups exactly respectively. User groups mapping is done the same way as for access rights mapping using the proper XML.
Note, that, unlike access right, the user can be a member of several groups and it is possible to map them separating by a comma:
<Mapping>
	<ExternalSystemAccess>Local Company</ExternalSystemAccess>
	<EncodeGroup>Argentina, Chile, Bolivia</EncodeGroup>
</Mapping>
To configure User Groups mapping follow the steps:
On the User Groups Mapping screen click Import and upload the mapping XML.
In the User Groups Mapping field, enter the Cognito claim attribute which is responsible for carrying the groups from the external system. In Cognito it is cognito:groups.
In the Claim Key selectbox select XML node that represents a group in the external system (ExternalSystemAccess).
In the User Groups Mapping selectbox select XML node that represents a group in Encodify (EncodeGroup).
The read-only mapping table will be generated and shown on the page.
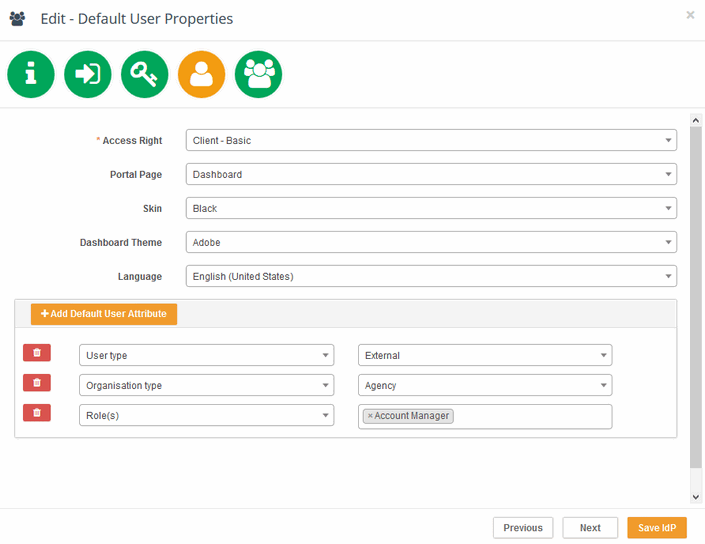
Default User Properties
This screen allows you to set default properties for users who will be added to this IdP or created on auto-provisioning via Single Sign-On. Those are:
Access Right
Portal Page
Skin
Dashboard Theme
Language
New UI (removed in version 13.0.0)
Classic UI (removed in version 13.0.0)
Other custom User Attributes can be added only in case User Management module is enabled on site. Click Add user Attribute to add an attribute. The left selectbox contains the list of custom fields in User Management module and the right one — the values you want to set as default.
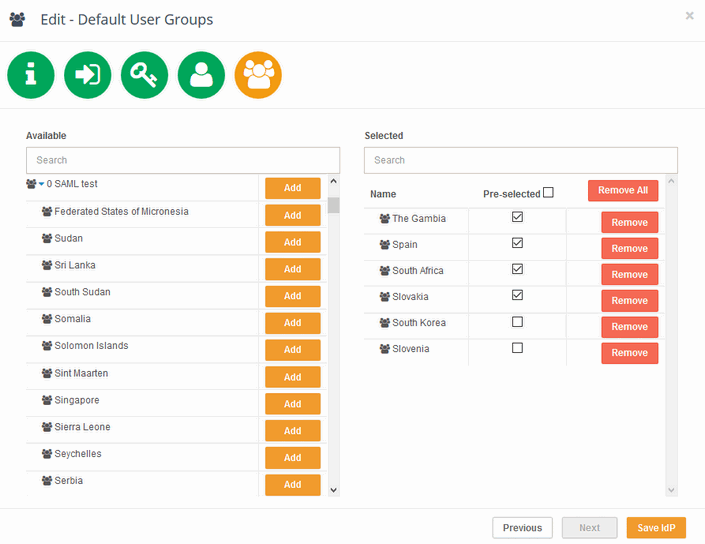
Default User Groups
This screen allows setting default user groups for users, who will be added to this IdP or created on auto-provisioning.
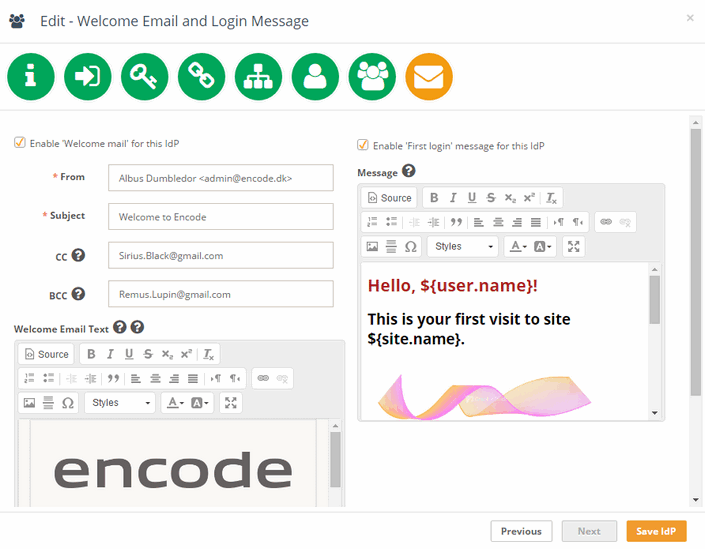
Welcome Email and Login Message
This screen allows configuring Welcome Email and “First Login” Message for new users. If those are enabled, a user who logs in to the Encodify system first time will receive the email and will see the modal window with welcome text on entering the site using current IdP authentication.
It is possible to upload predefined email template (a single HTML file) and then modify it or create the layout from scratch via Rich Text Editor.
It is also possible to use placeholders in Welcome mail and message. Following placeholders can be used in a template:
${user.name},${user.login},${user.email}— will be replaced with the value of the corresponding attribute of the new user.${site.name}— will be replaced with the name of a current site.
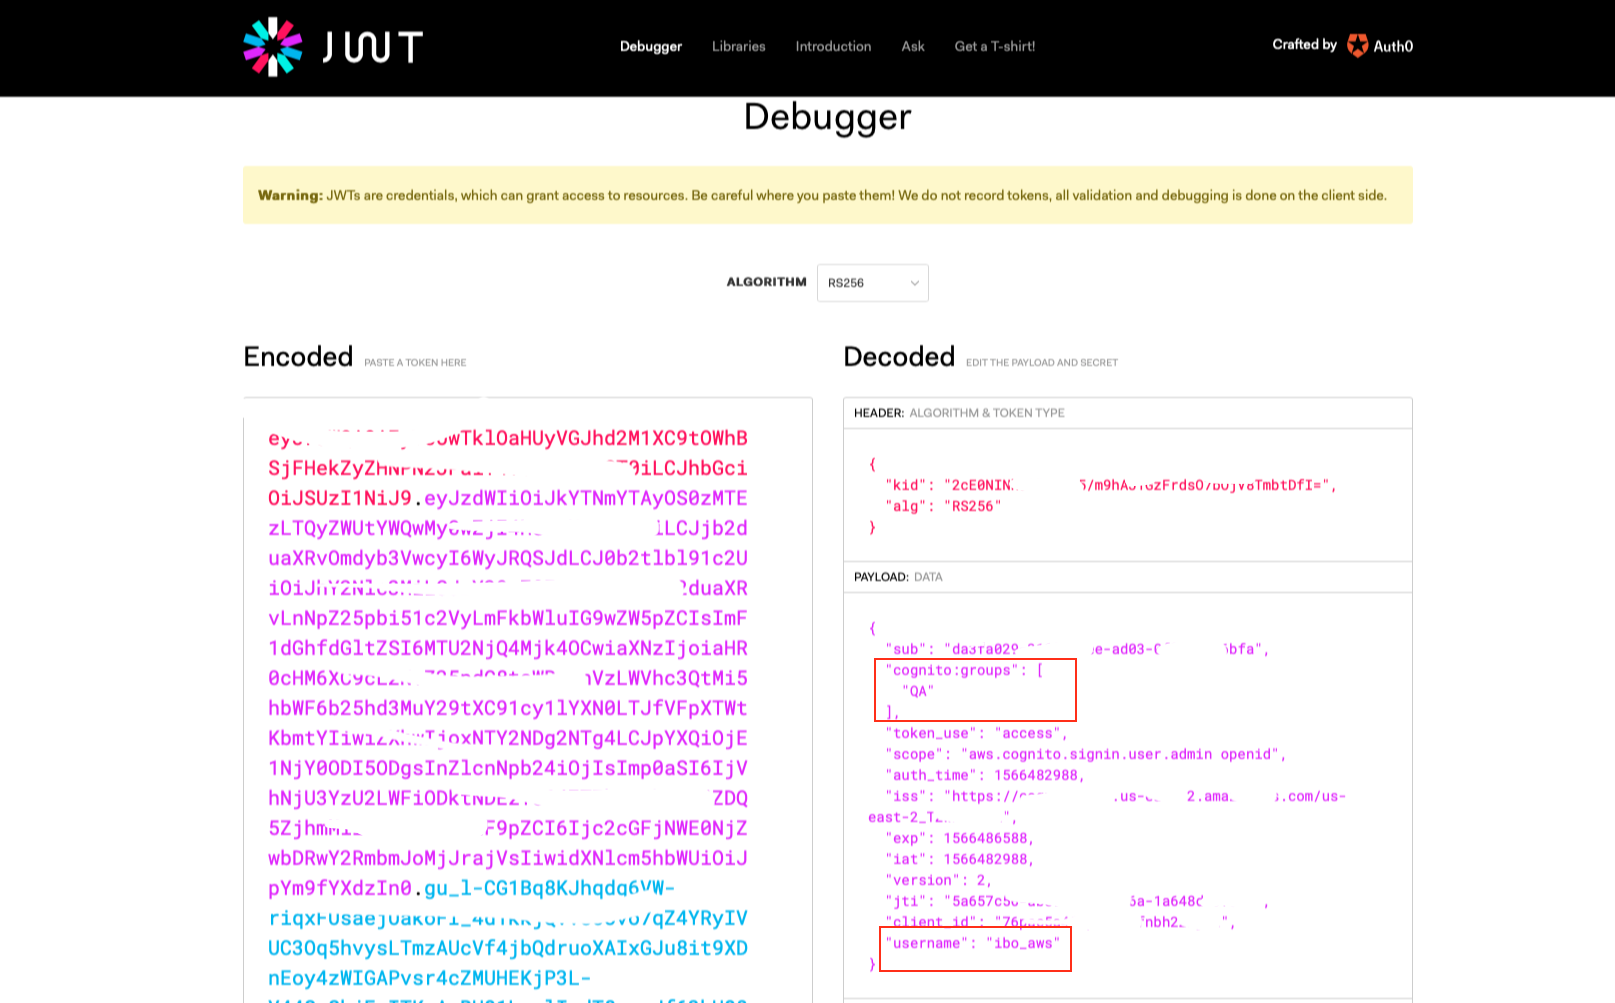
How to get user attributes from JWT token
OAuth token that Cognito sends on user's authentication and authorization contains data for autoprovisioning and user attributes.
To receive jwt token perform the following steps:
Create and configure cognito identity provider in Encodify.
Make sure that SSO works by clicking the corresponding login button and getting Cognito's login page.
Stop your current worker. This is needed to avoid redirect to the system after authentication.
Open new browser tab and paste the following URL into URL field:
https://your.cognito.domain.name/authorize?response_type=code&client_id=yourCognitoClientID&redirect_uri=https://serverName.dk/worker/login/oauth2/code/cognito&state=STATE&scope=openid+aws.cognito.signin.user.admin+profile+emailAfter sending the request, authorization code will be sent in response and can be copied from the URL.
Example:
https://serverName.dk/worker/login/oauth2/code/cognito?code=f88c7f-2e82rt-526-b964-e1a5451454514e5&state=STATEOpen Postman (or any other application that can be used to send the requests with paramaters). Example provided is based on Postman.
Send the following request:
In the URL field enter https://your.cognito.domain.name/oauth2/token.
On the Authorization tab, enter cognito client ID/Congnito client secret in the Username/Password fields correspondingly.
Make sure that Content-Type is set to application/x-www-form-urlencoded on the Headers tab.
Switch to Body tab, make sure x-www-form-urlencoded is selected and enter the following parameters' key values
Key
Value
grant_type
authorization_code
client_id
cognito client id
code
authentication code received on step 4.
redirect_uri
https://serverName.dk/worker/login/oauth2/code/cognito
Returned response should look similar to:
{
 "id_token": "eyJraWQiOiJGe426æowauefh4170RWNnRktySE0rWUo3WWZFPSIsImFsZyI6IlJTMjU2In0.eyJhdF9oYXNoIjoiX0NJQjczNlRCekliSjM2UTBhUjl2dyIsInN1YiI6IjU3MGFhZDQ2LTBkYWMtNGRlNi1iZDI2LTZjOGY3MDhhOTk1YSIsImNvZ25pdG86Z3JvdXBzIjpbIkZpcnN0TGluZVN1cHBvcnQiLCJPUFMiLCJEZXYiLCJEZXZlbG9wbWVudCIsIlFBIl0sImJpcnRoZGF0ZSI6IjAxLjAxLjIwMTIiLCJnZW5kZXIiOiJtYWxlIiwiaXNzIjoiaHR0cHM6XC9cL2NvZ25pdG8taWRwLnVzLWVhc3QtMi5hbWF6b25hd3MuY29tXC91cy1lYXN0LTJfVFpXTWtKbmtYIiwiY3VzdG9tOmFjY2Vzc19SaWdodF9BV1MiOiJBZ2VuY3kiLCJjdXN0b206YXdzX2FkZHJlc3MiOiJCYXVtZ2FydGVuc3ZlaiAxMiIsInByZWZlcnJlZF91c2VybmFtZSI6Impkb2UiLCJhdXRoX3RpbWUiOjE1NjYyOTE4MzgsImN1c3RvbTphd3NfaWQiOiI2NiIsIm5pY2tuYW1lIjoiam9lIiwiZXhwIjoxNTY2Mjk1NDM4LCJpYXQiOjE1NjYyOTE4MzgsImVtYWlsIjoiaXJpbmEuYm9yaW1za2F5YUBnbWFpbC5jb20iLCJlbWFpbF92ZXJpZmllZCI6dHJ1ZSwicGhvbmVfbnVtYmVyX3ZlcmlmaWVkIjp0cnVlLCJjb2duaXRvOnVzZXJuYW1lIjoiamRvZSIsImdpdmVuX25hbWUiOiJKb2huIiwibWlkZGxlX25hbWUiOiJubyBtaWRkbGUgbmFtZSIsImF1ZCI6Ijc2cGFjNWE0NjZwbDRwY2RmbmJoMjJrajVsIiwidG9rZW5fdXNlIjoiaWQiLCJuYW1lIjoiamRvZSIsInBob25lX251bWJlciI6IjQ1NDI5NDQwMDUiLCJmYW1pbHlfbmFtZSI6IkRvZSJ9.VKrsoQ9Zu-OwbgyILsOlAiKbonUrdFWFyKHGD1dcJPJ5Xe96dSNN6AzFse3QR-dmPUlaUrHJBMGbAz7xSbUqulg6rMt697y2lmPWxai7WZ0YpbE1IKM8Lk2OzLHVIH3Gslbu31bAiXWj0bUSVqXoKx5XUreS7hp7kTL5_6dHzmzkvP-o2qnIygmZrIOm_VY1l4TP-N1mJJ25K5DfLXeDnuEwb1G_OBYYP6PdXPPRxZx5w2RNXs78HlfSvGrlZbobACMwuYEMjgWGctDyNqfyS1I-ki_eG6XqaxAXuVWyLINagbZtmRlIw6trtfV6sFPwpegnYGbefn4bacE0rG8l1A",
 "access_token": "eyJraWQiOiIyY0UwTkkuwyefgv3689æoiehr257ahouregNPN2JPalY4VG1idERmST0iLCJhbGciOiJSUzI1NiJ9.eyJzdWIiOiI1NzBhYWQ0Ni0wZGFjLTRkZTYtYmQyNi02YzhmNzA4YTk5NWEiLCJjb2duaXRvOmdyb3VwcyI6WyJGaXJzdExpbmVTdXBwb3J0IiwiT1BTIiwiRGV2IiwiRGV2ZWxvcG1lbnQiLCJRQSJdLCJ0b2tlbl91c2UiOiJhY2Nlc3MiLCJzY29wZSI6ImF3cy5jb2duaXRvLnNpZ25pbi51c2VyLmFkbWluIG9wZW5pZCBwcm9maWxlIGVtYWlsIiwiYXV0aF90aW1lIjoxNTY2MjkxODM4LCJpc3MiOiJodHRwczpcL1wvY29nbml0by1pZHAudXMtZWFzdC0yLmFtYXpvbmF3cy5jb21cL3VzLWVhc3QtMl9UWldNa0pua1giLCJleHAiOjE1NjYyOTU0MzgsImlhdCI6MTU2NjI5MTgzOCwidmVyc2lvbiI6MiwianRpIjoiZmQzMmI3NzYtMWQ0NC00YWMwLWEyODgtYzRkY2NiMDlmMjMzIiwiY2xpZW50X2lkIjoiNzZwYWM1YTQ2NnBsNHBjZGZuYmgyMmtqNWwiLCJ1c2VybmFtZSI6Impkb2UifQ.LEKj3iFoUlQCDec5FkTxLprx9cdSR7Arhmf6gqNfoQxactZNzWObweR_ERpO-Vj6Jp6-vNqxp6yV5UhDseBtj8J1x8yjkeoEw0_UWkw_Qqasjvbr2JB9V8zhzoJ-nw3k9u6bzMz76saM4w9F1VAHBIOrO6bhPXzHW4i4nDHf4qSzVYMu2xpIP15f_7mZk8H7BIiRaVeJGIuuBdOCysr6nKeNRi9jsc1U9REbpjkk6aZ849U0yQ0HMpAISsHjYR3VABHsxxIxBITtx8v4ruO5ZFaHgg6MVBm6RFtHh0OmR0ZS6ZsHU3afBbMqtRdiWefnpl-a3lo33EnTmGcaMWmo3w",
 "refresh_token": "eyJjdHkiOiJKV1QiLCdsgber25JlbmMiOiJBMjU2R0NNIiwiYWxnIjoiUlNBLU9BRVAifQ.K_-Hg1UCSu8YmU6n12hDz_B5n5q2vTnr4U8OhTdQc-iT9WH21efqfLIN9BXlBNy6SoPjQQxaUFWCYl5X96Yb4Qc6JsEHFdzaicZsKJ8sDg1u8L4U3l1iHrB4cSSIU6J8_JD3YnOzss_DSINB0_AypkLuAZFjDqb65QLw92o6rIlUeBRzjLzRVwCmArn4tLc-tkiTRiTt-sSBdbIlJ1fHqm1W5mzsQzB8Zhv1zA3_eUpfcpfkj-iSulnVD9KYk1erRsttNcygNbFX6Y1axYWcPqe62G1nN1TVce4N1CkU_X5JhgfJbpDKGkKT_Zj0dS6qCIrEpVsdb3qDm8sIV8Uq_g.dRs1q6cfiy71ofsd.NgZ06DkKAGUiTS1VyTNGm-2boFWRqDRK6O6BiwwlX1ub_AxsO8c72GffR-rGNhWOShEHF8_shYNI3saz5EA0TAvSU12Ysjapapn8hDY7G2xv1LyjdFGfl9kAVyFnfsKf_9nXAyUatiPTiCE2uQaSgFV407zSakngCaVvMPuXMJ-OdsgsqnghJGsNgoQQE79u8aky0vzGIPHJpKzcdtUkaaftquphJCfVzM1OGhDXetOLnEtm-R7uHOyqQqd0fItnZhgWP8jFZ2AoJt-itFWOZR58z63LTLNucE8D4qcrkSoytKLtJbGMtCI2L-E3_Qcz3cxifAGSxzHW32jYvq4mqV82c3ErYmFmZRiyNYcPj22pex1otZtdJE1G88eyWlfXuUhfr7q57vCXRUXqkSoTW2J18s47Tt7rdtCOy0Icc17Xdss6ajPuphFZXozV1g67NBe41TJjERLJUKlSbrCvsycFk65PI3KODAxwQRNx5dhO0eyJYSxfPe86zQjj3ZEsVpb8mNlbhYp6hUtfBLJHyJcWvByhkbUGJkoPn3DVLyXm98VT2LefhPVGftb6QaY-XwB1sBnIpyEAnVmgywnVSKlftdLT8ZmQZTSU2xH3nNd0e2PBFo2Hsw6kXX5tmFBKsDt3LaPLPTyGSeIMfnE5dxGsnK2cOf9uAkKNioW6ClSnqI_eufmqj00_r4zAX57bPQ2zOwN4Uk0WPQhXxMgOkeU-JeOrfCPD1UwZgv4QfNAPGinRnC6wY5wAF3kt5pa76eb3T-5a7zUf9wmKVQteVrJalveO_LOc4dzFic5TMg8L3fwgpMAwss1vkk3XsdWQsYwqV3BWHP10DGZvRZpKCtQC1XfQP72wRT8FhOqP6uhO5oJ_q_DDX5POoLjfKDXr5dVXhrxoJlCHnvlAhMh5jlzjRlCvdtAvryGbazuMptXQ7IAN2UzPF7airXljA8jqfrevmBqyafwwHH1z5mQW4pAHKCuUK2H4itEaaH7QfB98XpxiktstVGgLrqZeAvC6_lgIoSsQyqunR80juoPx3Bqv8e61C1nxUnAehhqM5Y-20UJY8_kIE4-gmLRcVm9iCLWpZD_KThtIZ07u9SHNlIZ7PdTpkJxUpwX1n0hsFloojKqDSxEnHnSyLqHeDksxiZKF-T9DWTrOg0bNr819lV-ezEMZdMtP6vPofW0Dugyuv5Vlz4bFMTYfBdE6gfbLCZ7JnzHsZrmBQe3CbLIjymyo6j4Vxb10jmhYuBxR.-9F2n7rIWgTUX6uoHcV6Hg",
 "expires_in": 3600,
 "token_type": "Bearer"
}
Copy the value of the access token/id token.
Go to the https://jwt.io/ and paste the value of the token in the Encoded section.
In the section to the right, the decrypted data will be available.
More user attributes are available in id token.
Endpoint for provision token by external OpenId Token and retrieve Encodify access
In System Configuration -> Login Settings -> Client App Info create new application: Use the following data: "Scope" = "site_<site_id>_provisionByOpenIdToken_cognito"; "Authorized Grant Types" = "implicit,password,client_credentials,authorization_code,refresh_token". IMPORTANT: Before you save newly created application - save somewhere 'Client App Id' and 'Client App Secret'.
To get 'code' release the URL in browser. //For example: https://aqua-encode.auth.us-east-2.amazoncognito.com/authorize?response_type=code&client_id=3nejdnjgepadsf3fssnmokpsch&redirect_uri=https://dev-tn.encode.dk/encode/login/oauth2/code/cognito&state=STATE&scope=openid+aws.cognito.signin.user.admin+profile+email
When the Authentication page is opened - use the 'log in' credentials.
Redirection to another page should happen. No matter what it shows. URL contains the 'code' parameter.
Copy a part of URL between 'code=' and '&'.
Paste 'code' received in the previous step to a corresponded cell in Postman (or another related application).
Fill in the 'redirect_uri' field in the Body section of Postman.
Fill in the 'clientId' and 'clientSecret' fields in the Authorization section of Postman.
Send the following POST request in Postman: https://<cognito_client>.auth.us-east-2.amazoncognito.com/oauth2/token
The response should contain in JSON:
"id_token": "<value>"In Postman create the following POST request: https://<ebms_server-worker>.encode.dk/<worker>/oauth/token
In Body set the following 'key-value' pairs: "grant_type" = "client_credentials"; "client_id" = should be copied from the 'Client App Id' in step #1; "client_secret" = should be copied from the 'Client App Secret' in step #1.
Send the request.
Response should contain in JSON:
"access_token": "<value>"In Postman create the following POST request: https://<ebms_server-worker>.encode.dk/<worker>/rest/external/site/36/idp/cognito/provisionByOpenIdToken
In Body check the 'raw' radio-button.
Select 'JSON (application/json)' in drop-down.
Insert the following: '{ "openIdToken": "
In Authorization -> Token input the 'access_token' value received in step #9.
Send the request.
Response contains in JSON:
{
"access_token": "<value>",
"refresh_token": "<value>",
"token_type": "bearer",
"scope": "site_36_internalApi",
"expires_in": 14400,
"jti": "<value>"
}